Android Studio初学笔记-Day7-Button和Toast
Button和Toast
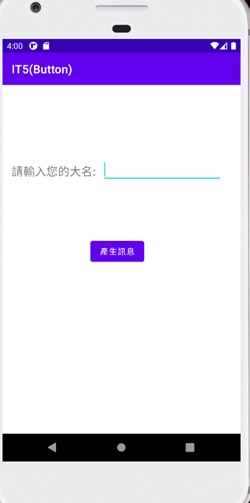
今天要介绍的是Button这个常在程序中能看到的元件,在Button的属性设定上许多都与之前介绍的元件大致相同,但一个按钮最重要的就是要有一个功能,所以今天就来讲一下如何设定按钮的功能。首先透过前两天介绍的元件来简单设计一个介面。
介面
布局程序码
<androidx.constraintlayout.widget.ConstraintLayout
    xmlns:android="http://schemas.android.com/apk/res/android"
    xmlns:app="http://schemas.android.com/apk/res-auto"
    xmlns:tools="http://schemas.android.com/tools"
    android:layout_width="match_parent"
    android:layout_height="match_parent"
    tools:context=".MainActivity">
    <TextView
        android:id="@+id/tx2"
        android:layout_width="wrap_content"
        android:layout_height="wrap_content"
        android:layout_marginStart="16dp"
        android:layout_marginLeft="16dp"
        android:layout_marginTop="136dp"
        android:text="请输入您的大名:"
        android:textSize="20dp"
        app:layout_constraintStart_toStartOf="parent"
        app:layout_constraintTop_toTopOf="parent" />

    <EditText
        android:id="@+id/et1"
        android:layout_width="wrap_content"
        android:layout_height="wrap_content"
        android:layout_marginStart="172dp"
        android:layout_marginLeft="172dp"
        android:layout_marginTop="124dp"
        android:ems="10"
        android:inputType="textPersonName"
        app:layout_constraintStart_toStartOf="parent"
        app:layout_constraintTop_toTopOf="parent" />

    <Button
        android:id="@+id/button"
        android:layout_width="wrap_content"
        android:layout_height="wrap_content"
        android:layout_marginStart="152dp"
        android:layout_marginLeft="152dp"
        android:layout_marginTop="264dp"
        android:onClick="show"
        android:text="产生讯息"
        app:backgroundTint="@null"
        android:background="@drawable/buttonframe"
        app:layout_constraintStart_toStartOf="parent"
        app:layout_constraintTop_toTopOf="parent" />

</androidx.constraintlayout.widget.ConstraintLayout>
在button中,比较重要的是按纽事件,而android:onClick=”” 这里设定的就是按钮事件的函数名称,透过这行取得按钮的事件功能。
接者来MainActivity.java中设定功能的函数:
程序码
public class MainActivity extends AppCompatActivity {
    EditText et1;                       //变数宣告
    @Override
    protected void onCreate(Bundle savedInstanceState) {
        super.onCreate(savedInstanceState);
        setContentView(R.layout.activity_main);
        et1=(EditText)findViewById(R.id.et1);       //取的物件
    }

    public void show(View v){
        Toast tos = Toast.makeText(this,et1.getEditableText()+"您好",Toast.LENGTH_SHORT);
        tos.show();
    }
}
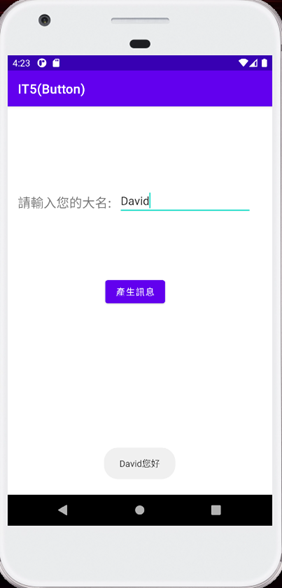
这里我用Toast产生一个简单的提醒讯息。
Toast tos = Toast.makeText(this,et1.getEditableText()+"您好",Toast.LENGTH_SHORT);
首先宣告变数tos(型态为Toast)并透过Toast.makeText()并设定内容,括号内分别需要写入Context(MainActivity.this)、要显示的Text(et1.getEditableText())、最後则是显示的持续时间(Toast.LENGTH_SHORT),此设定大约两秒。这样就完成Button的功能设定了。以下是效果展示:
Button就简单介绍到这里,谢谢大家
<<: [Android Studio 30天自我挑战] EditText的元件介绍
>>: Day 20-制作购物车系统之建立Routes&Controller
Unity与Photon的新手相遇旅途 | Day15-补血制作
今天介绍的内容为制作回血药剂,以及讲到该如何简单运用音效还有跨脚本呼叫函式的方式。 ...
Day3 自订电脑开机讯息
上一回,我提到 CC: Tweaked 的 Computer 方块有许多基础指令 但我不打算逐一介绍...
Day 14 并非是一成不变的!
很多事决非一成不变的,相反地,正如天空和海面,因风浪而起变化一样,最终也会因情况和时间的不同而产生变...
Day 29|Divi 功能练习 21 Fullwidth Menu Module 全宽选单设定
嗨呦大家好我是 Jasmine~脑袋总是胡思乱想停不下来的设计师一枚\(✪ω✪)/ 昏昏沈沈的礼拜一...
[Day12] JavaScript - 闭包 Closure
闭包(Closure)在MDN的解释为: 是函式以及该函式被宣告时所在的作用域环境(lexical ...