[Angular] Day9. Transforming Data Using Pipes
在上一章中介绍了如何在 template 中插入 component 的变量,而本章节要介绍如何使用 angular 的 pipes 来转换插入的值(字串、货币金额、日期或其他数据), pipes 是在模板表达式中的简单函数,用於接受输入值并返回转换後的值,而 Anngular 提供了几个预设的 pipes 提供使用:
- DatePipe:根据区域设置规则格式化日期值
- UpperCasePipe:将内容都变更为大写
- LowerCasePipe:将内容都变更为小写
- CurrencyPipe:将数字转换为货币字串,根据区域设置规则进行格式化。
- DecimalPipe:将数字转换为带小数点的字串,并根据区域设置规则进行格式化。
- PercentPipe:将数字转换为百分比字串,根据区域设置规则进行格式化。

Using a pipe in a template
要在 template 中使用 pipes 功能请使用管道运算符 ( | ),一样举个例子吧:
-
在 app.component.ts 中新增一个变数,赋予它 javescript 的 Date 型别资料
import { Component } from '@angular/core'; @Component({ selector: 'app-root', templateUrl: './app.component.html' }) export class AppComponent { birthday = new Date(1995, 9, 25); } -
在 app.component.html 中将 birthday 插入并将其中一个使用 pipes 改变他的型态
<!-- app.component.html -->

<p>My birthday is {{birthday}}</p>
<p>My birthday is {{birthday | date }}</p>

在画面中可以看到,没有使用 pipes 转换过的数值就是 javascript Date 型态的内容,而使用了 pipes 转换过的数值看起来就好看多了,而这就是 pipes 的用法。
Transforming data with parameters and chained pipes
在使用 pipes 改变呈现内容时,可以输入可选的参数来微调 pipes 输出的结果,比如说可以将国家单位(EUR)当作参数传递给 CurrencyPipe,将转换过的货币单位以欧元显示 {{ amount | currency:'EUR' }},如果要对一个 pipes 使用多个参数时请使用冒号分隔这些参数,比如 {{ amount | currency:'EUR':'Euros '}},也可以使用任何一个有效的模板表达式作为参数。
有些 pipes 需要至少一个参数才可以使用,比如说 SlicePipe ,{{ slice:1:5 }} 会创建一个新阵列或字串,其中包含从 element-1 开始到 element-5 结束的元素子集。
import { Component } from '@angular/core';

@Component({
  selector: 'app-root',
  templateUrl: './app.component.html'
})
export class AppComponent {
  sayHello = 'Hello world'
}
<!-- app.component.html -->

<h2>{{ sayHello | slice:1:5 }}</h2>

画面中原本要呈现的 Hello world,变成了 ello ,是因为透过 slice 选择了 index[1] ~ index[5] 的资料。
Creating pipes for custom data transformations
在开头时提到了 Angular 有提供几个预设的 pipes 可以使用,但这些不够应付我们可能面面临到的问题,这时候客制化 pipes 就很重要了,客制化的 pipes 也和预设的一样,接收一个输入将他转换过後输出,那麽就来看看该如何使用客制化 pipes 吧。
Marking a class as a pipe
要建立一个客制化的 pipes,首先需要向建立 component 一样先建立一个 typescript 的 class,但是不同的是,当我们创建 Component Class 时使用的装饰器是 @Component,代表这个 Class 是属於 Component 的,但是要建立 pipis class 则需要使用 @Pipe 这个装饰器,而对这个 Class 的命名请使用 驼峰命名法,不要在名称中间使用连字符号( - ),举个例子吧,可以建立一个 pipes 接收一个数值作为输入与一个参数,将输入的数值做参数的次方,比如输入 = 2 参数 = 10 那麽就会等於 2^10 = 1024。
-
使用 Angular CLI 建立一个 pipes class
ng generate pipe exponential-strength -
在 exponential-strength.pipe.ts 中添加转换 method
import { Pipe, PipeTransform } from '@angular/core'; @Pipe({name: 'exponentialStrength'}) export class ExponentialStrengthPipe implements PipeTransform { transform(value: number, exponent: number = 1): number { return Math.pow(value, exponent); } } -
如果你是使用 Angular CLI 他会自动将这个 pipes class 放到 app.module.ts 的 declarations 中,如果你是手动建立的话要记得将它放到 app.module.ts 的 declarations 里面喔!
import { NgModule } from '@angular/core'; import { AppComponent } from './app.component'; import { ExponentialStrengthPipe } from './exponential-strengh.pipe'; @NgModule({ declarations: [ AppComponent, ExponentialStrengthPipe, ] }) export class AppModule { } -
在 app.component.html 中使用客制化的 pipe 转换资料
<!-- app.component.html -->

<h2>Power boost: {{ 2 | exponentialStrength:10 }}</h2>

Detecting changes with data binding in pipes
还记得昨天提到的 Text interpolation 的特性吗?他可以随着 class 的 property 变化而动态的显示,而这个动态变化也可以套用到 pipe 中,所以当客制化的 pipe 输入是 string 或 number 时且发生改变时,会动态的作为输入进到 pipe 中进行转换,但如果是 Date 或 Array 类型时,Angular 会检测到 reference 发生改变时才会触发执行 pipe 的转换,举个例子吧
-
在 app.component.ts 中定义两个 property,一个代表要被转换的值(输入)另一个代表输入要做几次方
import { Component } from '@angular/core'; @Component({ selector: 'app-root', templateUrl: './app.component.html', styles: ['input {margin: .5rem 0;}'] }) export class AppComponent { power = 2; factor = 1; } -
在 app.component.module.ts 的 imports 中加入
FormsModule,这个是因为要在这个例子中使用到 form,所以要加入这个(之後会详细的介绍 form)import { NgModule } from '@angular/core'; import { BrowserModule } from '@angular/platform-browser'; import { AppRoutingModule } from './app-routing.module'; import { AppComponent } from './app.component'; import { FormsModule } from '@angular/forms'; import { ExponentialStrengthPipe } from './exponential-strengh.pipe'; @NgModule({ declarations: [ AppComponent, ExponentialStrengthPipe, ], imports: [ BrowserModule, AppRoutingModule, FormsModule ], providers: [], bootstrap: [AppComponent] }) export class AppModule { } -
在 app.component.html 中使用 pipe
<!-- app.component.html -->

<h2>Power Boost Calculator</h2>
<label for="power-input">Normal power: </label>
<input id="power-input" type="text" [(ngModel)]="power" />
<label for="boost-input">Boost factor: </label>
<input id="boost-input" type="text" [(ngModel)]="factor" />
<p>Super Hero Power: {{ power | exponentialStrength: factor }}</p>
这边可能会有疑问,
[(ngModel)]这个是什麽?这边大概介绍一下,如果将 component 中的 property 使用[(ngModel)]绑定,代表当 user 在画面中的<input>中改变数值时,他会同步改变到 Component 中的 property,当然如果你改 Component 中的 property 的数值一样会同步更改到画面<input>中的值,这称为双向绑定,之後会详细讲解,这边先有大概的概念就好。

在画面中可以看到,当我们每次更改 factor 的值时,pipe 都会自动重新计算结果。
Detecting pure changes to primitives and object references
在上面提到 如果是Date或Array类型时,Angular 会检测到 reference 发生改变时才会触发执行 pipe 的转换 这边要来详细的说明一下。
在默认情况下 pipe 要被定义成 pure 的,以便 Angular 只有在检测到输入值变化时才执行 pipe ,所以必须要是没有 side effect 的 pure function,而如果是将复合对象当作输入送进 pipe (现有的 arr 添加新元素)时,因为检查他的 reference 比深入到 arr 中递回的检查每个元素快得多,所以 Angular 会通过检查他的 reference 来判定是否发生改变,所以当你将一个 arr 作为输入送进一个 pipe 时,可能会发生意料之外的错误,下面来句个例子:
对了!如果是新手对 javascript 的 object reference 不熟悉的话,建议先去了解一下为什麽对 arr 使用 push 时不算对 reference 的改变,这也是为什麽使用 const 宣告 arr 却可以对他新增内容的原因
,我在 ES6 学习笔记_01(let & const) 中提到 const 的本质是什麽,有兴趣可以去看一下。
-
首先一样先创建一个 pipe
import { Pipe, PipeTransform } from '@angular/core'; @Pipe({name: 'flyingHeros'}) export class FlyingHerosPipe implements PipeTransform { transform(allHeroes: any) { return allHeroes.filter((hero: any) => hero.caFly); } } -
在 app.component.ts 中定义 Hero list
import { Component } from '@angular/core'; @Component({ selector: 'app-root', templateUrl: './app.component.html', }) export class AppComponent { Hero = [ { id: 11, name: 'Dr Nice', canFly: true }, { id: 12, name: 'Narco', canFly: false }, { id: 13, name: 'Bombasto', canFly: false }, { id: 14, name: 'Celeritas', canFly: true }, { id: 15, name: 'Magneta', canFly: false }, { id: 16, name: 'RubberMan', canFly: true }, { id: 17, name: 'Dynama', canFly: true }, { id: 18, name: 'Dr IQ', canFly: true }, { id: 19, name: 'Magma', canFly: false }, { id: 20, name: 'Tornado', canFly: true }, ]; } -
在 app.component.html 中使用 pipe 将可以飞的英雄显示出来
<!-- app.component.html -->

<div *ngFor="let hero of ( heros | flyingHeros )">
    {{hero.name}}
</div>

在画面中可以看到只有会飞的英雄显示出来,这时我们在 heros 中使用 push 新增英雄。
onAddHero() {
  this.heros.push({ id: 1, name: 'Fandix', canFly: true });
}
当我将新的英雄 push 近 heros 中,却发现画面没有更改,是坏掉了吗? 让我们将 heros console 出来确认是否真的有将他 push 进去。
onAddHero() {
  this.heros.push({ id: 1, name: 'Fandix', canFly: true });
	console.log(this.heros);
}
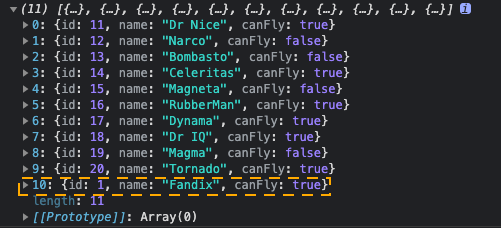
在 console 中可以看到我们确实有将新英雄 push 进 heros 中,这就是刚刚提到的 Angular 在面对 arr 时,只有在他的 reference 发生改变时才会触发 pipe,有兴趣的可以自己尝试一下,把 onAddHero() 变成
onAddHero() {
  this.heros = [
      { id: 11, name: 'Dr Nice', canFly: true },
      { id: 12, name: 'Narco', canFly: false },
      { id: 13, name: 'Bombasto', canFly: false },
      { id: 14, name: 'Celeritas', canFly: true },
      { id: 15, name: 'Magneta', canFly: false },
      { id: 16, name: 'RubberMan', canFly: true },
      { id: 17, name: 'Dynama', canFly: true },
      { id: 18, name: 'Dr IQ', canFly: true },
      { id: 19, name: 'Magma', canFly: false },
      { id: 20, name: 'Tornado', canFly: true },
      { id: 1, name: 'Fandix', canFly: true },
    ];
}
会发生什麽事。
所以在使用者种复合型的资料时,需要特别注意只有当输入的 Reference 发生改变时,才会触发 pipe。
Detecting impure changes within composite objects
那你可能想说,我不要啊我天生反骨我就是想要使用 push 就可以触发 pipe 可不可以?
当然可以,Angular 提供了当复合数据内发生改变时也可以触发 pipe 的方法,首先你需要将这个 pipe 变得 impure,这样才可以检测到 impure 的变化,所以 Angular 只要检测到每次按键或滑鼠的变化时都会触发一个 impure 的 pipe,要做的很简单,只要在 pipe.ts 中增加一个属性就可以了
@Pipe({name: 'flyingHeros', pure: false})
一样有兴趣的可以拿上面的例子直接将他变成 impure 试试看,这边就不再做一次了。
Pipes and precedence
介绍了这麽多的 pipe 用法,可能有人会问:既然 pipe 是透过 | 加在数值後面的,那如果这个数值在进行其他的 Javascript expressions 怎麽办?
其实在 Angular 中 pipe 运算符的优先级是高於三元运算子(: ?),这意味着如果你有一个 Text interpolation 长这样 {{ a ? b : c | x }} ,那麽他会被解析成 {{ a ? b : (c | x) }} 而这个结果可能不是你所希望的,如果你希望达到 {{ a ? b : c | x }} 这个结果,请使用括号将前面的三元运算子括起来 {{ (a ? b : c) | x }}
结论
本篇章中介绍了什麽是 pipe、该怎麽使用它以及客制化自己的 pipe,了解 pipe 对於开发专案是有帮助的,也要特别注意在预设情况下 pipe 是 pure 的,当传入的输入是复合型资料时,只有在他的 reference 发生改变时才会触发,如果想要避免这个问题可以将 pipe 更改为 impure 就可以了。
在官方文档中还有介绍 observable 与 HTTP 的 pipe,但是因为牵扯到太多其他的技巧不太符合我们新手入门的领域,所以不在这边介绍,不过了解了pipe 的基本原理之後,当遇到类似问题再去看就会比较容易看懂,所以就允许我偷懒一下吧
下一篇会介绍 template 的 property binding,它的作用是可以让你设置 HTML Tag 或 directive 的属性质,详细的介绍就期待明天吧。
Reference
<<: [Day 4] 使用 Gradle Multi-Project Builds X Shadow Plugin X Docker Compose 建置、打包、部署
>>: [Day09] 从 appsettings.json 取得设定
AI ninja project [day 27] QLattice --进阶分类
这一篇与[day25]的主要差异在於资料集以及应用上的不同, 参考的官方攻略: https://do...
Day27 javascript HTML DOM简单介绍
今天来看看JavaScript HTML DOM,这其实应该在前面就有稍微提到,但我想了想还是专门做...
【从零开始的 C 语言笔记】第六篇-变数
不怎麽重要的前言 上一篇我们介绍了资料型态,大家有没有好好记下来呢,今天的内容会结合上次所学喔! 我...
[区块链&DAPP介绍 Day17] Solidity 教学 - using-for
今天来延续一点昨天聊到的 libraries 的另一个应用 using-for using-for ...
Day8 Let's ODOO: View(1) Basic Views
今天我们介绍ODOO的view,以xml为写法,有三种主要的View,以之前设计的Model为例,并...