JS30 Day 26 - Stripe Follow Along Nav学习笔记
今天的内容为导览列显示之触发,当滑鼠移入导览列,会显示对应内容。
<body>
<h2>Cool</h2>
<nav class="top">
<div class="dropdownBackground">
<span class="arrow"></span>
</div>
<ul class="cool">
<li>
<a href="#">About Me</a>
<div class="dropdown dropdown1">
<div class="bio">
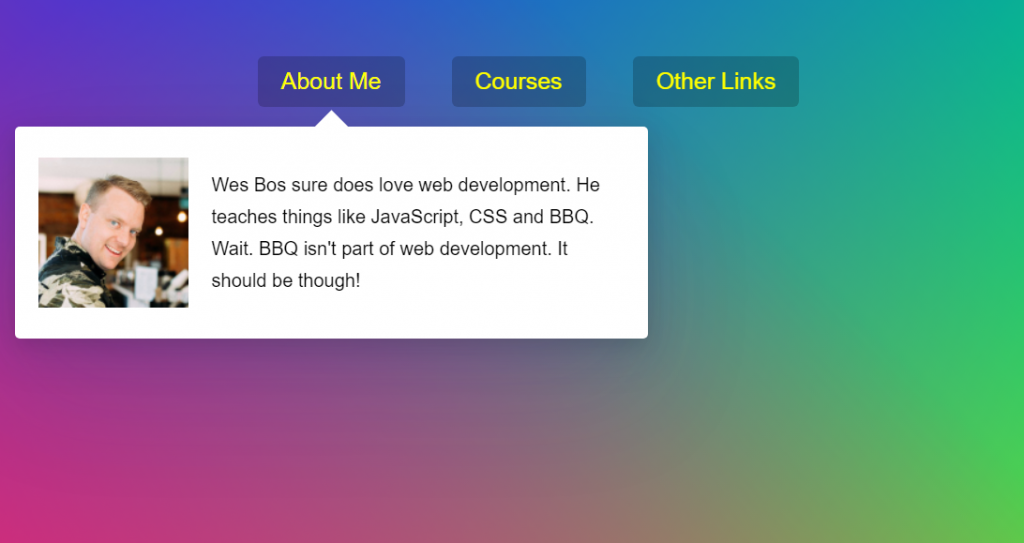
<img src="https://logo.clearbit.com/wesbos.com">
<p>Wes Bos sure does love web development. He teaches things like JavaScript, CSS and BBQ. Wait. BBQ isn't
part of web development. It should be though!</p>
</div>
</div>
</li>
<li>...</li>
<li>...</li>
</ul>
</nav>
.trigger-enter .dropdown {
display: block;
}
.trigger-enter-active .dropdown {
opacity: 1;
}
首先获取我们所需的元素。
    // 获取所有的导览
    const menus = document.querySelectorAll('.cool > li');

    // 利用此dom作为显示各导览细项的基底
    const dropdownBackground = document.querySelector('.dropdownBackground');
    const nav = document.querySelector('.top');
将所有li也就是我们,各导览项增听事件。
    menus.forEach(menu => {
      menu.addEventListener('mouseenter', enterHandler);
      menu.addEventListener('mouseleave', leaveHandler);
    });
在鼠标移入的函数当中,首先如果我们直接将样式利用classList.add加上去的话,视觉效果会很差不流畅,故我们利用setTimeout制造delay效果,当导览项目之内容背景显示出来後,内容才会跟着显示。
      //  如果将样式同时加上去动画效果会不好
      // this.classList.add('trigger-enter');
      // this.classList.add('trigger-enter-active');

      //  加入互动样式(dis block以获取座标)
      this.classList.add('trigger-enter');
      // 在第二个样式加上delay
      setTimeout(() => {
        this.classList.contains('trigger-enter') && this.classList.add('trigger-enter-active');
      }, 100);
而我们的导览列样式其实都是利用一个元素做为基底套下去的,故我们要获取对应导览列内容要显示的位置,此处利用getBoundingClientRect来获取元素相关之座标。
      const dropdown = this.querySelector('.dropdown');
      // 获取其元素之座标DOMRect {x: 0, y: 0, width: 0, height: 0, top: 0, …} 一开始都获得0是因为他初始样式设置display:none
      const rect = dropdown.getBoundingClientRect();
但利用getBoundingClientRect获取之座标皆是最外层获取,故我们要扣除掉在nav上方多出来的距离。
      // 获取多出来的距离
      const [navTop, navLeft] = [nav.offsetTop, nav.offsetLeft];
      console.log(rect);

      const menuRect = {
        width: rect.width,
        height: rect.height,
        top: rect.top,
        left: rect.left
      }
      dropdownBackground.classList.add('open');
      dropdownBackground.style.width = rect.width + "px";
      dropdownBackground.style.height = rect.height + "px";
      // 因为座标top是由整个画面开始,所以我们要扣掉多出来的(nav至顶端的距离)
      dropdownBackground.style.top = (rect.top - navTop) + "px";
      dropdownBackground.style.left = (rect.left - navLeft) + "px";
    }
鼠标离开时,样式也跟着移除。
    function leaveHandler(e) {
      e.stopPropagation();
      this.classList.remove('trigger-enter');
      // 在第二个样式加上delay
      this.classList.remove('trigger-enter-active');
      dropdownBackground.classList.remove('open');
    }
<<: 使用 Google 表单快速建立实名制出入场所登记资料 COVID-19
>>: [Android Studio] -- Day 3 Activity练习
Flutter体验 Day 24-sqflite
sqflite 昨日我们使用WebSocket技术建立了一个简单聊天室,不过每次重新刷新画面後聊天室...
第31天~
这个的前一篇是~https://ithelp.ithome.com.tw/articles/1024...
[Day18] 刺激! 居家上班之老板v.s.员工偷懒攻防战!
这边要强调一下,我相当珍惜公司给予的居家上班机会, 完全没有想过或做过以下行为,只是以少数人情况举例...
语法糖小测验: Scope functions & Extension function
最近补课的模式有了改变,大部分时间都是诗忆读着讲义,遇到问题或是想要学得更深入的时候再和唯心讨论。 ...
[第29天]30天搞懂Python-HTTP POST
前言 利用python resuests 函式库实作HTTP POST 程序实作 # 引入 requ...