[DAY13] 跟 Vue.js 认识的30天 - Vue 模组自定义事件(Custom Events)
每次写笔记都在想要怎麽写得让大家(包含未来的我)看得懂,所以每次都要写很久,但好像自己的内容有点太无聊了 XD 。
自定义事件( Custom Events )命名
因自定义事件的名称跟模组名称和 props 命名不同,在使用时并不会有转换的问题,所以怎麽命名就怎麽使用,命名用 myCustomEvent ,使用时也必须使用 v-on:myCustomEvent ,这时用 v-on:my-custom-event 是无效的。
在 HTML 中使用时,为了要遵守 HTML 的规范,所以自定义事件( Custom Events )名会被转换成小写,也因此在 HTML 中使用 v-on:myCustomEvent 时,会自动转换成 v-on:mycustomevent ,最後会因为事件名称不相同(myCustomEvent != mycustomevent)而导致该监听器无法作用。
因此 Vue 文件建议在一律以 kebab-case (短横线分隔)来命名自定义事件( Custom Events )。
模组的 v-model
在讲自定义事件的 v-model 前,先来了解一下 v-model 是如何产生作用的。
如果对 v-model 不太熟悉,可以先参考DAY09 | 跟 Vue.js 认识的30天 - Vue 的资料双向绑定(v-model)。
在一般情况下,我们想要双向绑定就会使用 v-model ,如下:
<input type="text" v-model="name">
<input> 的 value 值会受 Vue 实例资料 name 的影响,而 name 也同样受到 <input> 的 value 改变的影响。
但 v-model 是如何达到双向绑定的,其实就是透过 v-bind:value 跟 v-on:input
<input type="text" v-bind:value="name" v-on:input="name = $event.target.value">
也就是说 v-model 做了2件事:
-
<input>的 value 值绑定了 Vue 实例资料name。 -
当
<input>在输入(input事件)时,会让 Vue 实例资料name= 输入的值(也就是 value )。
如何在模组上使用 v-model
在模组上的 v-model ,做的事情跟上面的 <input> 很相似,但还是有些微不一样,模组上的 v-model 是如何作用的。
在预设的情况下, v-model 被绑定的属性是 value , 被监听的事件是 input 事件。
<!--以下2个 blog-input 做了相同的事情-->
<!--模组的 v-model 一样是由 v-bind:value 跟 v-on:input 组成的-->
<!-- 使用 $event 接收 $emit 的第2个参数值-->
<blog-input v-model="title"><blog-post>
<blog-input v-bind:value="title" v-on:input="title = $event"><blog-post>

<script>
Vue.component('blog-input', {
  props:['value'],
  template:`<input type="text" :value="value" @input="$emit('input', $event.target.value)">`
})
</script>
模组中的单选或复选按钮的 v-model
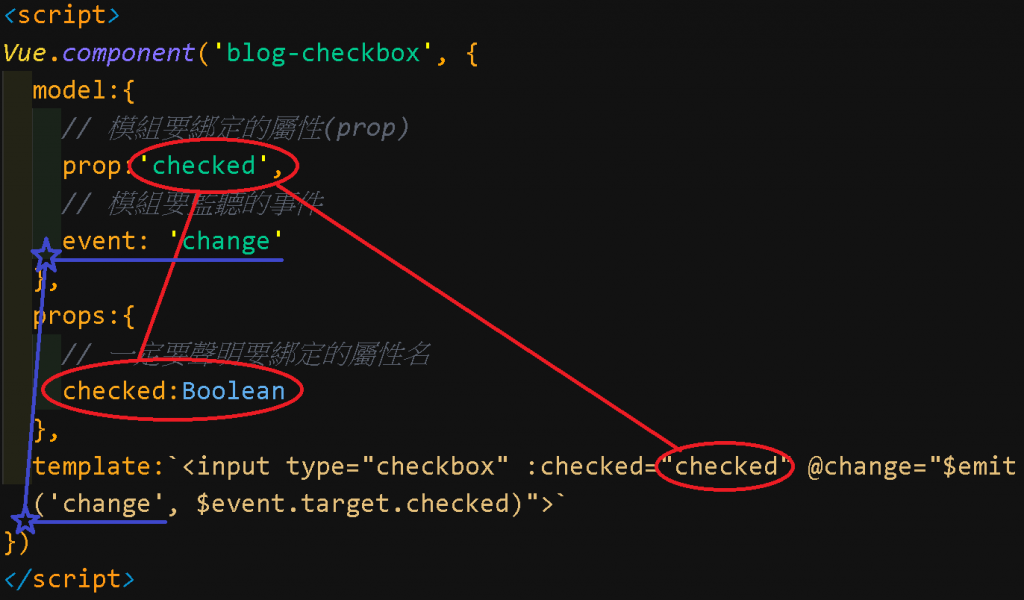
在模组中使用 v-model 的时候,预设所绑定的属性(prop)是 value ,预设绑定的事件是 input 事件。但是单选(type="radio")或复选(type="checkbox")按钮中的 value 属性并不是决定按钮是否被点选的关键,决定点选的是 checked 属性,所以可以透过模组 model 属性来变更会影响按钮结果的属性名(prop)跟事件。
<!-- agree为布林值-->
<blog-checkbox v-model="agree"><blog-checkbox>
<blog-checkbox v-bind:checked="agree" v-on:change="agree = $event"><blog-checkbox>

<script>
Vue.component('blog-checkbox', {
  model:{
    // 预设的属性跟事件
    /*
    prop:'value',
    event: 'input'
    */
    // 模组要绑定的属性(prop)
    prop:'checked',
    // 模组要监听的事件
    event: 'change'
  },
  props:{
    // 一定要声明要绑定的属性名
    checked:Boolean
  },
  template:`<input type="checkbox" :checked="checked" @change="$emit('change', $event.target.checked)">`
})
</script>
模组的修饰符
.native
可以透过加入修饰符 .native 来让模组标签直接监听原生事件(如 focus 、 click 等等非自定义的事件),而不需再透过内层 $emit 来传递事件。
<component-native @focus.native="focusCount"></component-native>
<script>
Vue.component('component-native',{
  template:`<input type="text">`
})
</script>
加入修饰符 .native 後,模组标签所监听的事件就会被内层根元素所继承,让内层根元素监听并传递同样的事件,原理如下:
<component-native @focus="focusCount"></component-native>
<script>
Vue.component('component-native',{
  template:`<input type="text" @focus="$emit('focus')">`
})
</script>
修饰符 .native 无法作用的情况
通常 input 标签会伴随着 label 出现,但这时如果一样使用修饰符 .native ,继承事件的根元素就是 label 而不是 input。
同样使用修饰符 .native 跟 focus 事件,测试看看:
<component-native-fail @focus.native="focusCount"></component-native-fail>
<script>
Vue.component("component-native-fail", {
  // 继承 focus 事件的是 label
  template: `<label>姓名
  <input type="text">
  </label>`
});
</script>
同时间测试了一下其他的原生事件,将 focus 事件改成了 click 、 mouseout 事件後,发现 focusCount 是可以正常触发的,所以後来想了下应该是因为只有 input 标签有 focus 事件,而 label 标签没有,所以才会导致 focusCount() 触发失败。
修饰符 .native 无法作用解决方法
如果真的出现修饰符 .native 无法作用的状况,用来取代修饰符 .native 的方法,就是透过 Vue 属性 $listeners 来改变模组内的继承元素。
<component-listener @focus="focusCount"></component-listener>
<script>
Vue.component("component-listener", {
  // 继承 focus 事件的是 label
  template: `<label>姓名
  <input type="text" v-on="$listeners">
  </label>`
});
</script>
以上就是透过 v-on="$listeners" 让模组标签的事件继承元素变成 <input> 而非 <label> 。
另外可以透过 computed 决定继承的事件的状况,例如某些事件要保留参数(预设是不带第2个参数的),或是继承的事件只有部分等等。
<component-listener-computed @focus="focusCount" @mouseout="mouseOutCount"  v-model="text"></component-listener-computed>
<script>
Vue.component("component-listener-computed", {
  props: ["value"],
  template: `<label>姓名
  <input type="text" v-on="customListeners">
  </label>`,
  computed:{
    customListeners(){
      // 排除 focus 事件
      const {focus, ...listeners} = this.$listeners;
      // 让 input 事件能将参数传递出去
      const vm = this;
      listeners.input = (e)=>{
        vm.$emit('input',e.target.value)
      }
      return listeners
    }
  }
});
</script>
有关 $listener 更多的资讯可以参考下方介绍:
QUICK VUE TIP - EVENT LISTENERS WITH THIS.$LISTENERS
.sync
在之前DAY12 | 跟 Vue.js 认识的30天 - Vue 模组资料传递(props)有提到过 props 是单向数据流,内层无法改变外层的 props 值,如果真的要由内层去改动外层资料的话,就必须先用 props 传递资料进内层,再透过 $emit 将资料往外层传递。
<!-- 1 透过 props 先传资料 name 进入 component -->
<!-- 3 新资料被传递出来後,在做更新,并影响 props 的值 -->
<!-- 4 将新 name 的值透过 props 在传递进去 component -->
<data-transfer :name="name" @update:name="name = $event"></data-transfer>
<script>
Vue.component('data-transfer',{
  props:['name'],
  // 2 透过$emit(自定义事件名,欲传递的值) 来将想改变的prop值传送出去
  template:`<div>
    <span>姓名</span>
    <p @click="$emit('update:name', 'Celeste')">{{name}}</p>
  </div>`
})
const vm = new Vue({
  el:'#vm',
  data:{
    name: 'Michelle'
  }
})
</script>
要从内层去改变外层传递进来的 prop ,有一个更简单的方法,那就是透过修饰符 .sync 来达成模组内外的 prop 值连动,修饰符 .sync 的原理就像上面的范例,但是使用 .sync 可以不用在外层模组标签上写下接收自定义事件。
要点就是外层加入要传递的 prop 上加入修饰符 .sync ,内层要改变该 prop 值的地方,使用 $emit('update:propName',该 prop 欲改变的值) 来做事件的传递。
<component-sync :name.sync="name"></component-sync>
<script>
Vue.component('component-sync',{
  props:['name'],
  template:`<div>
  <span>姓名</span>
  <span @click='$emit("update:name", "Linda")'>{{name}}</span>
  </div>`
})
const vm = new Vue({
  el:'#vm',
  data:{
    name: 'Michelle'
  }
})
</script>
还可以结合 v-bind="物件名" 来一次双向绑定所有物件属性值到模组内。
v-bind="物件名" 一次绑定所有物件属性的方法,可以参考Vue.js - 传入一个对象的所有 property。
<component-object-sync v-bind.sync="post"></component-object-sync>
<!-- v-bind="post" 的原理
<component-object-sync
v-bind:title="post.title"
v-bind:author="post.author"
v-bind:gender="post.gender"></component-object-sync>
-->
<script>
Vue.component('component-object-sync',{
  // 外层真正绑定的 prop 是该物件的所有属性名,而非整个 post,如果 props 写成 post ,会出错。
  props:['title','author','gender'],
  template:`<div>
    <p><span>标题</span>
    <span>{{title}}</span></p>
    <p><span>请点作者</span>
    <span @click='$emit("update:author", "Celeste")'>{{author}}</span></p>
    <p><span>请点性别</span>
    <span @click='$emit("update:gender", "female")'>{{gender}}</span></p>
  </div>`
})
const vm = new Vue({
  el: "#vm",
  data: {
    post:{
      title:'Celeste\'s Blog',
      author:'Michelle',
      gender:'male'
    }
  }
});

</script>
修饰符 .sync 注意事项
-
不能结合使用表达式。
-
要绑定物件时,一定要使用变数,而不能直接使用物件实字(Object Literals)来绑定物件。
Demo:DAY13 | 跟 Vue.js 认识的30天 - Vue 模组自定义事件(Custom Events)
参考资料:
<<: javascript网页座标(screen,page,client)
>>: [鼠年全马] W36 - Vue出一个旅馆预约平台(10)
[Day 13]每天前进一点应该也是进步吧?(後端篇)
挑战目标: MockNative Camp 今天来做教师的更新API,因为我没有实际看过教师更新的画...
CSS微动画 - Loading来了!九宫格可以很多变化
Q: 还是Loading吗? A: 一大系列!接下来的样式会比较不同~ 上两篇做完圆圈的Loadi...
[Day10] swift & kotlin 实作篇!(1) 开发工具与环境安装
前言 终於把swift & kotlin的基本语言都介绍完了 这些基本概念有了之後 要开始愉...
Day16 RTCPeerConnection: Offer / Answer
在前面的文章中,已经对 WebRTC 相关的重点进行了介绍,包含网络协商、媒体协商、如何进行网路穿透...
Day_02: 让 Vite 来开启你的Vue 微谈模组化与演进(上)
Hi Da Gei Ho~ 我是 Winnie , 今天是文章的第二篇,在开始进入主题 Vite之前...