Day 26. F2E-完善选择帐户

今天这篇也是被遗忘的xD
赶快把他补起来哈哈
#接上真实资料
在 Day 08. F2E-选择帐号 时已经将画面做完,并且使用假资料来生成
忘记制作过程可以回头复习一下~
我们就直接从真实资料替换开始做罗!!
#Step 1
将 /views/Index.vue 的 getSigninTokens() 复制过来:
getSigninTokens() {
  const api = `${process.env.VUE_APP_APIPATH}/users/signintokens`;
  this.$http({
    method: "GET",
    url: api,
  })
    .then((response) => {
      if (response.data.success) {
        this.users = response.data.users;
      }
    })
    .catch((error) => {
      console.log(error);
    });
},
在 created hook 触发,就可以得到目前的帐户清单罗!!
created() {
  this.getSigninTokens();
},
#Step 2
页面最上方帐户的 v-for 回圈将2改为 users,并将帐号及姓名都替换掉:
<template v-for="(item, index) in users">
  <v-list-item
    :key="`account_${item.accountId}`"
    @click="
      removeMode
        ? confirmRemove(`${item.username} - ${item.accountId}`)
        : ''
    "
  >
    <v-list-item-avatar>
      <v-icon
        class="grey lighten-1 white--text"
        v-text="`mdi-account`"
      ></v-icon>
    </v-list-item-avatar>
    <v-list-item-content>
      <v-list-item-title
        class="font-weight-black"
        v-text="`${item.username}`"
      ></v-list-item-title>
      <v-list-item-subtitle
        v-text="`${item.accountId}`"
      ></v-list-item-subtitle>
    </v-list-item-content>
    <v-list-item-icon v-if="removeMode">
      <v-icon color="red" v-text="`mdi-minus-circle-outline`"></v-icon>
    </v-list-item-icon>
  </v-list-item>
  <v-divider :key="`d${index}`"></v-divider>
</template>
#结果
真实资料的介接就完成罗~
之前登入过的帐号就会显示在可选择的清单上,画面如图:
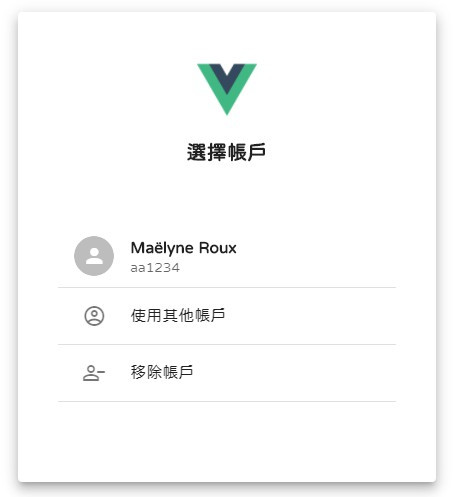
#选择帐户功能
选择帐号之後要导向 输入密码 页
在原来的判断後方改为 goToKeyinPswd() 方法并传入帐号及姓名:
<v-list-item
  @click="
    removeMode
      ? ...
      : goToKeyinPswd(item.accountId, item.username)
  "
></v-list-item>
对应的方法内容:
导向输入密码页并带上帐号及姓名参数
goToKeyinPswd(accountId, username) {
  this.$router.push({ name: "KeyinPswd", query: { accountId, username } });
},
这样就完成罗~
点下去之後就可以快速到达输入密码的关卡xD

#移除帐户功能
这里的移除帐户和首页的功能相同~
#Step 1
将在移除模式时点击帐号触发的 confirmRemove() 方法,修改一下传入值:
<v-list-item
  @click="
    removeMode
      ? confirmRemove(item.accountId, item.username)
      : ...
  "
></v-list-item>
对应的方法内容改为:
confirmRemove(accountId, username) {
  this.clickAccountId = accountId;
  this.clickUsername = username;
  this.dialogShow = true;
},
对应的data也加上 clickAccountId 与 clickUsername:
data() {
  return {
    clickAccountId: "",
    clickUsername: "",
  };
},
#Step 2
将 /views/Index.vue 的 removeUser() ' 方法复制过来:
removeUser(accountId) {
  const api = `${process.env.VUE_APP_APIPATH}/users/signintokens/${this.clickAccountId}`;
  this.$http({
    method: "PUT",
    url: api,
  })
    .then((response) => {
      if (response.data.success) {
        this.getSigninTokens();
        this.dialogShow = false;
        console.log("帐户移除成功");
      }
    })
    .catch((error) => {
      console.log(error);
    });
},
在 [是, 我要移除] 按钮触发:
<v-btn
  ...
  @click="removeUser"
  v-text="`是, 我要移除`"
>
</v-btn>
#结果
这样就完成移除帐户功能罗!!
来看看效果吧~

#首页导向修改
最後回到 /views/Index.vue 首页
要在点击登入按钮时触发的 goToLogin() 方法加上判断:
如果帐户清单有资料就导向 选择帐户页,没资料就导 输入帐户页
goToLogin() {
  if (this.users.length > 0) {
    this.$router.push({ name: "ChooseUser" });
  } else {
    this.$router.push({ name: "KeyinUser" });
  }
},
今日重点:
- 没什麽重点
没错~没甚麽重点!!
因为90%都是首页就已经做好的功能,只是复制过来改而已
比较有问题的点会在使用了重复的程序码
首页和选择帐户用了相同的API,如果可以整合起来就好看很多,这部分就...自行发挥吧xD
除了这个问题以外,有需要改进或是任何意见建议欢迎下面留言~
<<: [day28][版控] github,自动部属heroku的最简单选择
>>: [Day28]用Canvas打造自己的游乐场-labyrinth 收尾
D20 Email认证信 SMTP - Gmail
让注册会员收到email认证信 方法是在settings内定义好email port等等资讯 注意此...
[Day20]C# 鸡础观念- 物件导向(oop)基本观念
在程序语言中, 我们不只要掌握基本的语法, 还要去融会贯通, 掌握它的精随所在, 而物件导向正是C...
[Day 09] 从 tensorflow.keras 开始的 VGG Net 生活 (第二季)
2. VGG 实作(tensorflow) 2.1 南无观世"import"啥?...
菜鸟日记Day 28-如何为时钟刻上数字?
昨天我们以setInterval的方式,将指针放到时钟上并设定间隔,每秒钟执行1次setTime函式...
数字化转型与中台建设
数位转型(Digital Transformation)是企业『持续改善』的过程(Process),...