#24-这个播放器也太潮!用Canvas放音乐!w/JS web audio API
今天来试试看利用Canvas来做声音的视觉表现!
搭配Javascript web audio API
(其实是因为找不到好玩的点子)
主要是根据这个影片实作。
老样子,先看成果!
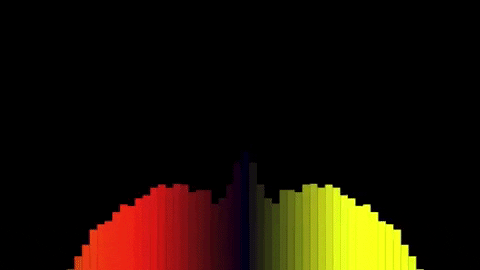
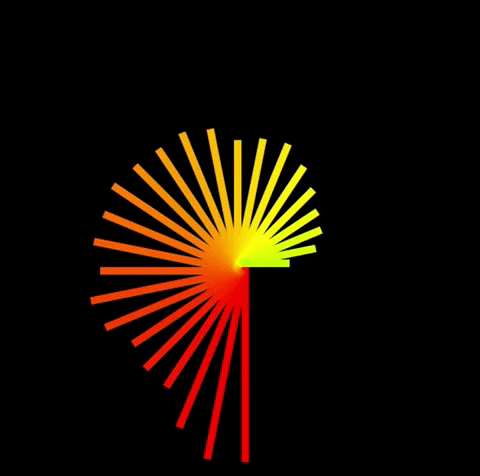
看成果两个呈现方式:(请自行搭配音乐XD)
| 长条型 | 放射状 |
|---|---|
 |
 |
在拆解code前,想先谈一下Base 64格式
想看code的请跳过:
Base 64
影片中有将音乐档案转成 Base 64的格式,(利用这个网站)
查了一下Base 64的好处:
- 提升网站速度,不用额外请求图片/影片资源
- 可以加密,无法一眼看出内容(最常在某些网站看到XD)
坏处:(列举部分)
- 无法缓存,下次用户再访问网站时无法加快载入
- SEO不友善 (无法反连结、或分享)
参见:Why "optimizing" your images with Base64 is almost always a bad idea
转成base64後我的音乐code变成长长一串,
所以我还是直接引用了!
有其他base 64实作上的心得/建议也请分享~
档案音乐我是在这边抓的:https://pixabay.com/music/search/genre/beats/
也很适合拿来当影片用~
来看Code吧!
详细code
上JS code:
详细可看影片!或可以参考中文的[基于Web Audio API实现音频可视化效果的方法](https://www.yisu.com/zixun/151229.html)
const container = document.getElementById('container');
const file = document.getElementById('fileupload'); //去读取上传档案的DOM
//canvas起手式
const canvas = document.getElementById('canvas1');
canvas.width = window.innerWidth;
canvas.height = window.innerHeight;
const ctx = canvas.getContext('2d');

//这边是我上的字
ctx.save();
ctx.font="32px 'Ubuntu', sans-serif";
ctx.fillStyle = 'white';
ctx.fillText('点击画面播放音乐', 30, 100);
ctx.fillText('或上传新的档案', 30, 150);
ctx.translate(canvas.width/2,canvas.width/2);
ctx.restore();

let audioSource;
let analyser;

//点击之後开始解析音频
container.addEventListener('click',function(){
    const audio1 = document.getElementById('audio1');
    audio1.src = '../../JSSound/club-fashion-house-2887.mp3'
    const audioContext = new AudioContext();
    audio1.play();
    audioSource = audioContext.createMediaElementSource(audio1);//接收元素
    analyser = audioContext.createAnalyser();//获取音频时间和频率数据
    audioSource.connect(analyser);
    analyser.connect(audioContext.destination); //音频最终输出目标,通常是指最终端的电脑喇吧,连结才会听到声音
    //下面三行是计算音频节点的
    //会创造出一个阵列
    analyser.fftSize = 64;//快速傅立叶变换,决定音频谱的密度
    const bufferLength = analyser.frequencyBinCount; //fftSize的一半
    const dataArray = new Uint8Array(bufferLength); //将每个字节视为0-255单个数字
    //https://zh.javascript.info/arraybuffer-binary-arrays

    const barWidth = (canvas.width/2) / bufferLength;
    let barHeight;
    let x;

    function animate(){
        x=0;
        ctx.clearRect(0,0,canvas.width, canvas.height);
        analyser.getByteFrequencyData(dataArray);

        drawVisualiser(bufferLength,x, barWidth, barHeight, dataArray);

        requestAnimationFrame(animate);

    }

    animate();
});

//这边是上传档案用,跟上面的code差不多
file.addEventListener('change', function(){
    const files = this.files;
    const audio1 = document.getElementById('audio1');
    audio1.src = URL.createObjectURL(files[0]);
    audio1.load();
    audio1.play();

    audioSource = audioContext.createMediaElementSource(audio1);
    analyser = audioContext.createAnalyser();
    audioSource.connect(analyser);
    analyser.connect(audioContext.destination);
    analyser.fftSize = 64;
    const bufferLength = analyser.frequencyBinCount;
    const dataArray = new Uint8Array(bufferLength);

    const barWidth = canvas.width / bufferLength;
    let barHeight;
    let x;

    function animate(){
        x=0;
        ctx.clearRect(0,0,canvas.width, canvas.height);
        analyser.getByteFrequencyData(dataArray);
        drawVisualiser(bufferLength,x, barWidth, barHeight, dataArray);

        requestAnimationFrame(animate);
    }

    animate();

});

//画图用
function drawVisualiser(bufferLength,x, barWidth, barHeight, dataArray){

    // 1.中心圆的版本
    // for(let i = 0; i<bufferLength; i++){
    //     barHeight = dataArray[i];
    //     ctx.save(); //将当前状态保存, 不保存的话下面的图案都会跟着上一个的参数旋转
    //     ctx.translate(canvas.width/2, canvas.height/2);
    //     ctx.rotate(i * Math.PI * 2 / bufferLength);
    //     const hue = i * 3 ;
    //     ctx.fillStyle = 'hsl('+hue+',100%, 50%)';
    //     ctx.fillRect(0, 0, barWidth, barHeight);
    //     ctx.restore(); //取出原来所保存状态
    //     // save & restore说明:https://blog.csdn.net/tiankongcheng6/article/details/83000247
    // }

    //2. 柱状的版本
		//左侧
    for(let i = 0; i<bufferLength; i++){
        barHeight = dataArray[i];
        const red = i * barHeight/10;
        const green = i*4;
        const blue = barHeight/10;
        ctx.fillStyle = 'rgb('+red+','+green+','+blue+')';
        ctx.fillRect(canvas.width /2 - x, canvas.height - barHeight, barWidth, barHeight);
        x += barWidth;
    }

		//右侧

    for(let i = 0; i<bufferLength; i++){
        barHeight = dataArray[i];
        const red = i * barHeight/10;
        const green = i*20;
        const blue = barHeight/10;
        ctx.fillStyle = 'rgb('+red+','+green+','+blue+')';
        ctx.fillRect(x, canvas.height - barHeight, barWidth, barHeight);
        x += barWidth;
    }

}
以上!
Canvas可以玩的东西很多!音乐也是满有趣的议题,
第一次玩JS audio API,
里面有很多跟音讯相关的硬知识,
比图像还复杂,算是初体验吧!
有错误/想法欢迎留言~
<<: Day 28:开始来学资料系结:使用目前所学,来个简单实作吧!(二)
>>: Day 25. slate × Normalizing × Dirty-Path
Day18 Refs 和 DOM
React中若想将父层Component资料传递给子层Compontent的话,唯有使用Props方...
[day30]优化架构-登入登出检核&最後一天心得
登入登出检核 之前已经针对登入登出进行控管,非登入无法进入会员页,按照此网站的需求,订单建置、订单查...
ESP32_DAY2 开发环境-Arduino IDE
在开始玩ESP32开发板之前先来准备开发环境吧! ESP32系列控制板可用乐鑫科技提供的SDK、Ar...
Day 30 结语
终於坚持到了最後一篇了,那就轻松一点,来讲点的写完这系列的心得吧。 就如同 Day 03 所讲的,这...
【Day 13】 浅谈 OSM
Open Street Map 开放街图,OpenStreetMap,简称 OSM,我们把它当成一个...