[Angular] Day31. Angular Module(二)
在上一篇中介绍了 Angular 中 Module 的一部分,接着要继续介绍还没讲完的部分,那就往下看吧

Entry components
在上一张的 NgModule metadata 中提到了 bootstrap 这个 Property,设置他的主要目的是为了让应用程序透过这个指定的这个 component 创建最基础的 DOM 元素,插入这个 bootstrapped component 後会触发一连串的子层 component 来填充这个应用程序的 component tree,而这个被指定的 component 就称为 Entry components。
Entry components 是 Angular 按类型命令加载的 component,这意味者你不需要在任何 template 中引用他,可以通过 NgModule 中的 bootstrap 中这定他,也可以通过将它包含在 rooting 中来指定 Entry components。
所以 Entry components 主要可以分为两种
- bootstrapped component:metadata 中 bootstrap 的 component
- 在 route 中指定的 component
A bootstrapped entry component
bootstrapped component 是 Angular 在引导过程(应用程序启动)期间加载到 DOM 的 Entry component,一个最基本的 bootstrapped component 就是在 app.module.ts 中设定的 Entry component
@NgModule({
  declarations: [
    AppComponent
  ],
  imports: [
    BrowserModule,
    FormsModule,
    HttpClientModule,
    AppRoutingModule
  ],
  providers: [],
  bootstrap: [AppComponent] // bootstrapped entry component
})
以上面的例子来说,Angular 会动态加载 root AppComponent,因为他被设置在 bootstrap 中。
@NgModule.bootstrap property 告诉编译器这是一个 entry component,应该生成戴法来用这个 component 启动应用程序,所以 bootstrapped component 必须要是 entry component,因为 bootstrapping 是一个命令式的过程,所唷需要一个 entry component。
A routed entry component
第二种 entry component 会出现在 route 的定义中,比如
const routes: Routes = [
  {
    path: '',
    component: CustomerListComponent
  }
];
所有 router components 必须是 entry component,因为这需要在两个地方(router 和 entryComponents) 添加 component,所以编译器可以识别这是一个 router 定义并自动将它添加到 entryComponent 中。
The entryComponents array
虽然 @NgModule 装饰器有一个 property 是 entryComponent 的阵列,但大多数不需要设置任何 entryComponent,因为 Angular 添加了 @NgModule.bootstrap 中添加的 component 和 route 定义中的那些自动进入的 component,尽管这两种机制占了大多数的 entry components,但如果你的应用程序需要引导或动态加载 component,则也可以将 component 添加到 entryComponent 中。
Feature modules
feature module 是用於组织程序的 NgModules,随着应用程序着增长,可以将特定功能的相关程序组织在一起,这有助於增加应用程序中每个功能之间的边界,使用 feature modules 将特定功能或相关的程序与其他部分拆开,这样的分割有助於开发人员与团队人员的合作,将不同的 feature modules 交由不同人进行维护与开发,可以更好的保障这个功能的完整性与安全性。
Feature modules vs. root modules
feature modules 是一种组织相关程序的最佳实践,他与 Angular 核心的 API 概念相反,feature module 提供了一组内聚的功能,专注於特定的应用程序功能或需求,例如 form 或 routing 等等,虽然这些动作都可以在 root module 中做到,但使用 feature modules 可以帮助你将应用程序以功能而言划分为不同的重点区域。
How to make a feature module
可以在应用程序中使用 Angular CLI 建立一个新的 feature module
ng generate module CustomerDashboard
输入上面的 CLI Command 後 Angular 会建立一个名为 customer-dashboard 的资料夹,其中会包含一个名为 customer-dashboard.module.ts 的文件,文件内容会是
import { NgModule } from '@angular/core';
import { CommonModule } from '@angular/common';

@NgModule({
  declarations: [],
  imports: [
    CommonModule
  ]
})
export class CustomerDashboardModule { }
无论是 root module 或是 feature module 他们的 NgModule 结构都会是一样的,在 CLI 产生的 feature module 中,在它的顶部 import 了两个东西,第一个是导入 NgModule 他与 root module 一样允许你使用 @NgModule 装饰器,第二个导入的事 CommonModule 他用於提供与多常用的 directive,比如 ngIf 或 ngFor, feature module 导入的是 CommonModule 而不是像 root module 中引入 BrowserModule, 因为他只会被引入一次,CommonModule 只包含常见的 directive 而 BrowserModule 是会为浏览器配置 Angular 应用程序,这个过程只需要完成一次。
module 中的 declarations 阵列可以用来定义属於这个 module 的 component、pipe 或 directive,要添加属於这个 module 的 component 的话,可以使用下面的 CLI Command
ng generate component customer-dashboard/CustomerDashboard
或
ng generate component customer-dashboard --module customer-dashboard.module
都可以建立一个属於 customer-dashboard.module 的 component
import { NgModule } from '@angular/core';
import { CommonModule } from '@angular/common';
import { CustomerDashboardComponent } from './customer-dashboard.component';

@NgModule({
  declarations: [
    CustomerDashboardComponent
  ],
  imports: [
    CommonModule
  ]
})
export class CustomerDashboardModule { }
CustomerDashboardComponent 会透过 Import 引入 module 中,并将它添加到 declarations 中,这样会让 Angular 知道这个 Component 与这个 module 有关联。
Importing a feature module
要将其他的 feature modules 合并到应用程序中,需要让 root module 知道这件事,可以看到 customer-dashboard.module 的最下方有使用 export 将此 module 导出,这样可以让其他 module 使用,要将其添加到 AppModule 中的 imports 中。
import { NgModule } from '@angular/core';
import { BrowserModule } from '@angular/platform-browser';

import { AppRoutingModule } from './app-routing.module';
import { AppComponent } from './app.component';
import { CustomerDashboardModule } from './customer-dashboard/customer-dashboard.module';

@NgModule({
  declarations: [
    AppComponent
  ],
  imports: [
    BrowserModule,
    AppRoutingModule,
    CustomerDashboardModule
  ],
  providers: [],
  bootstrap: [AppComponent]
})
export class AppModule { }
Rendering a feature module’s component template
要在 AppComponent 中的 template 中使用 CustomerDashboardComponent 的 selector,首先需要将在 CustomerDashboardModule 中导出 CustomerDashboardComponent
import { NgModule } from '@angular/core';
import { CommonModule } from '@angular/common';
import { CustomerDashboardComponent } from './customer-dashboard.component';

@NgModule({
  declarations: [
    CustomerDashboardComponent
  ],
  imports: [
    CommonModule
  ],
  exports: [
    CustomerDashboardComponent
  ]
})
export class CustomerDashboardModule { }
将它导出後就可以在 AppComponent 中的 template 中使用这个 selector
<h1>{{title}}</h1>

<app-customer-dashboard></app-customer-dashboard>

Providing dependencies in modules
provider 是 Dependency Injection 系统关於如何获取 dependency 的指令。
Providing a service
可以使用 Angular CLI 建立一个新的 service
ng generate service User
用这个 CLI Command 创建出来的 servce.ts 会长成下面这样
import { Injectable } from '@angular/core';

@Injectable({
  providedIn: 'root',
})
export class UserService {
}
有了这个 service 後就可以在应用程序的任何一个位置注入 UserService。
service 本身是由 Angular CLI 所建立出来的一个 class,他使用了 @Injectable() 进行修饰,默认情况下这个装饰器有一个 property 名为 providedIn,他会为 service 创建一个 provider,在上面的例子中 provideIn: 'root' 代表它他是注入在 root injector 中,代表所有地方都可以将它注入并且使用。
Provider scope
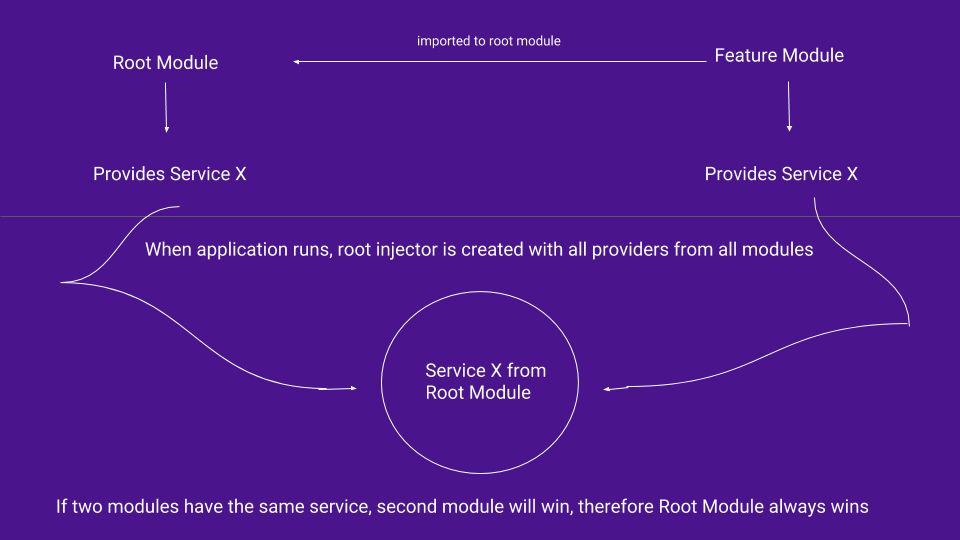
当在 root module 中提供 service 时 Angular 会将它建立成一个单一的、共享的 service 实例,并注入到任何需要他的 class 中,除了这样之外 Angular 还会将没有被使用到的 service 移除进而优化整个应用程序,所以将 service provider 添加到 root module 後,代表所有地方都可以将它注入并且使用,这意味着如果两个 module 都在使用这个 service 的内容时,他们使用的是相同的 service 实例(singleton pattern),所以记得当添加 service 到 root module 时,他会变成整个应用程序都可以使用,并且大家都是放问到同一个实例,除非 module 是使用延迟载入。
当有两个不同 module 中(这边举例 AppModule 和 FeatureModule)的 component 使用同一个 service(这边举例 VoteService)所提供的服务时会发生以下的事件
- AppModule 和 FeatureModule 的 providers 都有 VoteService
- 因为在 AppModule 中有将 FeatureModule 导入,并且这两个 module 都有着同一个
token(相同的 service)的 provider,所以最上层的 AppModule 会获胜,因为 Angular 所使用的 injector 系统在应用程序启动後载入 root module 时,所有被导入的 module 中的 providers 都会被添加到root injector中。 - 所以当 FeatureModule 中的 component 要使用 VoteService 所提供的内容时,会因为在
root injector中找到了被创建实例的 VoteService,所以就会直接使用它而不会创建一个新的 VoteService 实例。
Limiting provider scope by lazy loading modules
一般来说透过 Angular CLI 所建立的 Module 中都是被急切载入的,这意味着当应用程序启动的话就会立马加载这些 module,Angular 使用 injector 系统使 module 之间的 service 可以互相使用,但在急切加载的应用程序中 root injector 会让所有 module 的 providers 在整个应用程序中可以使用,这意味着刚刚介绍的方法变得无法使用。
不过当你使用延迟加载的话就不会出现这种行为,延迟加载是指仅在需要的时候才载入某一个 Module,例如 route 变化的时候,他不会像急切加载一样立即加载所有的 module,这意味着延迟载入的 module 中 providers 的 service 变得无法被其他地方使用,因为 root injector 不知知道这些 module( 尚未被载入 )。
当 router 延迟加载一个 module 时会创建一个新的 injector,这个 injector 是 root injector 的小孩,每一个延迟加载的 module 都会有一个 root injector 和 child injector,router 会将所有 providers 从 root injector 添加到 child injector,所以当 router 透过延迟加载的 module 创建 component 时,会将延迟加载的 module 的 providers 创建成 service 实例,可能有点抽象这边举个个例子
-
使用 Angular CLI 创建新的 service
import { Injectable } from '@angular/core'; @Injectable({ providedIn: 'root' }) export class VoteService { votes = 10; constructor() { } getVotes() { return this.votes; } setVotes(vote: number) { this.votes = vote; } } -
在 app.component 中注入 service 并将获得的数据显示在画面中
import { Component, OnInit } from '@angular/core'; import { VoteService } from './vote.service'; @Component({ selector: 'app-root', template: ` app component - {{votes}} <button (click)="onClick()">get vote again</button> <button routerLink="/orders">Orders</button> <router-outlet></router-outlet> ` }) export class AppComponent implements OnInit { votes!: number; constructor(private voteService: VoteService) {} ngOnInit() { this.votes = this.voteService.getVotes(); this.voteService.setVotes(25); } onClick() { this.votes = this.voteService.getVotes(); } } -
接着使用 Angular CLI 创建一个延迟载入了 module 与他的 component
ng generate module customers --route customers --module app.module这边可能会有点看不懂,但没关系之後会详细介绍 Angular 的延迟载入 module
-
使用上的 CLI Command 後,在 order.component 中注入 VoteService,并将获得的数据显示在画面上
import { Component, OnInit } from '@angular/core';
import { VoteService } from '../vote.service';

@Component({
  selector: 'app-orders',
  template: `
    <div>app-orders - {{vote}}</div>
  `
})
export class OrdersComponent implements OnInit {
  vote!: number;
  constructor(private voteService: VoteService) { }

  ngOnInit(): void {
    this.vote = this.voteService.getVotes();
  }
}

在 app.component 中已经将 VoteService 中的 votes 更改为 25,但是在 orders.component 中所获得的依然是初始的 10,这代表 app.component 中所使用的 service 实例与 orders.component 中使用的 service 实例是不一样的。
结论
本章介绍了什麽是 Entry components,设置他的主要目的是为了让应用程序透过这个指定的这个 component 创建最基础的 DOM 元素,而设定这个 entry component 可以透过在 AppModule 中的bootstrap 中设定,也可以在 routed 中设定,这两种方法都可以设定应用程序的 Entry components。
介绍了什麽是 Feature module 与该如何建立与使用,通常会因为应用程序着增长,而将特定功能的相关程序组织在一起,这有助於增加应用程序中每个功能之间的边界。
最後介绍了 Providing dependencies,provider 是 Dependency Injection 系统关於如何获取 dependency 的指令,而当在 root module 中提供 service 时 Angular 会将它建立成一个单一的、共享的 service 实例,所以当不同 module 中的 component 注入并且使用同一个 Service 时,其实他们是会使用同一个 Service 的实例,这就是 Angular 的 singleton pattern 模式。
但是如果是在延迟载入的 module 中使用相同的 Service 的话就会跟上面说的不一样,延迟载入的 module 会为自己的 component 创建一个新的 Service 实例。
本章中利用延迟载入来测试延迟载入的 module 是否会跟其他立即载入的 module 共用同一个 service 实例,不过却没有详细的讲解这个方法,不过没关系明天将会详细的介绍 Angular 的延迟载入功能,那就明天见吧
Reference
- Angular.io - Entry components
- Angular.io - Feature modules
- Angular.io - Providing dependencies in modules
- Understanding provider scope in Angular
<<: [Day17] Flutter with GetX binding (一) 元件与属性绑定
#3 JavaScript Crash Course 2
今天教 Promise Async / Await。 Promise Promise 这个东西跟时间...
修改word 作者属性
删除作者 作法1 : 直接修改 删除作者,删掉,从这边删掉,按确定就可以了 作法2 : 移除档案属性...
Laravel:Route Wildcards 2
前言 Laravel:Route Wildcards - iT 邦帮忙::一起帮忙解决难题,拯救 I...
【Day24】I2C Master 的实现及验证(最终章)
今天,我们要来完成整个 I2C 的最後一个部份了! 先来看看这个 I2C Master write ...
第27天~CRUD
C-新增 R-查询 U-更改 D-删除 流程: 建置 设定 show 4.一定会有key:value...