【day13】DashboardFragment X CardView
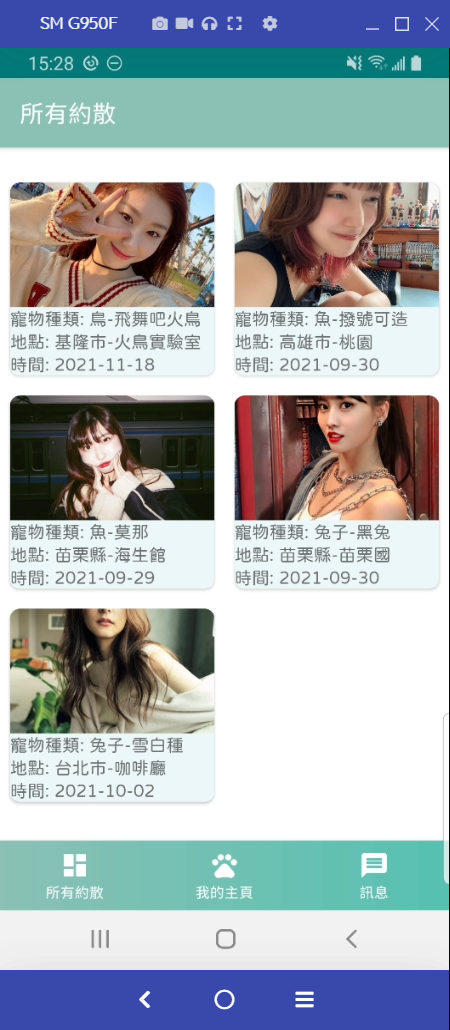
今天我们要做的就是,当使用者一进到我们的App时,就可以看到除了自己上架的其他讯息!
先上图
1.建立RecyclerView
我们这次做的RecylcerView跟上次做出小小的区别,我们这次做的比较有质感一点
我们首先要建立Adapter,而基本上跟上一次的HomeAdapter一样,要注意的是我们在onCreateViewHolder的地方有换写法,可以让我们Recyclerview的item可以调间距。
class DashboardAdapter(private val fragment: DashboardFragment): ListAdapter<Invitation, DashboardAdapter.DashboardViewHolder>(DiffCallback){


    class DashboardViewHolder(val binding: DashboardInvitationItemListBinding): RecyclerView.ViewHolder(binding.root){
        fun bind(item: Invitation){
            binding.invitation = item
            binding.executePendingBindings()
            Constant.loadPetImage(item.pet_image,binding.ivDashboardInvitationItemListImage)

        }
    }

    override fun onCreateViewHolder(parent: ViewGroup, viewType: Int): DashboardViewHolder {
        val binding: DashboardInvitationItemListBinding = DataBindingUtil.inflate(LayoutInflater.from(parent.context),
            R.layout.dashboard_invitation_item_list,parent,false)
        return DashboardViewHolder(binding)
    }

    override fun onBindViewHolder(holder: DashboardViewHolder, position: Int) {

            val model = getItem(position)
            holder.bind(model)
						//这边一样设定OnClick事件,并把我们选择的item传到viewModel
            holder.itemView.setOnClickListener{
                fragment.addSelectedInvitationToViewModel(model)
            }
    }

		//会帮我们判断list是否一样
    companion object DiffCallback: DiffUtil.ItemCallback<Invitation>(){
        override fun areItemsTheSame(oldItem: Invitation, newItem: Invitation): Boolean {
            return oldItem === newItem

        }

        override fun areContentsTheSame(oldItem: Invitation, newItem: Invitation): Boolean {
            return oldItem.id == oldItem.id
        }
    }

}
这时候我们可以看到红字,也就是我们传进DashboardFragment里面的funtion!
所以我们就要在Fragment里面新增以下
原则上这边就跟我们在HomeFragment里面做的点击事件一样,把我们的livedata资料更新,让我们在InvitationDetailFragment观测Livedata
fun addSelectedInvitationToViewModel(invitation: Invitation) {
    matchingViewModel.addSelectedInvitationToLiveData(invitation)
    nav.navigate(R.id.action_navigation_dashboard_to_invitationDetailFragment)

  }
★别忘了要在navigation里面连连看喔,不然我们没办法透过id来导航。
接下来来实例化我们的Adapter,并且在我们的onCreateView呼叫
private fun setAdapter() {
//指定我们的layoutManager为GridLayoutManager,第一个参数 context,第二个则是一行几个item
	  binding.rvDashboardFragment.layoutManager =   GridLayoutManager(requireContext(), 2)
    dashboardAdapter = DashboardAdapter(this)
//让我们item有新增或减少时,item的size不会改变,让RecyclerView不用重新计算大小
    binding.rvDashboardFragment.setHasFixedSize(true)
    binding.rvDashboardFragment.adapter = dashboardAdapter

  }
LayoutManager,我们可以用以下方是来调整排版
- LinearLayoutManager,就是水平或是垂直排版
- GridLayoutManager,格状,也就是我们这次要用的效果,可以自订一行几个item
- StaggeredGridLayoutManager,瀑布,适合各种不同size的item
★ 对於时做有兴趣的小夥伴们可以参考这篇文章
https://givemepass.blogspot.com/2016/09/recyclerview-layoutmanager.html
在过来就是我们的Layout啦!
别忘了我们的recyclerview要有两个layout
- 本身在UI层(Activity,Fragment),要新增RecyclerView所占的范围
- ItemView的layout
所以我们先在fragment_dashboard_xml 新增以下,让它范围占好占满
<androidx.recyclerview.widget.RecyclerView
        android:id="@+id/rv_dashboard_fragment"
        android:layout_width="match_parent"
				android:layout_marginTop="20dp"
        android:layout_height="match_parent">

    </androidx.recyclerview.widget.RecyclerView>
因为我们这次会需要用到CardView,顾名思义它就是类似卡片的效果,看起来会比较立体
我们要先去gradle新增
implementation "androidx.cardview:cardview:1.0.0"
主要用法就是把它包在view外面,可以直接在cardView设定以下
- cardBackgroundColor 设定cardview的背景色
- cardCornerRadius 设定cardview的圆角大小
- cardElevation 设定cardview阴影的大小,你要看起来越立体,就调越高
- cardMaxElevation 设定cardview阴影的最大高度
★ 参考文章:https://ithelp.ithome.com.tw/articles/10249805
dimen
	<dimen name="dashboard_cardView_radius">8dp</dimen>
    <dimen name="dashboard_cardView_margin">8dp</dimen>
    <dimen name="dashboard_image_height">100dp</dimen>
color
<color name="item_background">#ebf6f8</color>
新增dashboard_invitation_item_list.xml
<?xml version="1.0" encoding="utf-8"?>


<layout xmlns:android="http://schemas.android.com/apk/res/android"
    xmlns:app="http://schemas.android.com/apk/res-auto">

		//一样我们在这边设定databinding,让我们在Adapter绑定
    <data>
        <variable
            name="invitation"
            type="com.example.petsmatchingapp.model.Invitation" />
    </data>

    <androidx.cardview.widget.CardView
        android:layout_width="match_parent"
        android:layout_height="wrap_content"
        app:cardBackgroundColor="@color/item_background"
        android:layout_margin="@dimen/dashboard_cardView_margin"
        app:cardCornerRadius="@dimen/dashboard_cardView_radius">


<LinearLayout
    android:layout_width="match_parent"
    android:layout_height="wrap_content"
    android:orientation="vertical">


    <ImageView
        android:id="@+id/iv_dashboard_invitation_item_list_image"
        android:layout_width="match_parent"
        android:layout_height="@dimen/dashboard_image_height"
        android:scaleType="center">

    </ImageView>


        <com.example.petsmatchingapp.utils.JFTextView
            android:layout_width="wrap_content"
            android:layout_height="wrap_content"
            android:text="@{@string/home_fragment_pet_type(invitation.pet_type,invitation.pet_type_description)}"/>


        <com.example.petsmatchingapp.utils.JFTextView
        android:layout_width="wrap_content"
        android:layout_height="wrap_content"
        android:text="@{@string/home_fragment_pet_place(invitation.area,invitation.date_place)}"/>

        <com.example.petsmatchingapp.utils.JFTextView
            android:layout_width="wrap_content"
            android:layout_height="wrap_content"
            android:text="@{@string/home_fragment_pet_time(invitation.date_time)}"/>


</LinearLayout>

    </androidx.cardview.widget.CardView>

</layout>
2.从FireStore拿到所有的邀约
来到 MatchingViewModel新增,一样透过新增到livedata的方式让我们UI层可以观察
我们希望我们的DashboardFragment里面的资料不要看到自己PO出来的资料,这样才不会导致自己约自己的荒谬行为!
//设定我们的livedata让我们好观察
private val _allInvitationList =  MutableLiveData<List<Invitation>>()
val allInvitationList: LiveData<List<Invitation>>
get() = _allInvitationList


fun getAllInvitation(userID: String,fragment: DashboardFragment){
        Firebase.firestore.collection(Constant.INVITATION)
	        //我们直接用get拿到所有资料,之後再来筛
            .get()
            .addOnSuccessListener {
                val list = mutableListOf<Invitation>()
                for (i in it.documents){
                    val model = i.toObject(Invitation::class.java)
//我们这时候要确认我们的model的user_id跟我们currentUserId是不一致的
                    if (model != null && model.user_id != userID){
                        list.add(model)
                    }
                }
                _allInvitationList.postValue(list)
            }
            .addOnFailureListener {
                fragment.getAllInvitationFail(it.toString())
            }
    }
一样我们可以看到几个红字,也就是我们要新增我们的get失败,回到我们的Fragment
fun getAllInvitationFail(e: String) {
    showSnackBar(e, true)
  }
并且在onCreateView呼叫它,在最初的时候我们就先呼叫!
accountViewModel.getCurrentUID()?.let { matchingViewModel.getAllInvitation(it,this) }
最後在观测我们的allInvitationList,如果有变更的时候,就把list丢进我们的adapter
matchingViewModel.allInvitationList.observe(viewLifecycleOwner, Observer {
dashboardAdapter.submitList(it)
})
别忘了我们先在如果点进InvitationDetailFragment的时候会把ActionBar跟bottomNavigation隐藏,所以我们要在onResume呼叫。
if (requireActivity().findViewById<BottomNavigationView>(R.id.nav_view).visibility == View.GONE) {
      requireActivity().findViewById<BottomNavigationView>(R.id.nav_view).visibility =
        View.VISIBLE
    }
★切记不能在onCreateView里面呼叫喔! 因为在onCreateView是在Fragment初次创建时调用。但此刻Activity还没有创建完成,因为我们的Fragment也是Activity创建的一部分。所以无法获取Activity的一些资源
Fragment生命周期对应Activity
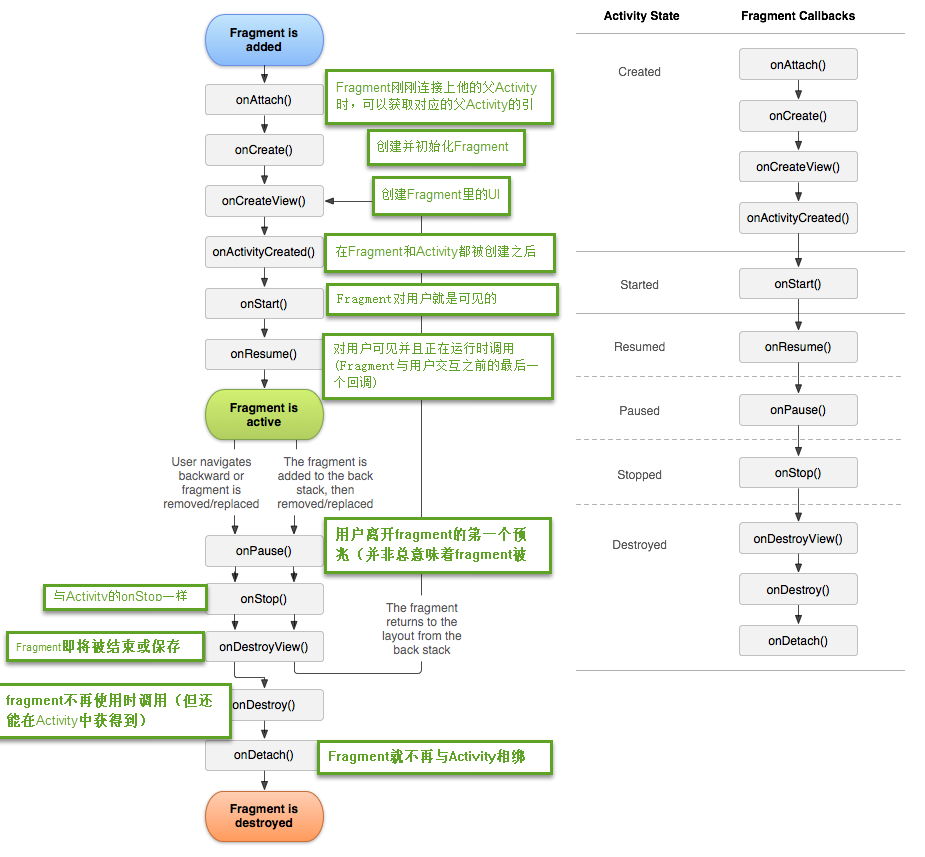
参考文章&图片来源:https://www.aiwalls.com/android软件开发教学/08/23989.html
今天就先这样啦! 明天会新增一些筛选的选单,让我们当今天资料比较多的时候,可以让user去快速找到想要的约散!
成品!!
>>: Day.19 「认识 JavaScript 记忆体堆叠、传值 与 传址」 —— JavaScript 物件 与 记忆体
Day3-自制网站卷轴(上)_CSS就能做得到
这次要介绍如何「自制假卷轴」 前言// 大学期间有一次网页程序课程的作业需要仿制一个网站 该网站的左...
(Day30)第三方套件---图表套件Charts(下)
这篇会介绍图表套件Charts的功能 graphView.leftAxis.enabled = fa...
【左京淳的JAVA学习笔记】第三章 运算子与分歧文
运算子 运算子即计算、比较、位移用的种种符号,欲知详情请自行google。 让我们先来看看算数运算子...
《赖田捕手:追加篇》第 31 天:初始化 LINE BOT on Heroku
第 31 天:初始化 LINE BOT on Heroku 事实说来可笑:别试着和任何人讨论任何关於...
CSS微动画 - Loading来了!九宫格可以很多变化
Q: 还是Loading吗? A: 一大系列!接下来的样式会比较不同~ 上两篇做完圆圈的Loadi...