[Angular] Day28. Control Value Accessor (CVA)
前几篇介绍了 Form 的基本操作与概念,也介绍了如何在表单中加入验证,最後要来介绍 Angular Form 中一个我满喜欢的功能,Control Value Accessor 简称 CVA,就像开发 component 一样,当这个 component 太大的时候我们会选择将这个大的 component 拆解成一个一个小的 component,这样比较方便撰写维护与测试,CVA 就有是这种概念,当要开发一个超大的表单时,每一个 FormControl 都有自己的设定和各自的 Validator funciton,这样整个 component 都会充满不同的表单设定,除了 component 之外 template 也会非常庞大,要找一个 formControlName 就会找半天,所以需要使用 CVA 将庞大的表单分割成一个一个小的 component,这样可维护性与可测试性就会提高。

Learn by example
本篇会透过一个建立一个 CVA 的例子来讲解如何从零开始建立属於你的 CVA component,那麽就往下看吧。
Create new Component
首先先使用 Angular CLI 建立一个新的 component
ng generate component single-control-cva
Setting NG_VALUE_ACCESSOR
接着在 single-control-cva.component.ts 中加入 CVA 的设定
import { Component, OnInit, forwardRef } from '@angular/core';
import { ControlValueAccessor, NG_VALIDATORS, NG_VALUE_ACCESSOR } from '@angular/forms';

@Component({
  selector: 'app-single-control-cva',
  templateUrl: './single-control-cva.component.html',
  styleUrls: ['./single-control-cva.component.css'],
  providers: [
    {                                                                   // (1)
      provide: NG_VALUE_ACCESSOR,
      useExisting: forwardRef(() => SingleControlCvaComponent),
      multi: true
    },
    {
      provide: NG_VALIDATORS,                                           // (2)
      useExisting: forwardRef(() => SingleControlCvaComponent),
      multi: true
    }
  ]
})
export class SingleControlCvaComponent implements OnInit {

  constructor() { }

  ngOnInit(): void {
  }
}
首先要先在 single-control-cva.component.ts 中建立 NG_VALUE_ACCESSOR 的设定,这样当 Angular 在运行的时候会检查这个 component 是否有这个设置,如果有就会将这个 component 视为一个 FormControl。
- (1): 将
NG_VALUE_ACCESSOR以 SingleControlCvaComponent 为模板创建一个实例,用於将这个 component 定义为NG_VALUE_ACCESSOR,让 Angular 将这个 component 当作 FormControl,而这边使用forwardRef代表允许引用尚未定义的 reference - (2): 将
NG_VALIDATORS以 SingleControlCvaComponent 为模板创建一个实例,用於建立这个 compoennt 的 validator
Inplements ControlValueAccessor
接着要将 ControlValueAccessor 利用 implements 将它继承给 SingleControlCvaComponent,将这个虚拟 interface 继承给 component 後会需要在 component 中添加几个 method 分别是:
- writeValue(value: any):当父层传给子层新值时会触发,简单来说就是当有新的值传进来时就会触发
- registerOnChange(fn: any):当 CVA component 中的 FormControl 内容发生更改时触发
- registerOnTouched(fn: any):当 CVA component 中的 FormControl 被处碰时触发
- setDisabledState(isDisable: boolean)?:当 CVA component 为 disable 状态时触发
接着将他们加入到 single-control-cva.component.ts 中
export class SingleControlCvaComponent implements OnInit, ControlValueAccessor {
  onChanged: any = () => {};
  onTouched: any = () => {};
  constructor() { }

  ngOnInit(): void {
  }

  writeValue(value: any) {};

  registerOnChange(fn: any) {
    this.onChanged = fn;
  }

  registerOnTouched(fn: any) {
    this.onTouched = fn;
  }

	validate(): ValidationErrors | null {
	  return this.form.valid ? null : { invalidValue: 'single-control-cva error' };
	}
}
Bind to parent layer
设定好基本的 CVA 架构後,接着回到 app.component.ts 中建立最上层的表单结构
import { Component } from '@angular/core';
import { FormBuilder } from '@angular/forms';

@Component({
  selector: 'app-root',
  templateUrl: './app.component.html',
  styleUrls: ['./app.component.css']
})
export class AppComponent {
  form = this.fb.group({
    singleControlCva: ['']
  })

  constructor(private fb: FormBuilder) {}
}
在 app.component.ts 中利用 FormBuilder 建立一个 FormGroup,里面有一个名为 singleControlCva 的 FormControl。
接着将这个 FormGroup 与 FormControl 绑定到 template 中
<!-- app.component.html -->
<form [formGroup]="form" class="content">
<div class="item">
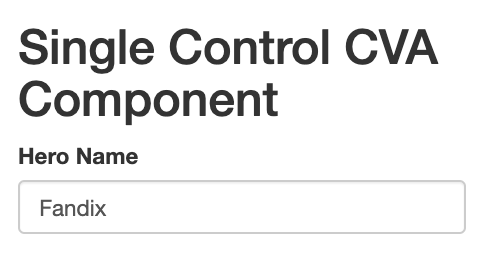
<h2>Single Control CVA Component</h2>
<app-single-control-cva formControlName="singleControlCva"></app-single-control-cva>
</div>
</form>
绑定 FormGroup 的方法与之前一样,不同的点在於之前的 formControlName 是绑定一个输入元素 ( <input>, <select> ... ) 但是这边却不一样,CVA 的特色就在这边,他可以将一个 component 的 selector 当作一个输入元素,因为在 CVA component 中设定了 NG_VALUE_ACCESSOR 那麽 Angular 就会将这个 component 看作一个 FormControl,所以可以达到上面这样的效果。
Pass new Value to CVA component and display it
设定完 CVA component 和绑定父层後,藉着来从父层传递新的值给 CVA component
form = this.fb.group({
  singleControlCva: ['Fandix']
})
传递数据非常简单,就跟之前传递预设值给 FormControl 一样,作为 FormControl 的第一个参数即可。
接着在 single-control-cva.component.ts 中建立属於他的 FormControl 并在 writeValue() 中将获得的值赋予给它
export class SingleControlCvaComponent implements OnInit, ControlValueAccessor {
  onChanged: any = () => {};
  onTouched: any = () => {};
  name = new FormControl('');                      // (1)

  constructor() { }

  ngOnInit(): void {
  }

  writeValue(value: any) {
    this.name?.setValue(value);                    // (2)
  };

  registerOnChange(fn: any) {
    this.onChanged = fn;
  }

  registerOnTouched(fn: any) {
    this.onTouched = fn;
  }

	validate(): ValidationErrors | null {
	  return this.name.valid ? null : { invalidValue: 'single-control-cva error' };
	}
}
- (1): 建立 single-control-cva.component.ts 的 FormControl
- (2): 将获得的值赋予给 name (FormControl)
接着在 single-control-cva.component.html 中添加输入元素并绑定 FormControl
<label for="name">Hero Name</label>
<input type="text" id="name" class="form-control" [formControl]="name" />
Retrun update value to parent layer
可以从父层获得值并显示在 CVA Component 的 template 中後,接着就要做到当 CVA Component 的 FormControl 内容发生改变时,也要将这个结果往上传回给父层,这就需要用到 registerOnChange(fn: any) 了
import { Component, OnInit, forwardRef, OnDestroy } from '@angular/core';
import { ControlValueAccessor, FormControl, FormGroup, NG_VALIDATORS, NG_VALUE_ACCESSOR, ValidationErrors } from '@angular/forms';
import { Subscription } from 'rxjs';                                  // (1)

@Component({
  selector: 'app-single-control-cva',
  templateUrl: './single-control-cva.component.html',
  styleUrls: ['./single-control-cva.component.css'],
  providers: [
    ...
  ]
})
export class SingleControlCvaComponent implements OnInit, ControlValueAccessor, OnDestroy {
  onChanged: any = () => {};
  onTouched: any = () => {};
  subscription!: Subscription;                                         // (2)
  name = new FormControl('');

  constructor() { }

  ngOnInit(): void {
    this.subscription = this.name.valueChanges.subscribe((val) =>     // (3)
      this.onChanged(val)
    );
  }

  ngOnDestroy() {                                                     // (4)
    this.subscription.unsubscribe();
  }

  writeValue(value: any) {
    this.name?.setValue(value);
  };

  registerOnChange(fn: any) {
    this.onChanged = fn;
  }

  registerOnTouched(fn: any) {
    this.onTouched = fn;
  }

  validate(): ValidationErrors | null {
    return this.name.valid ? null : { invalidValue: 'single-control-cva error' };
  }
}
- (1): 从
rxjs中引入Subscription - (2): 建立一个 property
subscription - (3): 将 FormControl 实例提供的 valueChanges.subscribe() 所获得的 FormControl 值的快照传入
this.onChanged()中,用於将值传回父 - (4): 在 component 结束要销毁时解除订阅以免造成记忆体泄漏

Send different types of data
上面介绍了如何使用 CVA Component,但你可能觉得有只传一个 FormControl 有必要使用 CVA Component 吗? 其实传入 CVA Component 的值可以是 Object 或 Array,这样就可以把 FormGroup 或 FormArray 写在 CVA Component,保持最上层的 Form Model 都只有 FormControl,个举个例子吧
Send Object in cva component
-
首先新增一个新的 component
ng generate component group-control-cva -
在 app.component.ts 中的 Form Model 中新增一个 FormControl 并将一个 Object 传给他做为预设值
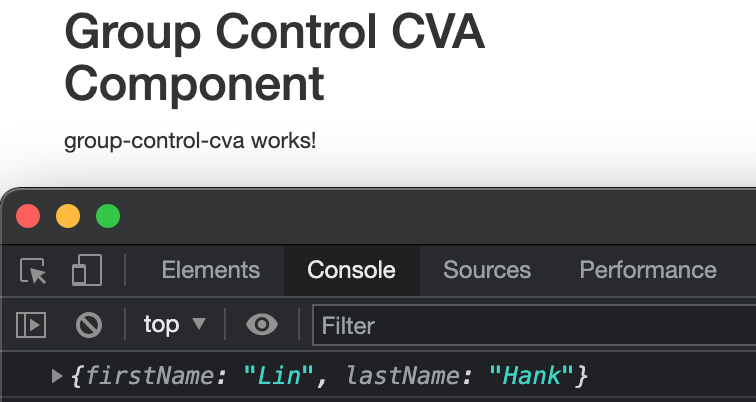
form = this.fb.group({ singleControlCva: ['Fandix'], groupControlCva: [{ firstName: 'Lin', lastName: 'Hank' }] }) -
在 app-group-control-cva.ts 中将 CVA component 的设定写好,和上面的方式一样
import { Component, OnInit, forwardRef, OnDestroy } from '@angular/core';
import {
  ControlValueAccessor,
  NG_VALIDATORS,
  NG_VALUE_ACCESSOR,
  ValidationErrors,
  FormBuilder
} from '@angular/forms';
import { Subscription } from 'rxjs';

@Component({
  selector: 'app-group-control-cva',
  templateUrl: './group-control-cva.component.html',
  styleUrls: ['./group-control-cva.component.css'],
  providers: [
    {
      provide: NG_VALUE_ACCESSOR,
      useExisting: forwardRef(() => GroupControlCvaComponent),
      multi: true,
    },
    {
      provide: NG_VALIDATORS,
      useExisting: forwardRef(() => GroupControlCvaComponent),
      multi: true,
    },
  ],
})
export class GroupControlCvaComponent implements OnInit, ControlValueAccessor {
  onChanged: any = () => {};
  onTouched: any = () => {};
  subscription!: Subscription;
  form = this.fb.group({
    firstName: [''],
    lastName: ['']
  })
  constructor(private fb: FormBuilder) { }

  ngOnInit(): void {
  }

  ngOnDestroy() {
    this.subscription.unsubscribe();
  }

  writeValue(value: any) {
		console.log(value);
    this.form?.setValue(value);
  }

  registerOnChange(fn: any) {
    this.onChanged = fn;
  }

  registerOnTouched(fn: any) {
    this.onTouched = fn;
  }

  validate(): ValidationErrors | null {
    return this.form.valid
      ? null
      : { invalidValue: 'group-control-cva error' };
  }
}
在 writeValue() 中加上 console.log 後可以看到,父层传递的数据是一个 object

除了传 object 之外还可以传 Array 进去,将 FormArray 写在 CVA Component 中,将 FormArray 的动态新增或删除 FormControl 都写在 CVA Componet 中,这样的话就算你的表单同时有 5, 6 个 FormArray 也不用担心会将最上层的 Component 写爆,因为对於最上层的 Component 来说他只是 FormControl,而他们各自的逻辑写在各自的 CVA Component 就好。
结论
本章介绍了如何使用 CVA Component 将庞大的表单项开发 Component 一样分成数个 CVA Component,在面对非常庞大的表单时就可以使用这种技巧,将每一个 FormControl 的逻辑写在自己的 CVA Component 中,这样对於维护还是测试都比较简单。
本章是介绍 Angular Form 的最後一章,明天将会介绍 Angular 中提供的一种方便的工具 i18n,在这个越来越发达的网路世界中,国际化网站会越来越多,所以 Angular 提供了 i18n 让我们可以开发支持多国语言的专案,详细的内容就留到明天讲解吧,那一样明天见罗
Redux流程 + 如何调用 redux 的 state
这篇会介绍的几种调用 redux state 的方式,都是工作上遇到的,算是长了知识,网路上也许会有...
[Day31] 完结篇 感动最终回 - 我与 ASP.NET Core 3 的 30天
终於接束三十天的挑战,一开始也算是蛮突然决定要参加这次的铁人赛。 不过也藉着这次机会更深入了解ASP...
Day-19: 咩啊抓产生假资料,让我们来使用factory_bot
因为专案做的是电商网站, 不免俗需要一些假资料, 所以在一个月做专案的期间也学会了, 如何做假资料,...
[Day30] 浅谈重构(refactoring)与两把刷子
铁人赛的最後一天,让我们先来简单的聊聊重构,这部分是笔者之前在看「大规模重构」这本书时整理的内容,目...
Day-29 请说明 RDBMS 和 NOSQL 是什麽?
传说中的资料库来了,我也不太熟,所以大家快来认识一下吧! 据说面试中有提到资料库就会考这题 RDB...