D13/ 怎麽做翻卡片的动画 - Animation Part 2 & GraphicsLayer
今天大概会聊到的范围
- Animation
- Modifier.graphicsLayer
上一篇讲到 Animation,今天想要拿 Animation 来实作看看。
再跑敏捷的过程中,常常需要举牌投点。我都会用 Scrum Time 这个 App 来进行。在这个 App 中,点数牌打开时有一个漂亮的翻牌动画。今天,我想用 Compose Animation 来试图达到一样的效果。

先做出牌面
在开始之前,我先做出基本的牌面
@Composable
fun CardBack() {
    Card(
        modifier = Modifier
            .aspectRatio(.65f)
            .defaultMinSize(minHeight = 60.dp),
        backgroundColor = Color.Blue,
        border = BorderStroke(width = 16.dp, color = Color.White)
    ) {

    }
}


@Composable
fun CardFront() {
    Card(
        contentColor = SpotiColor.Black,
        backgroundColor = Color.coverColor3,
        border = BorderStroke(width = 16.dp, color = Color.White),
        modifier = Modifier
            .aspectRatio(.65f)
            .defaultMinSize(minHeight = 60.dp)
    ) {
        Box(modifier = Modifier.fillMaxSize()) {
            Text(
                text = "Front",
                fontSize = 36.sp,
                fontWeight = FontWeight.Black,
                color = Color.White,
                textAlign = TextAlign.Center,
                modifier = Modifier.align(Alignment.Center)
            )
        }
    }
}
CardFront() |
CardBack() |
|---|---|
 |
 |
让牌视觉上有翻转效果
在动画之前,我想先了解如何让我的卡片“看起来”像是有翻转。
先说到旋转,最常见的旋转是绕着 Z 轴(垂直於萤幕平面的轴)旋转。我们可以透过 Modifier.rotate 来修饰元件达到这件事情。
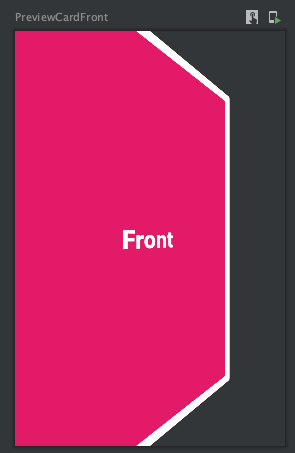
@Preview
@Composable
fun PreviewCardFront() {
    Box(modifier = Modifier.rotate(30f)) {
        CardFront()
    }
}

rotate 内部的实作,其实是透过另一个 Modifier graphicsLayer。
fun Modifier.rotate(degrees: Float) =
    if (degrees != 0f) graphicsLayer(rotationZ = degrees) else this
graphicsLayer 这个 modifier 可以对他修饰的 component 进行图形上的改动。例如放大缩小、旋转、形状与透明度。
fun Modifier.graphicsLayer(
    // 放大缩小
    scaleX: Float = 1f,
    scaleY: Float = 1f,
    // 透明度
    alpha: Float = 1f,
    // 位移
    translationX: Float = 0f,
    translationY: Float = 0f,
    // 阴影
    shadowElevation: Float = 0f,
    // 绕着不同轴旋转
    rotationX: Float = 0f,
    rotationY: Float = 0f,
    rotationZ: Float = 0f,
    cameraDistance: Float = DefaultCameraDistance,
    transformOrigin: TransformOrigin = TransformOrigin.Center,
    shape: Shape = RectangleShape,
    clip: Boolean = false,
    renderEffect: RenderEffect? = null
): Modifier
除了 rotate 外,Modifier.clip、Modifier.alpha 和 Modifier.scale 等 modifier 也都是对 graphicsLayer 的包装。
回到这次的目标,我们需要绕着 Y 轴选转我们的牌。因此,我们透过 graphicsLayer 并且设定 rotationY。
@Preview
@Composable
fun PreviewCardFront() {
    Box(modifier = Modifier.graphicsLayer(rotationY = 30f)) {
        CardFront()
    }
}
知道卡片该怎麽转之後,就可以开始来做动画了。
开始建构画面
// 背景
Box(
    modifier = Modifier
        .fillMaxSize()
        .background(color = darkBgColor)
) {
    // Card 包装
    Box(
        modifier = Modifier
            .fillMaxSize(.6f)
            .align(Alignment.Center)
    ) {
        CardFront()
    }
}
我希望在点击卡片後,卡片就会翻转。因此,在卡片上 ( Box 那一层 ) 增加一个 clickable 的 modifier。点击後,修改目前应该要是正面或反面的 state。
enum class CardState { Front, Back }


// in Composable
var state by remember { mutableStateOf(CardState.Front) }

// 背景
Box(
    modifier = Modifier
        .fillMaxSize()
        .background(color = darkBgColor)
) {
    // Card 包装
    Box(
        modifier = Modifier
            .fillMaxSize(.6f)
            .align(Alignment.Center)
            .clickable {
                state = when (state) {
                    CardState.Front -> CardState.Back
                    CardState.Back -> CardState.Front
                }
            }
    ) {
        CardFront()
    }
}
开始做动画
上次有提到,我们可以用 updateTransition 来将 state 转成 transition。可以透过同一个 transition 来控制不同动态的值。
var state by remember { mutableStateOf(CardState.Front) }

val flipTransition = updateTransition(targetState = state)

// 正面时不翻转,反面时翻转 180 度
val rotateY by flipTransition.animateFloat {
    when (it) {
        CardState.Front -> 0f
        CardState.Back -> 180f
    }
}

// 背景
Box(
    modifier = Modifier
        .fillMaxSize()
        .background(color = darkBgColor)
) {
    // Card 包装
    Box(
        modifier = Modifier
            .fillMaxSize(.75f)
            .align(Alignment.Center)
            .clickable {
                state = when (state) {
                    CardState.Front -> CardState.Back
                    CardState.Back -> CardState.Front
                }
            }
            .graphicsLayer {
                rotationY = rotateY       // <-- 使用 rotateY 这个参数当作 rotationY 的值
            }

    ) {
        CardFront()
    }
}

在翻转时,会发现卡的边边会被削掉。因为虚拟的 "摄影机" 和实际元件的距离短於卡片宽度的一半,导致卡片翻转时,卡片的边会超过虚拟摄影机的镜头。
当我们要做 rotationY / rotationX 时,都建议在 graphicsLayer 加上 cameraDistance,设定一个大於卡片宽度的距离。
.graphicsLayer {
    rotationY = rotateY
    cameraDistance = DefaultCameraDistance * density
}

因为要翻牌,我们希望卡片在翻到 90 度的时候,显示的内容由卡面换成卡背。这个部分我一样可以透过 ratateY 这个值来做判断
if (rotateY <= 90f) {
    CardFront()
} else {
    CardBack()
}

优化动画
到目前为止,翻转卡片的动画已经大致上完成。但是还想要改变几个部分:
- 反转的速度太快了
- 希望和 Scrum Timer 的效果类似,在翻转时稍微缩小卡片
在 transition 转成 animation 时,或是 animateXXXAsState 等 function 时,都可以加入 transitionSpec,transitionSpec 可以调整动画的影格对应到参数的变动速率。
val rotateY by flipTransition.animateFloat(
    transitionSpec = {
        tween(
            delayMillis = 50,
            durationMillis = 500,
            easing = LinearOutSlowInEasing
        )
    }
) {
    when (it) {
        CardState.Front -> 0f
        CardState.Back -> 180f
    }
}
常用的 spec 有:
-
spring:数值 A 到数值 B 的曲线会类似弹簧一样(可以设定弹力系数和力道),当力道强的时候会来回弹跳 -
tween:可以设定数值 A 到 B 的时间,并且透过 easing 设定数值变动的曲线 -
keyframes:设定每个关键影格所代表的值(以 ms 为单位) -
repeatable:数值会在 A B 之间不断重复,到某个固定的值。还有 infiniteRepeatable 可以无限重复 -
snap:会瞬间将数值 A 转变成数值 B

透过一样的概念,我们可以透过 transition 独立出另一个数值 scale。并且透过 keyframe 达到让 Scale 进行 大 > 小 > 大 的动画。
val scale by flipTransition.animateFloat(
    transitionSpec = {
        keyframes {
            durationMillis = 500
            .6f at 250 with LinearEasing
        }
    }
) {
    when (it) {
        CardState.Front -> 1f
        CardState.Back -> 1f
    }
}
keyframe 中,可以透过 <数值> at <影格 (ms)> with <easing> 来设定影格。start 会动画启动当下的值,end 会是 targetValue ( 後面提供的 lambda 所提供的值 )
.graphicsLayer {
    rotationY = rotateY
    cameraDistance = DefaultCameraDistance * density
    scaleX = scale
    scaleY = scale
}
最後,在 graphicsLayer 可以设定 scaleX、scaleY 依照 scale 这个值缩放

卡片翻转的动画就这样完成了!透过实作范例比较能了解复杂的 Animation 中各种工具的参数。今天的范例还是有很多部分没有接触到,未来也许可以再回头来看看。
Reference:
- https://developer.android.com/reference/kotlin/androidx/compose/ui/graphics/package-summary#(androidx.compose.ui.Modifier).graphicsLayer(kotlin.Function1)
- https://developer.android.com/jetpack/compose/animation
- How to make FlipCard animation in Jetpack compose - Stack Overflow
>>: [Day 13] -『 GO语言学习笔记』- 核心型别(I)
资安学习路上-picoCTF 解题(General) 1
最近开始打CTF,决定从最简单的picoCTF 开始,有解决一些题目,觉得有几题蛮有趣的想插播跟大家...
Day 15 知识地图
画出一张属於自己的学习地图,只有知道自己身在何处,才不会迷路。你必须知道这项学习的终点,该拥有什麽样...
电子书阅读器上的浏览器 [Day02] 开发原则
开发原则主要有三点:1. 减少画面重绘次数, 2. 缩小重绘范围, 3. 提高画面元件对比度 减少...
【4】实验 Batch size大小对训练模型的影响
Colab连结 相信每个人在学习ML时,都会遇到超参数 Batch size 应该要设置多少才好的问...
Day-8 Geeker 们最爱的工程型怀旧游戏神器 OSSC
如果要把怀旧玩家分种类、我想我会分成以下三种。 玩家、这类型的人以游戏为主、不一定会在乎用什麽方式玩...