Day 22.5 | Livewire 实作 购物网站: 建立资料表
本来预计都写在 Day22 的,但是加上本篇内容後会让一天的篇幅太长,且考虑到有些夥伴可能没有建立资料表的需求。因此资料建立方面独立开一篇来做解说,之後的内容接续本篇 Day 22 | Livewire 实作 购物网站(一): 建立商品列表
建立资料表
首先要来规划资料表,以下先设想几个栏位:
| 栏位名称 | 型态 | 允许空值 | 说明 |
|---|---|---|---|
| name | varchar | x | 商品名称 |
| price | integer | x | 商品价格 |
| slogan | varchar | v | 广告标语 |
| specs | text | v | 商品规格 |
| content | text | v | 商品内容 |
| image_url | varchar | v | 图片网址 |
大致想好後透过 migration 来建立资料表:
php artisan make:migration create_goods_table
透过指令建立迁移档後可以到 /database/migrations 下找到刚刚新增的档案,档名类似这样 2021_09_24_161700_create_goods_table.php 前面会带有建立的时间戳,接着照刚刚个规划来编辑迁移档的内容:
...

public function up()
{
    Schema::create('goods', function (Blueprint $table) {
        $table->id();
        $table->string('name')->comment('商品名称');
        $table->integer('price')->comment('商品价格');
        $table->string('slogan')->nullable()->comment('广告标语');
        $table->text('specs')->nullable()->comment('商品规格');
        $table->text('content')->nullable()->comment('商品内容');
        $table->string('image_url')->nullable()->comment('商品图片网址');
        $table->timestamps();
    });
}

...
编辑完成後再透过指令就能靠迁移档来开资料表啦!
php artisan migrate
别忘记建立 Model!
php artisan make:model Good
Model 中要新增可被填写的资料栏位:
class Good extends Model
{
    use HasFactory;

    protected $fillable = [
        'name',
        'price',
        'slogan',
        'specs',
        'content',
        'image_url',
    ];
}
建立资料
有了资料表就差资料了,在 Laravel 我们能很方便的透过 Factory 来建立大量资料,但这样会增加学习成本,平时不做测试也不会用到,因此这边就不教各位怎麽用 Factory 加 Faker 来建立假的资料,有兴趣的夥伴可以自行 Google。
还是照往常一样,我们用 Livewire 能很快的刻出一个表单输入。这里就顺便在练个手,熟悉一下操作吧!
php artisan make:livewire Shopping/CreateItem
记得加到 routes 中才找得到页面哦
Route::get('/shopping-create', App\Http\Livewire\Shopping\CreateItem::class);
因为知道後端要哪些东西了,这次就从後端先做:
<?php

namespace App\Http\Livewire\Shopping;

use Livewire\Component;
use App\Models\Good;

class CreateItem extends Component
{
    // 宣告到时候 Input 会用到的栏位
    public $name;
    public $price;
    public $slogan;
    public $specs;
    public $content;

    // 验证必填栏位
    protected $rules = [
        'name' => 'required|min:3',
        'price' => 'required|integer',
    ];

    public function render()
    {
        return view('livewire.shopping.create-item');
    }

    //
    // 建立商品
    public function createItem()
    {
        $this->validate();

        Good::create([
            'name' => $this->name,
            'price' => $this->price,
            'slogan' => $this->slogan,
            'specs' => $this->specs,
            'content' => $this->content,
        ]);

        // 完成後清除
        $this->name = '';
        $this->price = '';
        $this->slogan = '';
        $this->specs = '';
        $this->content = '';

        // 通知页面已新增
        $this->emit('created');
    }
}
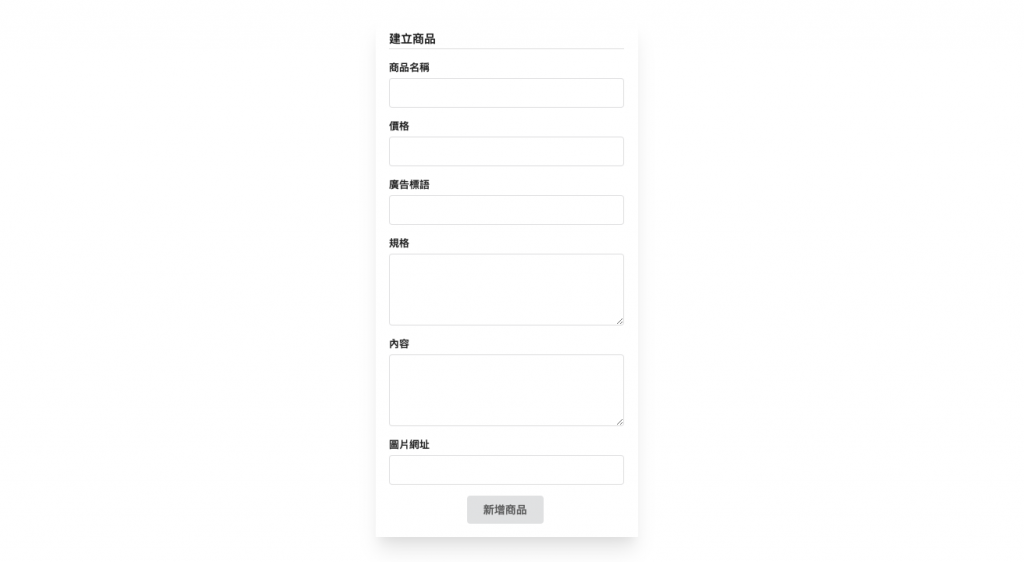
之後就是前端页面啦
<div class="mx-2 mt-2 flex justify-center">
    <div class="ui form my-5 w-96 shadow-xl p-5">
        <h4 class="ui dividing header mb-2">建立商品</h4>
        <div class="field">
            <label>商品名称</label>
            <input type="text" wire:model.defer="name">
            @error('name')<span class="text-red-500">{{ $message }}</span>@enderror
        </div>
        <div class="field">
            <label>价格</label>
            <input type="text" wire:model.defer="price">
            @error('price')<span class="text-red-500">{{ $message }}</span>@enderror
        </div>
        <div class="field">
            <label>广告标语</label>
            <input type="text" wire:model.defer="slogan">
        </div>
        <div class="field">
            <label>规格</label>
            <textarea rows="4" wire:model.defer="specs"></textarea>
        </div>
        <div class="field">
            <label>内容</label>
            <textarea rows="4" wire:model.defer="content"></textarea>
        </div>
        <div class="field">
            <label>图片网址</label>
            <input type="text" wire:model.defer="image_url">
        </div>
        <div class="text-center">
            <button class="ui button" wire:click="createItem">新增商品</button>
        </div>
    </div>
</div>

<!-- 接收来自後端的 $emit('created') -->
@section('scripts')
<script>
    Livewire.on('created', () => {
        alert('商品建立完成!')
    })
</script>
@endsection
如果要加上上传图片的功能会更复杂,这边用直接填入图片网址代替,至於图片来源可以直接从免费图库复制网址来当假资料使用!

这麽一来就能新增商品了呢!
【25】ReLU 家族评比 个别使用ReLU LeakyReLU PReLU SELU 来训练
Colab连结 今天要来实验不同的 ReLU 家族的评比,挑战者有 基本 ReLU 尾巴翘起来的 L...
CSS微动画 - Loading来了!七彩霓虹灯
Q: 今天叫醒你的是什麽? A: 是迷糊中醒来後,看到草稿不见的震撼(✘﹏✘ა) 继上一篇 Loa...
Day 30 工作排程与打包
30天的旅程就要在这边画上句点罗~ 今天的影片内容为介绍两个实用的辅助工具—工作排程器与pyinst...
Day-10 heap与heap sort
Heap Heap(堆积)是一个阵列,可以把它看作类似完全二元树(也就是按照顺序排放的树)。 p.s...
食谱搜寻系统未来展望
小白食谱搜寻系统缺点 (要说缺点真的是一大堆) 属性不足 : 最大的缺点就是在食材、调味料和做法的栏...