电子书阅读器上的浏览器 [Day23] 双视窗可拖拉调整大小元件
在 Day 21 显示 Google Translate 网页翻译内容时,画面呈现的作法是很单纯的新增一个 LinearLayout,把原先的 WebView 和新增的翻译结果 WebView 各占一半地放在里面。这个作法虽然在开发上很快,但是如果想要让画面更有弹性的话,就不是那麽合适了。
针对翻译网页的显示,接下来有两个想要改善的地方:
- 两个网页画面的比例可以按照使用者需求调整大小 → 希望有个 drag handler 在画面中间,让使用者自行拖拉,改变画面大小。
- 目前预设双画面的呈现方式是原
WebView在左边,新增的WebView在右边。希望有机会让使用者切换翻译结果是在左边或右边;甚至,可以把两个WebView切换成上下的关系!
为了要达成上述的功能,如果硬是要在目前的架构中把更多的逻辑塞进去,只会让程序码混杂着画面变化的逻辑和翻译操作的逻辑。
所以,我另外开发了一个 UI 元件 -- TwoPaneLayout,专门处理这种两个画面的 customized container。开发者只要把想要的 UI 元件放进去就好,至於中间的 drag handler,怎麽放怎麽移动;画面要水平切割或垂直切割,都会由这个 container 内部实作。
这一篇就来介绍一下这个 TwoPaneLayout 的架构和实作方式。
TwoPaneLayout
首先,我建立了一个 TwoPaneLayout 的 class,继承自 FrameLayout。
在 Android 中如果要开发一个 class 继承自 View,以 Kotlin 开发的话可以用下面的写法,把传统的三个 constructor 都涵盖到:
class TwoPaneLayout : FrameLayout {
    @JvmOverloads
    constructor(
            context: Context,
            attrs: AttributeSet? = null,
            defStyleAttr: Int = 0
    ) : super(context, attrs, defStyleAttr) {
        initAttributes(attrs)

        initDragHandle()
        doOnLayout { initViews() }
    ...
	  }
}
initAttributes() 是处理这个 Custom View 特有的属性。待会儿下面会有更多的说明。
initViews() 被包在 doOnLayout 中的原因是:初始化 View 时会需要知道元件被赋予的宽跟高,所以得先等 onLayout 完成後才拿得到。
版面配置
画面中两个视窗的内容是需要使用者自己设定进来的,所以没有办法一开始预先建立。但是为了让画面可以调整大小,TwoPaneLayout 中要显示一个可以拖拉的元件才行;另外,在没有拖拉时,为了避免画面两侧的边界不是很明显,我还加了一条浅浅的线在中间,让使用者稍微看得出来两者间的界线。这两个元件都是事先产生好的。为此,我建了一个 two_pane_layout.xml
<?xml version="1.0" encoding="utf-8"?>
<merge xmlns:android="http://schemas.android.com/apk/res/android"
    android:layout_width="match_parent"
    android:layout_height="match_parent">

    <View
        android:id="@+id/separator"
        android:layout_width="1px"
        android:layout_height="match_parent"
        android:background="?attr/colorControlNormal" />
    <View
        android:id="@+id/floating_line"
        android:layout_width="2dp"
        android:layout_height="match_parent"
        android:visibility="gone"
        android:background="?attr/colorControlNormal" />
    <View
        android:id="@+id/drag_handle"
        android:layout_width="12dp"
        android:layout_height="50dp"
        android:layout_centerVertical="true"
        android:layout_marginStart="-6dp"
        android:layout_marginTop="-25dp"
        android:paddingHorizontal="12dp"
        android:visibility="gone"
        android:alpha="0.3"
        android:background="?attr/colorControlNormal" />
</merge>
id drag_handle 的 View 是一个长长的方块,平常时它的透明度是 30%。一旦使用者开始拖拉它,我会将它以及 id floating_line 的 View (一条线) 都调整成全黑的,让使用者感觉到拖拉是有作用的。
新增专用的 View 属性
这在网路上找得到的 Custom View 教学中都会看到怎麽新增。一般会是在 values/attr.xml 中加入自定义的 declare-styleable element。以下是我针对 TwoPaneLayout 想要提供的参数加入的内容:
<resources>
    <declare-styleable name="TwoPaneLayout">
        <attr name="show_second_pane" format="boolean"/>
        <attr name="drag_resize" format="boolean"/>
        <attr name="orientation">
            <enum name="vertical" value="0" />
            <enum name="horizontal" value="1" />
        </attr>
    </declare-styleable>
</resources>
-
show_second_pane: 当画面建立时,是不是直接显示第二个视窗 -
drag_resize:当拖拉 drag handler 时,是不是即时更新画面大小 (在电子纸的情况下,会需要关闭这功能,避免画面一直闪), 还是等手放开时才更新。 -
orientation:要垂直切割画面,还是横向切割。
这些参数建立好後,在实际使用 TwoPaneLayout 时就可以在 layout xml 中指定想要的初始值。范例如下:
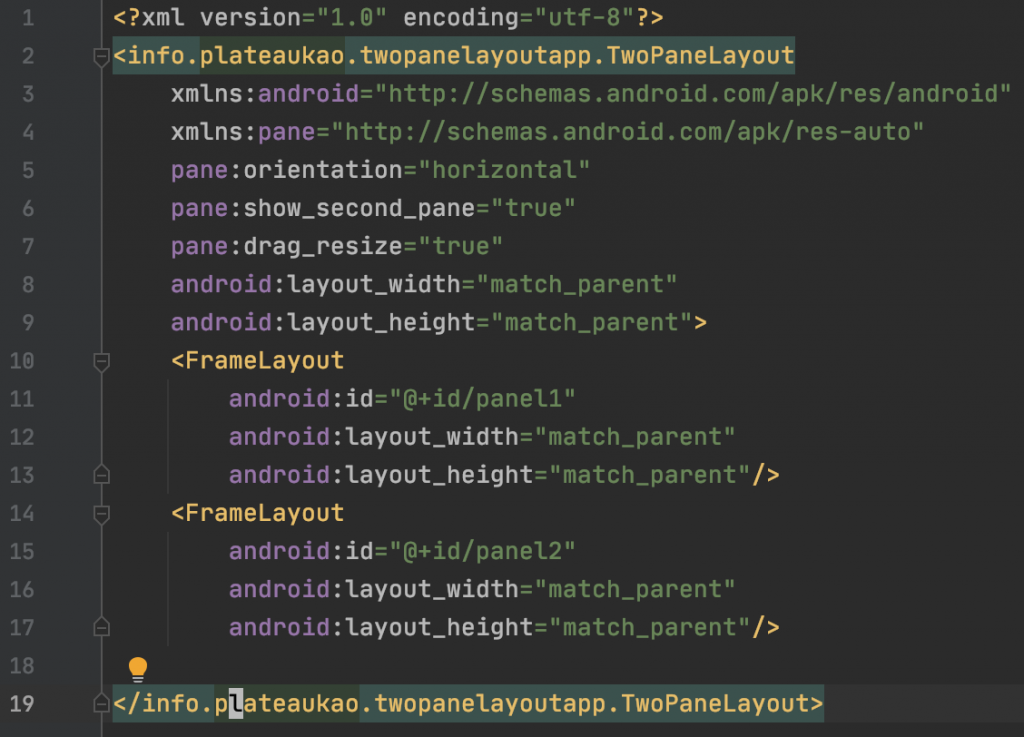
上面的 layout 会建立一个双视窗的画面,预设第二个画面也会显示,切割方式是横向的(会产生左右两个画面,左边是 panel1 ,右边是 panel2);在拖拉时,画面大小会即时更新。
读取 attrs.xml 定义好的参数
刚刚在程序码 I 中的第 23 行有看到,初始化 TwoPaneLayout 时,会顺便把 layout xml 中设定的参数都读进来。
    private fun initAttributes(attrs: AttributeSet?) {
        attrs ?: return

        val attributeValues = context.obtainStyledAttributes(attrs, R.styleable.TwoPaneLayout)
        with(attributeValues) {
            try {
                shouldShowSecondPane = getBoolean(R.styleable.TwoPaneLayout_show_second_pane, false)
                orientation = Orientation.values()[getInt(R.styleable.TwoPaneLayout_orientation, Orientation.Horizontal.ordinal)]
                dragResize = getBoolean(R.styleable.TwoPaneLayout_drag_resize, false)
            } catch (ex: Exception) {
                // TwoPaneLayout configuration error
                Log.d("TwoPaneLayout", ex.toString())
            } finally {
                recycle()
            }
        }
    }
将 xml 中的参数读出来变成一包资料,再利用 getBoolean(), getInt() 等方式将它们转成 class 中的变数以供後续初始化的执行。
功能实作
接下来会稍微说明一下各个功能是如何实作出来的。一样一样来看的话,其实都不会太复杂。
显示/隐藏第二个视窗
为了要做到显示或隐藏第二个视窗,我们要先找出使用者塞进来的两个 View。这件事是实作在 initView() 中:
    private fun initViews() {
        val userAddedViews = children.iterator().asSequence()
        .filter { // line 119
            !listOf(separator, floatingLine, dragHandle).contains(it)
        }.toList()

        if (userAddedViews.size != 2) {
            // print errors
        }

        panel1 = userAddedViews[0]
        panel2 = userAddedViews[1]
        subPanel = panel2

        ...

        updatePanels()
    }
在讲解 layout 时有提到,我们会事先建好分隔线(separator),拖拉长方块(dragHandle),所以只要把事前建好的这些 View 排除掉(第 119 行),剩下的两个 View 就(应该)是使用者塞进来的两个元件。如果数量不是 2 的话,那就天下大乱了,因为目前我没有做任何错误处理。
将这两个 View 分别记入 panel1 和 panel2 参数,便可以根据刚刚读来的 shouldShowSecondPane 值决定是否显示。
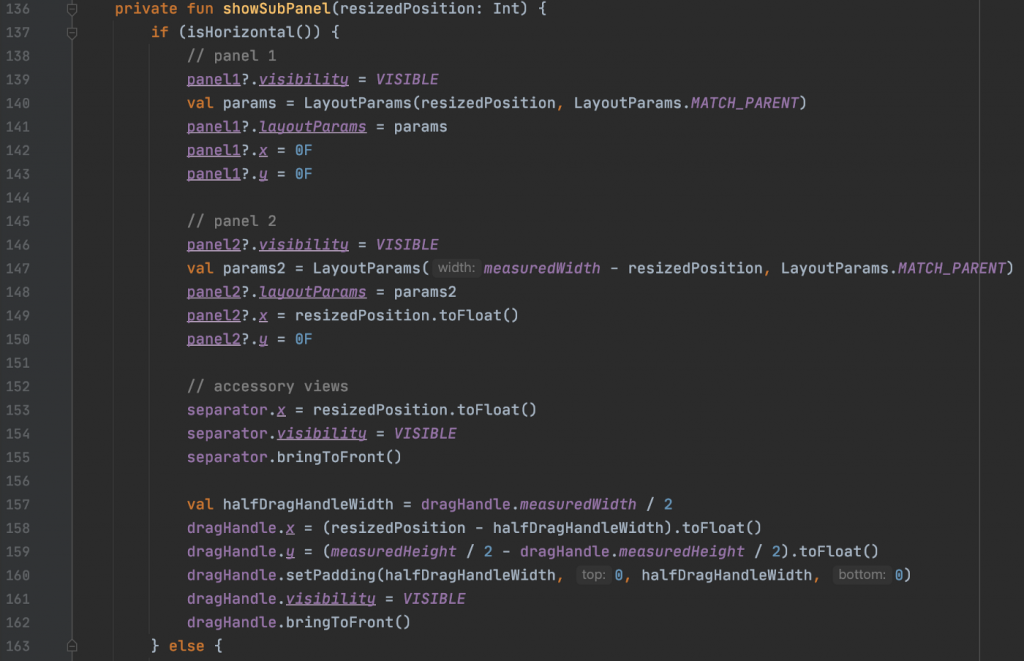
如果要显示的话,panel 1 和 pane2 的大小在一开始会先各分一半画面的宽度(横向的情况)。緃向的话,则是各分一半画面的高度(第163行,省略)。由於画面的分割位置会随着拖拉後有所改变,所以 showSubPanel 需要代入目前调整後的位置。
拖拉後调整画面大小
这部分是整篇文章的精华。在长方块(drag Handler) 被拖拉时,会收到 Touch 相关 event。针对这些 event 我们要记录下来相关的变化,然後反应到画面上。
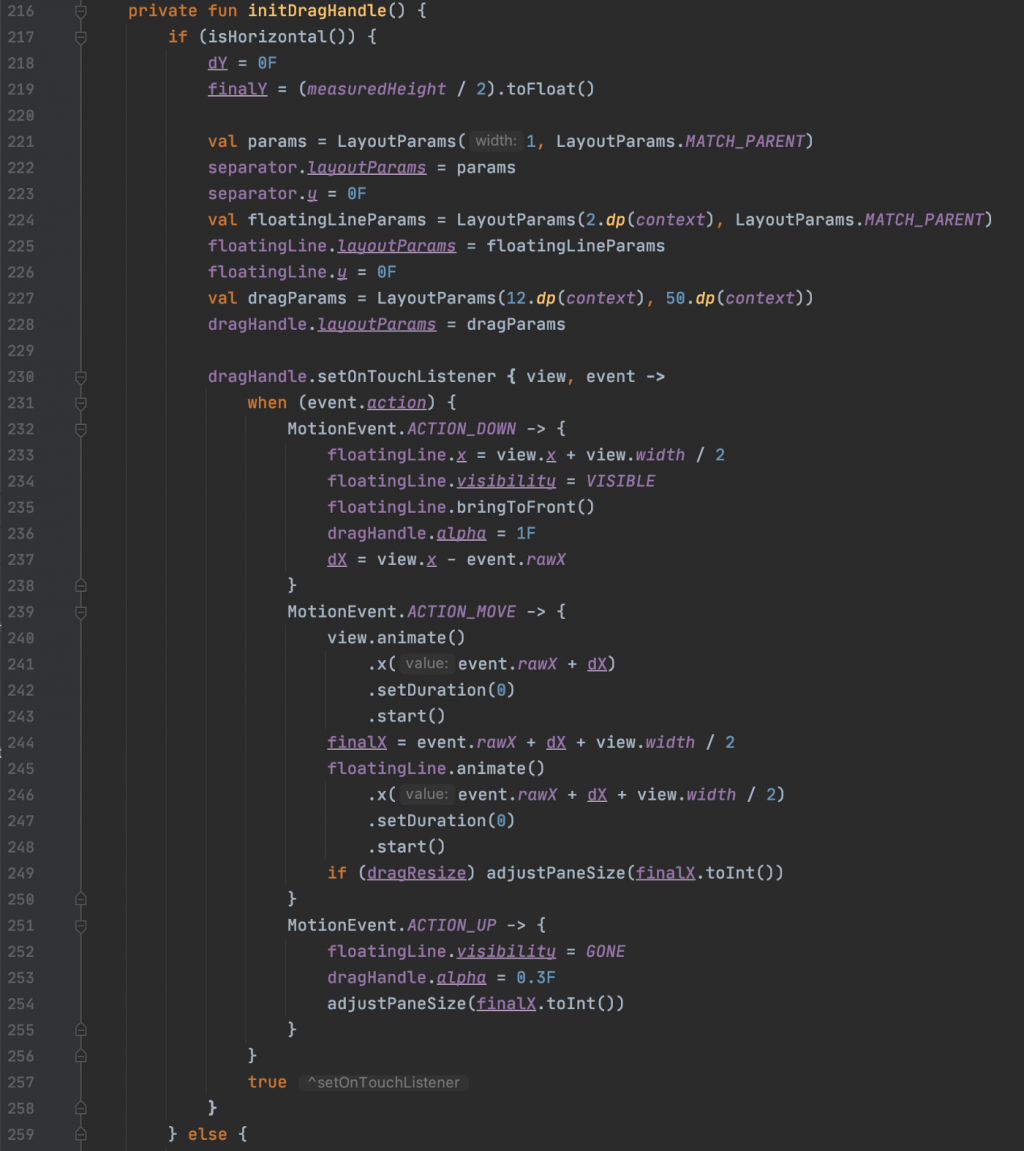
这边一样是以横向的例子来说明。第 221 行到 228 行会先将分隔线和拖拉长方块初始化。在横向时,长方块要是直的,分隔线也要直的;在緃向时,长方块要是横的,分隔线也要是横的。
第 230 行开始,实作 dragHandler 的 TouchListener。当收到 ACTION_DOWN 时,长方块要变成全黑的;接着,不断收到 ACTION_MOVE 时,要调整 drag Handler 的位置和 finalX 的值。如果 dragSize 是设定为 true 的话,便要直接调整画面大小(第 249 行)。当最後收到 ACTION_UP ,使用者手离开画面时,再调整一次画面大小(第 254 行).
切换画面切割方向
这功能的实作很单纯,把 orientation 值换掉,再重新初始化就行了。
    fun setOrientation(orientation: Orientation) {
        if (this.orientation != orientation) {
            this.orientation = orientation
            initDragHandle()
            binding.root.requestLayout()
            this.requestLayout()
            this.doOnLayout { initViews() }
        }
    }
切换两个画面的位置
这只要把 panel1 和 panel2 对调就行。
    fun switchPanels() {
        // replace view position
        val tempPanel = panel1
        panel1 = panel2
        panel2 = tempPanel

        updatePanels()
    }
套用到 browser App 中
在 browser 中,预设是不会开启全文翻译画面,而且在拖拉时,不要即时更新画面。所以在 xml 中是这麽写的:
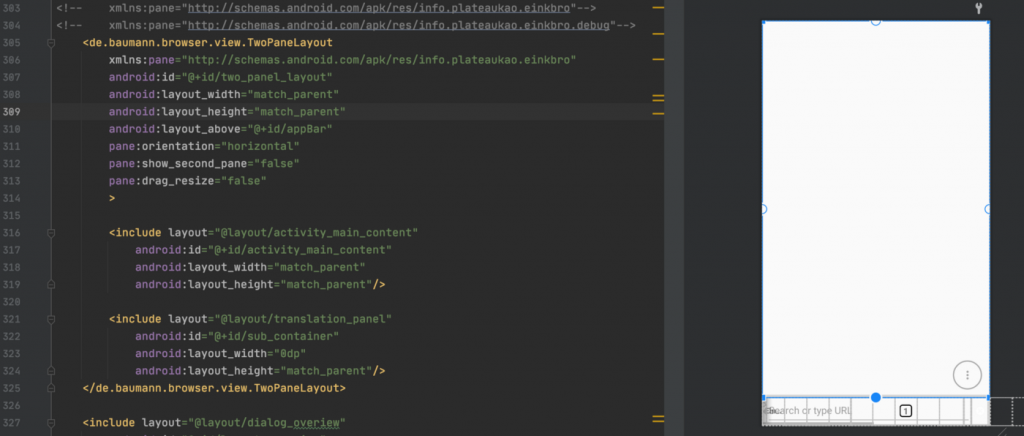
第 316 行和 321 行分别是显示网页的 WebView 和负责全文翻译的另一个 WebView (和翻译时需要的一些小按钮)。
另外,跟翻译相关的逻辑全部都写在一个 TranslationViewController 中。从它的 constructor 可以看到,我们传入了 TwoPaneLayout 。
class TranslationViewController(
    private val activity: Activity,
    private val translationViewBinding: TranslationPanelBinding,
    private val twoPaneLayout: TwoPaneLayout,
    private val showTranslationAction: () -> Unit,
    private val onTranslationClosed: () -> Unit,
    private val loadTranslationUrl: (String) -> Unit
) {
在收到要全文翻译的需求时,TranslationViewController 会去做一大堆事情,然後利用 TwoPaneLayout 显示负责翻译的 WebView (第94行)。
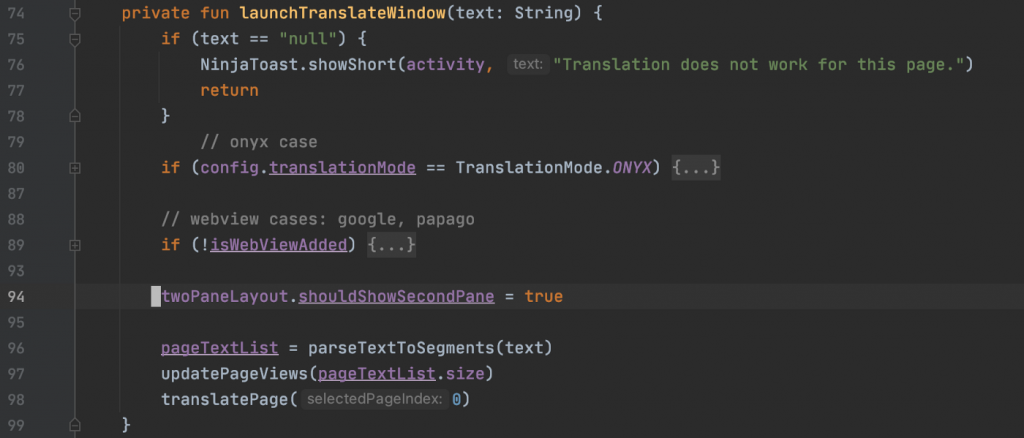
在 TwoPaneLayout 中,这个参数在被赋值时,会同时更新画面:
    var shouldShowSecondPane = false
        set(value) {
            field = value
            updatePanels()
        }
示范影片
到这里,关於 TwoPaneLayout 的实作,以及它的应用就都说明完了。下面是它在 browser 中操作的效果。(为了显示 drag and resize 的功能,我特地编译了一版是会即时更新的版本)
参考原始码版本
https://github.com/plateaukao/browser/releases/tag/v8.11.0
<<: 全端入门Day23_後端程序撰写之多一点的Node.js
Day-13 观念补遗:TDZ与全域变数
在先前的『Day-06 始於足下:基本语法、陈述句与宣告』一文中,曾经介绍JavaScript的不同...
分散式资料库:New SQL
分散式资料库可以依据资料模型及系统架构分类; OLAP(On-Line Analytical Pro...
[Day 30] Partitioning (4) - Request Routing & 结论
Request Routing partitioning 的最後一个段落想讲的问题:如果我想写入或读...
课堂笔记 - 深度学习 Deep Learning (15)
梯度下降的常见算法 (SGD) Stochastic Gradient Descent Algori...
Day14:全端工程师的工作内容?(上)
一、前言 因为我待的是较小型的接案公司,基本上全端工程师的工作几乎全包,从投标、接案、访谈客户需...