Day 22 - Follow Along Links
前言
JS 30 是由加拿大的全端工程师 Wes Bos 免费提供的 JavaScript 简单应用课程,课程主打 No Frameworks、No Compilers、No Libraries、No Boilerplate 在30天的30部教学影片里,建立30个JavaScript的有趣小东西。
另外,Wes Bos 也很无私地在 Github 上公开了所有 JS 30 课程的程序码,有兴趣的话可以去 fork 或下载。
本日目标
当滑鼠移入<a>所代表的连结时,快速移动一个白框,产生文字背景为白底的聚光灯效果。

解析程序码
HTML 部分
总共分成两个部分,一个是上方的导览列(.menu),另一个是放置众多文字段落和连结的容器(.wrapper)。
<nav>
    <ul class="menu">
        <li><a href="">Home</a></li>
        <li><a href="">Order Status</a></li>
        <li><a href="">Tweets</a></li>
        <li><a href="">Read Our History</a></li>
        <li><a href="">Contact Us</a></li>
    </ul>
</nav>

<div class="wrapper">
    <p>Lorem ipsum dolor sit amet, <a href="">consectetur</a> adipisicing elit. Est <a href="">explicabo</a> unde natus necessitatibus esse obcaecati distinctio, aut itaque, qui vitae!</p>
    <p>Aspernatur sapiente quae sint <a href="">soluta</a> modi, atque praesentium laborum pariatur earum <a href="">quaerat</a> cupiditate consequuntur facilis ullam dignissimos, aperiam quam veniam.</p>
    <p>Cum ipsam quod, incidunt sit ex <a href="">tempore</a> placeat maxime <a href="">corrupti</a> possimus <a href="">veritatis</a> ipsum fugit recusandae est doloremque? Hic, <a href="">quibusdam</a>, nulla.</p>
    <p>Esse quibusdam, ad, ducimus cupiditate <a href="">nulla</a>, quae magni odit <a href="">totam</a> ut consequatur eveniet sunt quam provident sapiente dicta neque quod.</p>
    <p>Aliquam <a href="">dicta</a> sequi culpa fugiat <a href="">consequuntur</a> pariatur optio ad minima, maxime <a href="">odio</a>, distinctio magni impedit tempore enim repellendus <a href="">repudiandae</a> quas!</p>
</div>
在这边先破梗一下,类似聚光灯的白底效果,其实是靠在文件上新增一个<span>来达成。
CSS 部分
这次的 CSS 很重要,需要稍微说明一下。
.highlight 这个 class 选择器,是要用来加到前面说的那个<span>。
在滑鼠移动到<a>元素里面的时候,我们会利用 JS 取得<a>元素的宽、高,还有元素离视窗上方(top)、左方的距离(left),让<span>的宽、高和目前所在的<a>元素一致且因为设定<span>的position: absolute;,所以可以利用取得的top、left,令<span>和<a>贴在一起。
为避免<span>贴到和<a>同一个位置造成覆盖,我们把z-index设为-1,让<a>在上层而<span>在下层,最後设定background: white;,此时会发现<span>完全变成<a>的背景了呢~
.highlight {
  transition: all 0.2s;
  border-bottom: 2px solid white;
  position: absolute;
  top: 0;
  background: white;
  left: 0;
  z-index: -1;
  border-radius: 20px;
  display: block;
  box-shadow: 0 0 10px rgba(0,0,0,0.2);
}
JS 部分
宣告常数triggerts用来放置所有取得的<a>元素(NodeList)。
宣告常数highlight用来放置我们建立的<span>元素。
const triggers = document.querySelectorAll('a');
const highlight = document.createElement('span');
把.highlight这个 CSS class 选择器套用到新建的<span>元素,然後将其加入到body里面
highlight.classList.add('highlight');
document.body.append(highlight);
我们希望在移入<a>时触发事件处理函式highlightlink(),所以利用forEach()在每个<a>上注册mouseenter event listener。
function highlightLink(){}

triggers.forEach(trigger => trigger.addEventListener('mouseenter',highlightLink));
在事件处理函式highlightLink()里,我们首先要做的就是取得先前提到滑鼠移入的那个<a>标签的宽、高和它离视窗上方(top)、左方(left)的距离。
function highlightLink(){
      const linkCoords = this.getBoundingClientRect();
      console.log(linkCoords);
}
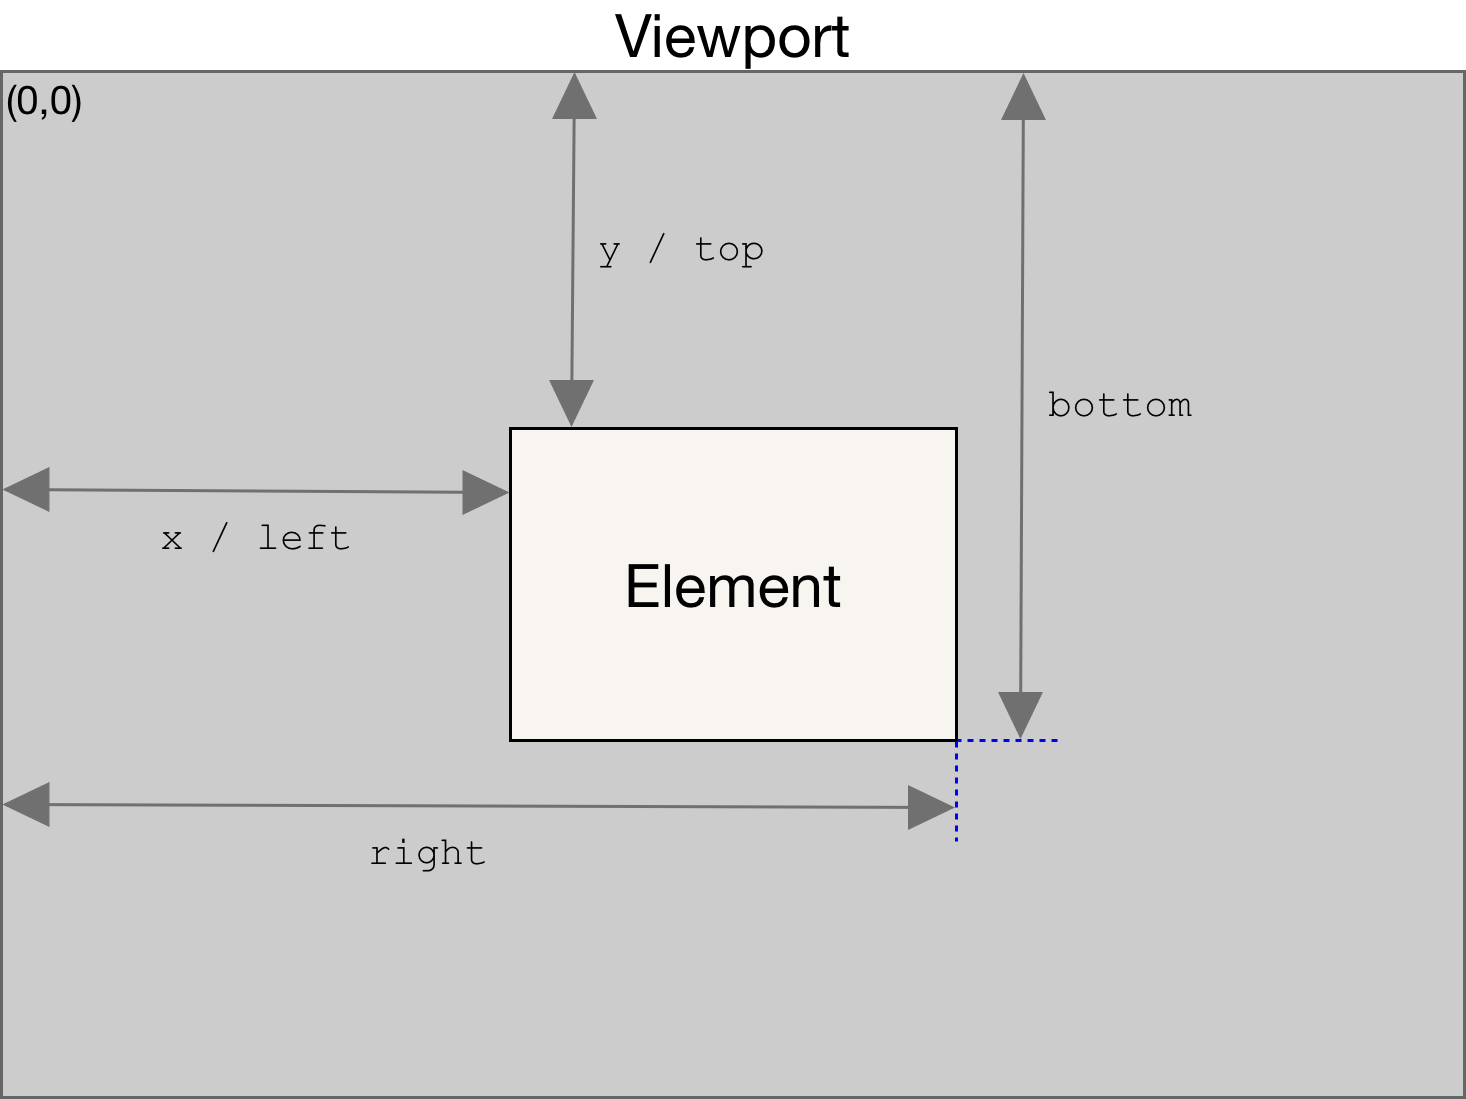
Element.getBoundingClientRect() :
这个方法会回传一个DOMRect物件,DOMRect本身是一个可以包住该元素的最小方形(包含padding、borderWidth),而从这个物件可以得知呼叫元素的width、height、left、top、bottom等等...。
接下来,我们依序指定<span>元素的宽高和位置,让它的宽高和位置与滑鼠移入的<a>相同。(一定要记得加上单位喔!)
function highlightLink(){
    /*上略...*/
    highlight.style.width = `${linkCoords.width}px`;
    highlight.style.height = `${linkCoords.height}px`;
    highlight.style.top = `${linkCoords.top}px`;
    highlight.style.left = `${linkCoords.left}px`;
}
嗯,看起来还蛮正常的落在soluta。

(卷轴往下拉) 滑鼠一样移到soluta,但<span>却浮在更上面的位置。

会有这样的问题出现是因为DOMRect始终是以初始视窗的左上角计算元素的top和left,当我们把卷轴往下拉,它的位置没有加上卷轴的移动量,自然就会出现在较上方的位置。
下面我们对left、top进行修正,分别加上x和y方向的卷轴移动量,这样就完成了。
function highlightLink(){
    /*上略...*/
    highlight.style.width = `${linkCoords.width}px`;
    highlight.style.height = `${linkCoords.height}px`;
    highlight.style.top = `${linkCoords.top + window.scrollY}px`;
    highlight.style.left = `${linkCoords.left + window.scrollX}px`;
}
当然我们也可以把这些属性值都写到一个物件里,再个别呼叫物件属性。
function highlightLink(){
    /*上略...*/
    const coords = {
        width: linkCoords.width,
        height: linkCoords.height,
        top: linkCoords.top + window.scrollY,
        left: linkCoords.left + window.scrollX
    }

    highlight.style.width = `${coords.width}px`;
    highlight.style.height = `${coords.height}px`;
    highlight.style.top = `${coords.top}px`;
    highlight.style.left = `${coords.left}px`;

}
补充资料:
Element.getBoundingClientRect()
DOMRect
今天的内容也相对简单,相信大家都可以轻松愉快的学习~
范例网页请点此
>>: 【Day 07】- 第一只网路爬虫要用什麽函式库? (Requests)
Docker:Docker Hub Pull 流程
什麽是Docker Hub? 就如GitHub一样,只是Docker Hub是一个存放Docker ...
[MySQL] MySQL重置密码及修改密码
此文章记录在Linux上 MySQL重制密码及修改密码方式 一、 重置密码 使用指令找到MySQL读...
【Day11】动态型别
JavaScript 是动态型别的程序语言,指的是变数的型别是可以更换的, 而 JavaScript...
Day15:全端工程师的工作内容?(下)
一、前言 上一篇文章有提到我现职公司中全端工程师的工作项目大纲,这篇就我个人日常上班中比较常做、...
Vue CLI安装
前面都使引用CDN的script标签去使用Vue.js,今天要介绍的是用NPM去安装vue-cli ...