Day7 用python写UI-聊聊标签Label方法(二)
今天要主要会介绍几个 widget 的共通方法,後面的部分会介绍如何在介面上加上图片还有其他几个实用的方法~
♠♣今天的文章大纲♥♦
- widget的共通方法
- 如何将影像放到介面上
widget的共通方法
-
config()
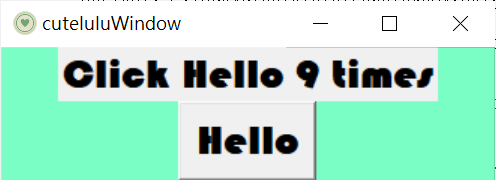
首先,定义一个按钮函数 clickHello(),处理 Hello 按键被按次数,用全域变数 count,记录 Hello 按键被按次数,count 会随着 Hello 被按次数增加,且透过呼叫元件 config() 函数更改标签元件的文字内容
import tkinter as tk
root = tk.Tk()
root.title('cuteluluWindow')
root.configure(bg="#7AFEC6")
root.iconbitmap('heart_green.ico')
text=tk.Label(root, text="Hello\@^0^@/",font=("Bauhaus 93",20,"bold"))

count=0
def clickHello():
    global count
    count=count + 1
    text.config(text="Click Hello " + str(count) + " times")
B=tk.Button(root, text="Hello", command=clickHello,font=("Bauhaus 93",20,"bold"))

text.pack()
B.pack()

root.mainloop()
下图为执行结果⬇⬇⬇
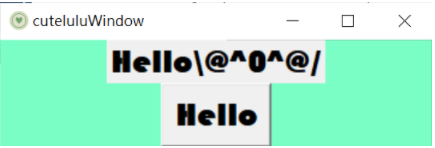
按按钮後会自行加总:
-
keys()
用串列list回传widget所有的参数
import tkinter as tk
root = tk.Tk()

root.title('cuteluluWindow')
root.configure(bg="#7AFEC6")
root.iconbitmap('heart_green.ico')
text=tk.Label(root, text='I am Label',
              font="Times 25 bold")
text.pack()
print(type(text))

print(text.keys()) #回传参数

root.mainloop()
下图为执行结果⬇⬇⬇

-
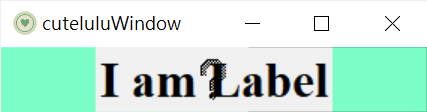
wraplength()
设定文字在多少像素後自动换行
import tkinter as tk
root = tk.Tk()

root.title('cuteluluWindow')
root.configure(bg="#7AFEC6")
root.iconbitmap('heart_green.ico')
text=tk.Label(root, text='I am Label',
              font="Times 25 bold",
              wraplength=40) #40像素後自动换行

text.pack()


root.mainloop()
下图为执行结果⬇⬇⬇

-
justify 参数
设定标签内容是靠左、置中还是靠右,预设是置中
import tkinter as tk
root = tk.Tk()

root.title('cuteluluWindow')
root.configure(bg="#7AFEC6")
root.iconbitmap('heart_green.ico')
text=tk.Label(root, text='I am Label',
              font="Times 25 bold",
              wraplength=40,
              justify="right") #文字靠右

text.pack()


root.mainloop()
下图为执行结果⬇⬇⬇

-
compound()参数
同时有图像与文字时,定义图像与文字的位置
left:图在文字左侧
right:图在文字右侧
top:图在文字上面
bottom:图在文字下方面
center:文字覆盖在图像上
import tkinter as tk
root = tk.Tk()

root.title('cuteluluWindow')
root.configure(bg="#7AFEC6")
root.iconbitmap('heart_green.ico')
text=tk.Label(root, text='I am Label',
              font="Times 25 bold",
              bitmap="question",
              compound="center")

text.pack()


root.mainloop()
下图为执行结果⬇⬇⬇
-
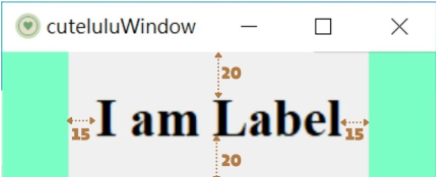
padx/pady
padx:设定标签文字左右的边界与标签区间的x轴间距离
pady:设定标签文字上下的边界与标签区间的y轴间距离
import tkinter as tk
root = tk.Tk()

root.title('cuteluluWindow')
root.configure(bg="#7AFEC6")
root.iconbitmap('heart_green.ico')
text=tk.Label(root, text='I am Label',
              font="Times 25 bold",
              padx=15,pady=20) #左右间隔5,上下间隔10

text.pack()


root.mainloop()
下图为执行结果⬇⬇⬇
如何将影像放到介面上
-
在Python中使用Label组件加入Gif动态图片
imageobj=PhotoImage(file=”xxx.gif”)
import tkinter as tk
root = tk.Tk()

root.title('cuteluluWindow')
root.configure(bg="#7AFEC6")
root.iconbitmap('heart_green.ico')

gif=tk.PhotoImage(file="7.gif")
text=tk.Label(root,image=gif)
text.pack()

root.mainloop()
下图为执行结果⬇⬇⬇

-
在Python中使用Label组件加入Jpg图片
首先必须要用PIL的Image模组跟Image Tk模组
from PIL import Image,ImageTk
import tkinter as tk
root = tk.Tk()

root.title('cuteluluWindow')
root.configure(bg="#7AFEC6")
root.iconbitmap('heart_green.ico')

image=Image.open("five.jpg")
five=ImageTk.PhotoImage(image)
text=tk.Label(root,image=five)
text.pack()

root.mainloop()
下图为执行结果⬇⬇⬇
- 在Python中使用Label组件加入图片与文字
import tkinter as tk
root = tk.Tk()

root.title('cuteluluWindow')
root.configure(bg="#7AFEC6")
root.iconbitmap('heart_green.ico')

lyrics="""This is my fight song
Take back my life song
Prove I'm alright song
My power's turned on
Starting right now I'll be strong
I'll play my fight song
And I don't really care if nobody else believes
'Cause I've still got a lot of fight left in me"""#文字内容

gif=tk.PhotoImage(file="7.gif")#图片
text=tk.Label(root, image=gif,text=lyrics,bg="#F5F5DC",
              compound="left", fg="#556B2F",
              font=("Viner Hand ITC", 12, "bold", "italic"))
text.pack()

root.mainloop()
下图为执行结果⬇⬇⬇
❗❗❗ 重要提醒:如果bitmap参数跟image参数同时存在,bimap参数会没有用 ❗❗❗
- Separator分隔线
from tkinter.ttk import Separator #导入模组
import tkinter as tk
root = tk.Tk()

root.title('cuteluluWindow')
root.configure(bg="#7AFEC6")
root.iconbitmap('heart_green.ico')

Title="FIGHT SONG"
Content="""This is my fight song
Take back my life song
Prove I'm alright song
My power's turned on
Starting right now I'll be strong
I'll play my fight song
And I don't really care if nobody else believes
'Cause I've still got a lot of fight left in me"""


text1=tk.Label(root,text=Title,bg="#F5F5DC",
              compound="left",fg="#556B2F",
              font=("Viner Hand ITC",18,"bold"))
text1.pack(padx=5,pady=5)

sep=Separator(root,orient=tk.HORIZONTAL) #分隔线
sep.pack(fill='x',padx=7)

text2=tk.Label(root,text=Content,bg="#F5F5DC",
              compound="left",fg="#556B2F",
              font=("Viner Hand ITC",12,"bold","italic"))
text2.pack(padx=5,pady=5)

root.mainloop()
下图为执行结果⬇⬇⬇
Label 的部分就在今天结束了~明天会进入功能钮的部分,有问题都可以留言一起讨论喔(。・∀・)ノ゙

>>: 用React刻自己的投资Dashboard Day7 - CORS与Proxy Server
Html元素-清单&表格(DAY4)
建立清单或表格的用意,可以把资料排序得更加整齐,让人一看到就能浅显易懂,若想要让资料更方便阅读或是有...
前端工程学习日记第18天-Emmet简易教学 - 快速上手包
资料来源:https://pjchender.blogspot.com/2016/07/emmet....
鬼故事 - 为什麽骇客一直回来
鬼故事 - 为什麽骇客一直回来 鬼故事 故事回到我们小新的身上, 小新公司最近被骇客入侵,身为网管兼...
IOS、Python自学心得30天 Day-24 Firebase衔接Python-2
前言: 知道怎麽使用 Firebase 的资料後 可以开始把辨识的程序码衔接上去 辨识程序码: im...
Day-29 了解 Kubernetes AutoScaler
前言 到了这个章节大家可能会开始回想,刚开始听到K8S时很多人都说Kubernetes的AutoSc...