连续 30 天 玩玩看 ProtoPie - Day 29
糟糕 突然就 29 天 了。
今天来看官网上的 ProtoPie Advanced Workshop 2 。
https://www.youtube.com/watch?v=ZunEmcNV2Sw
讲者 Jeff 昨天有提到今天要来玩 Variables 和 Formulas 。
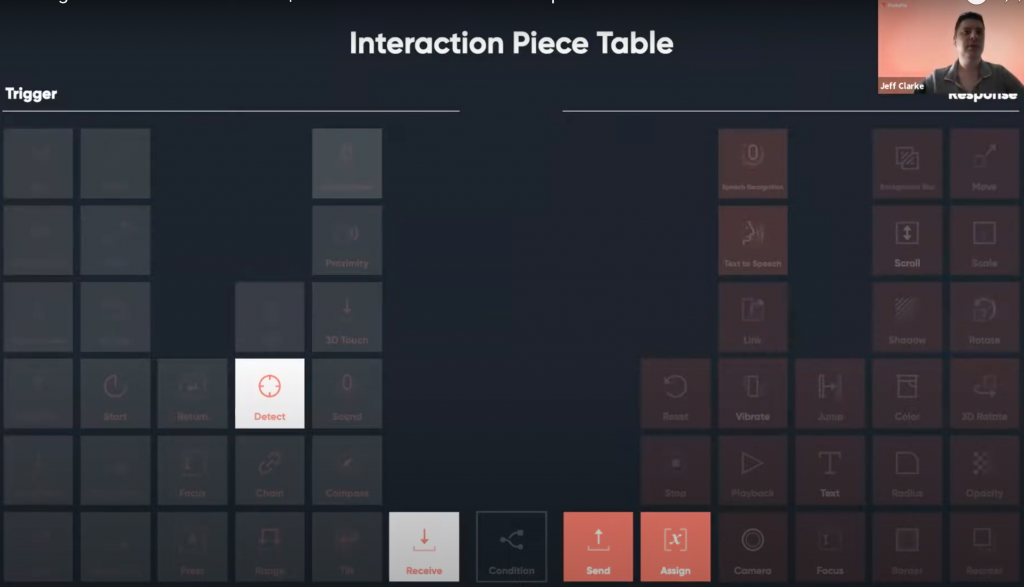
会玩到两个新的 Trigger , Detect 和 Receive 。
两个新的 Response , Send and Assign 。
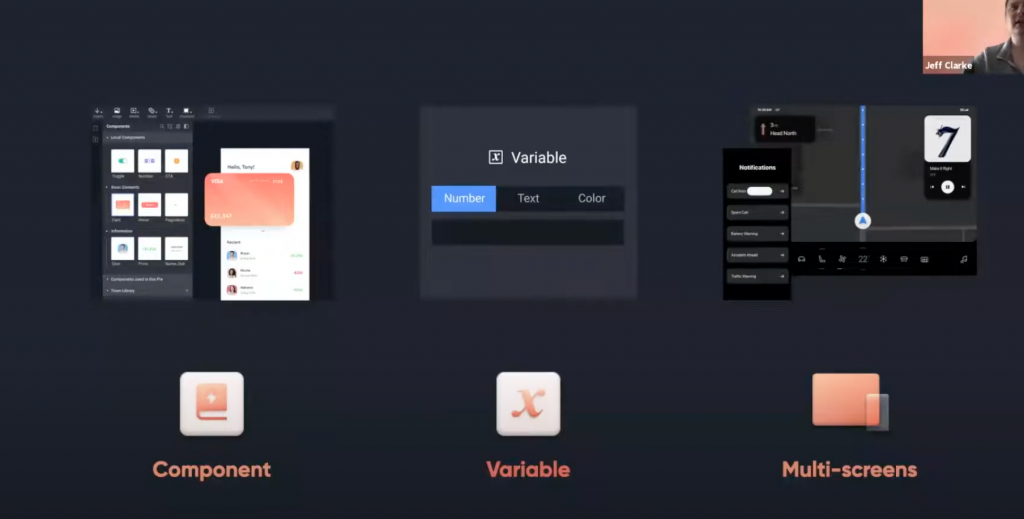
而这个 Workshop 会带大家...
- 制作元件 Component (之前快捷键有看到)
- 设定变数 Variable
- 多萤幕 Multi-screens (可以模拟多萤幕的互动,好像满帅的)
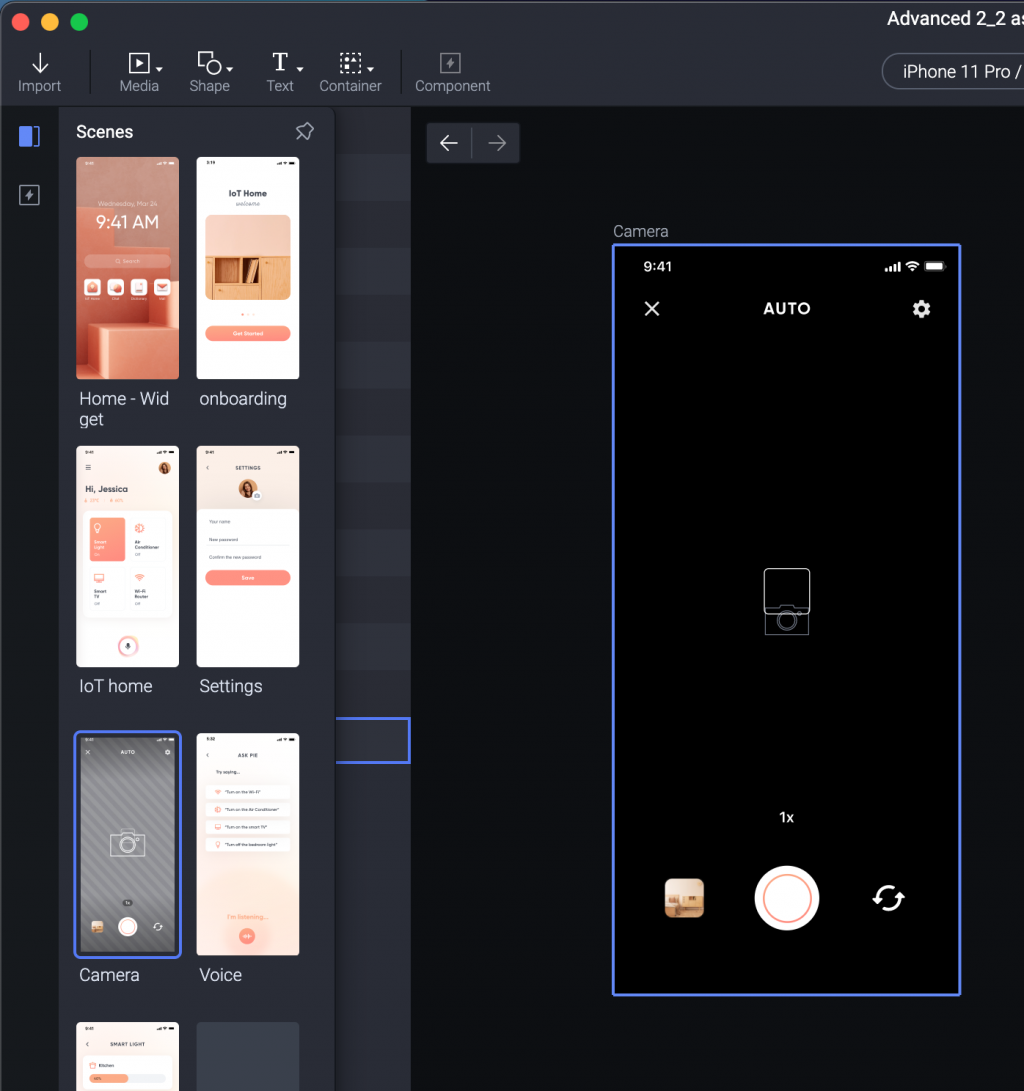
先下载第一个档案:
打开会长这样。

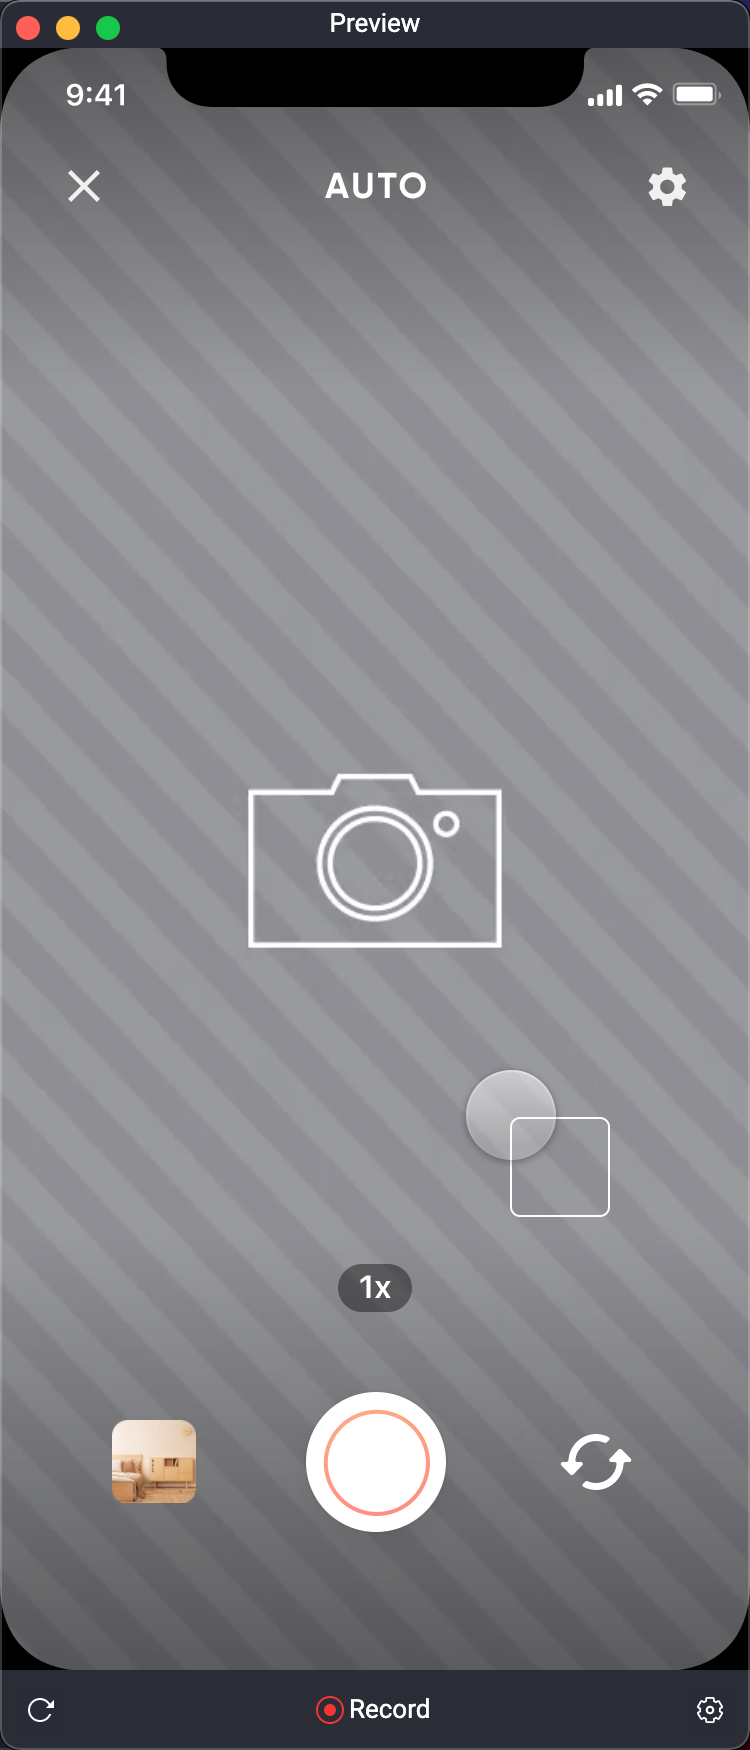
先来玩玩 Formula 来做出相机对焦
然後去 Scenes 里面选择 Camera 这个 Scene。
中间有个方块框,我们要来把它变成使用者点萤幕任何一处的时候,模拟「聚焦」的点。
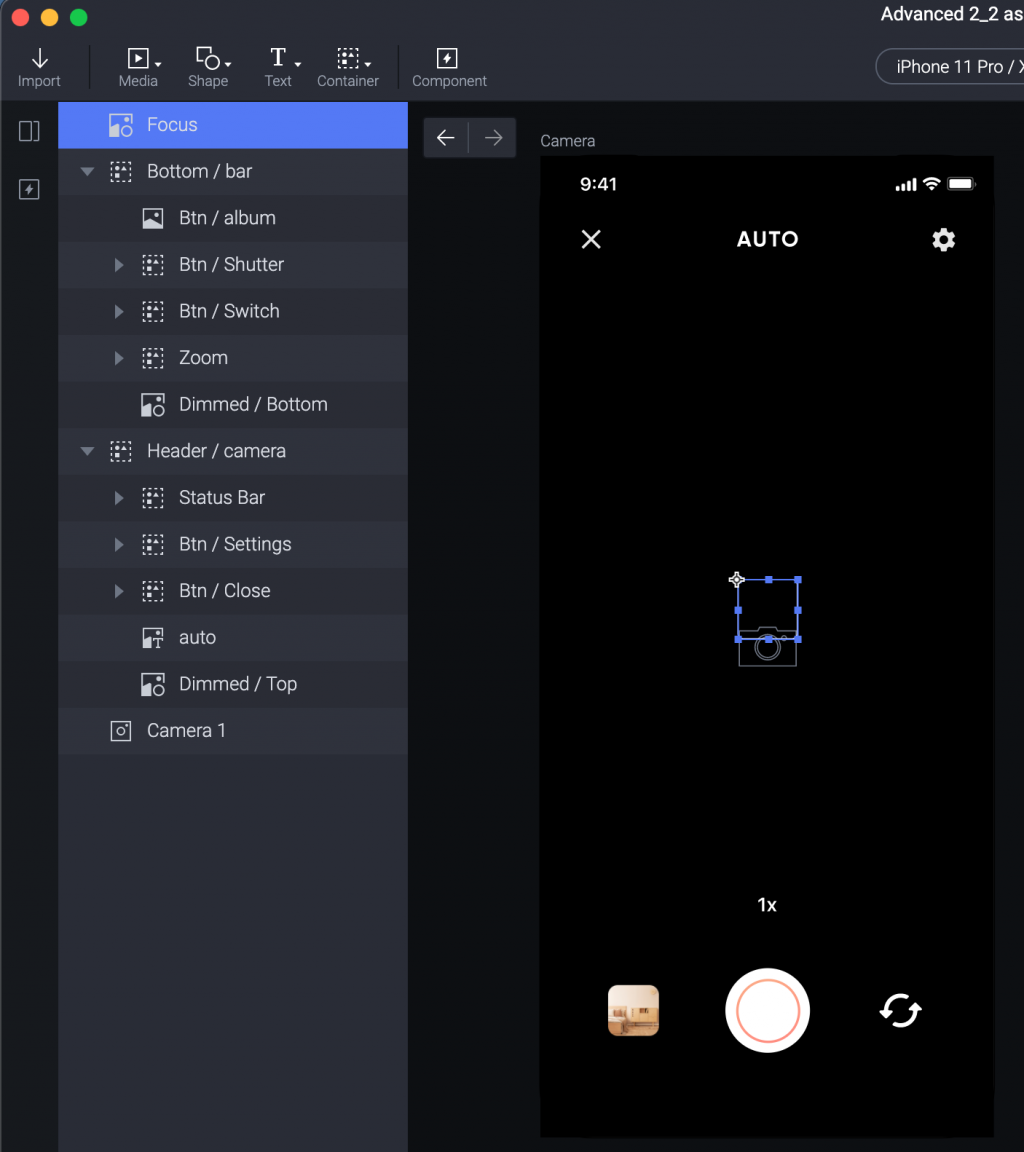
我们第一步,要帮整个萤幕的 Layer Camera 1 选择一个 Tap Trigger 。
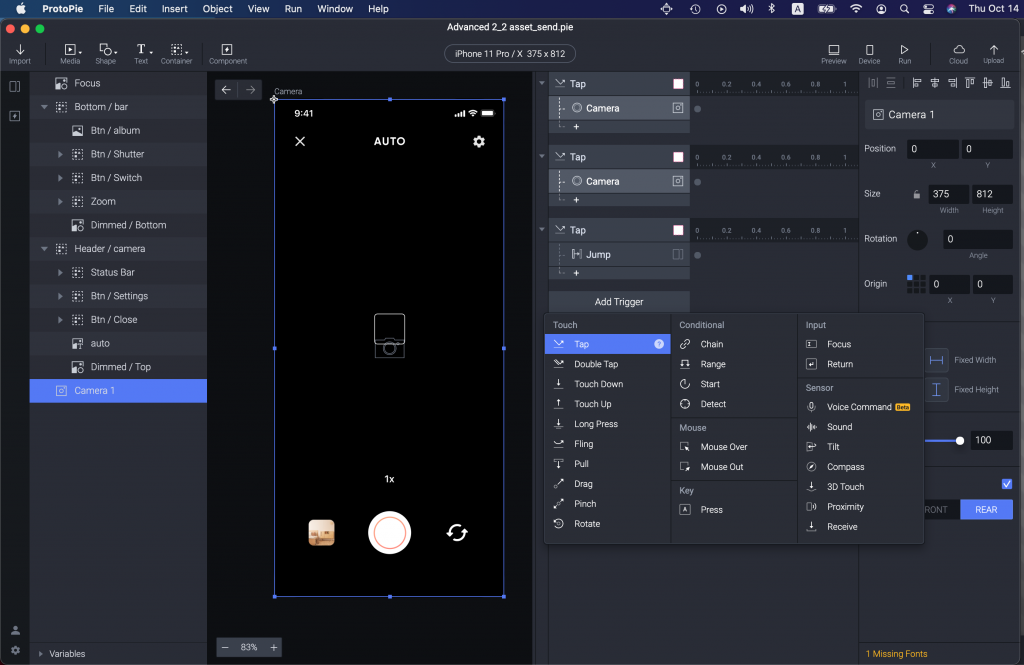
接着选择 Focus 这个方块,选 Move 作为 Response 。
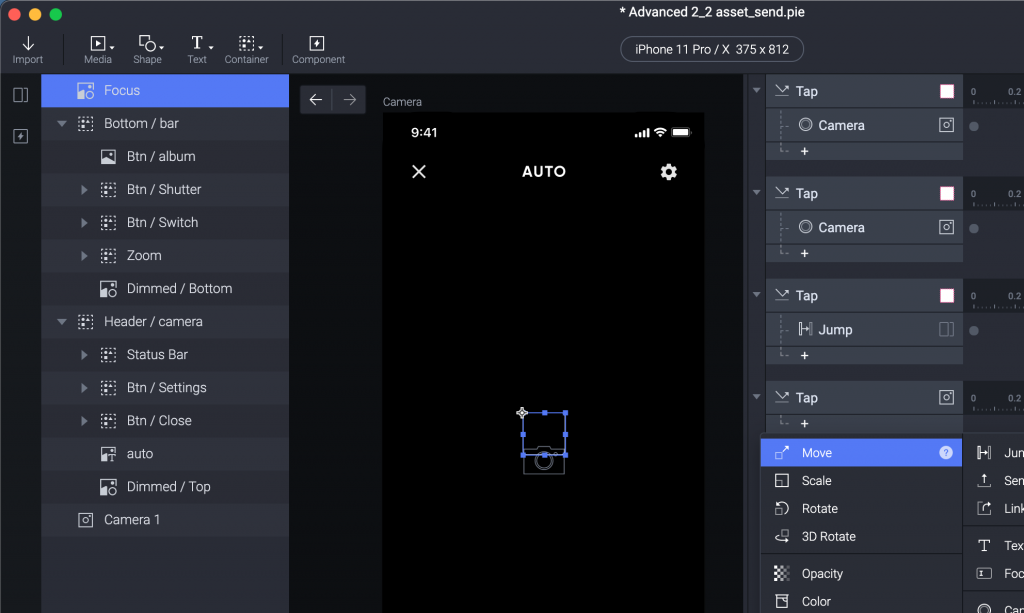
但我们 Move 要怎麽设定 Move 去哪呢?
之前都是直接设定 X 和 Y 值,但这是动态的行为,使用者可能在萤幕任何一处点击。
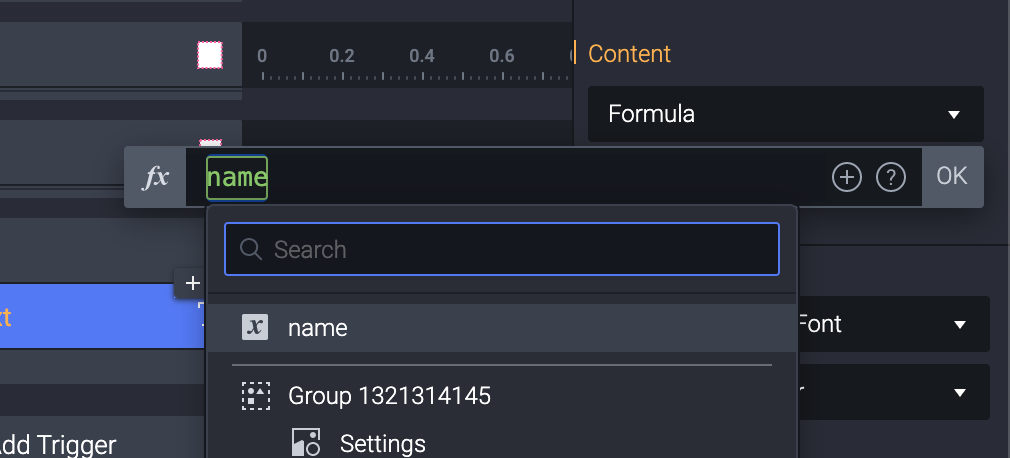
这时候就要用一个 Formula ,右手边可以点一下这个格子,会出现一个 fx 。

点一下 fx 会展开一个输入窗,最右手边有个问号,点一下。
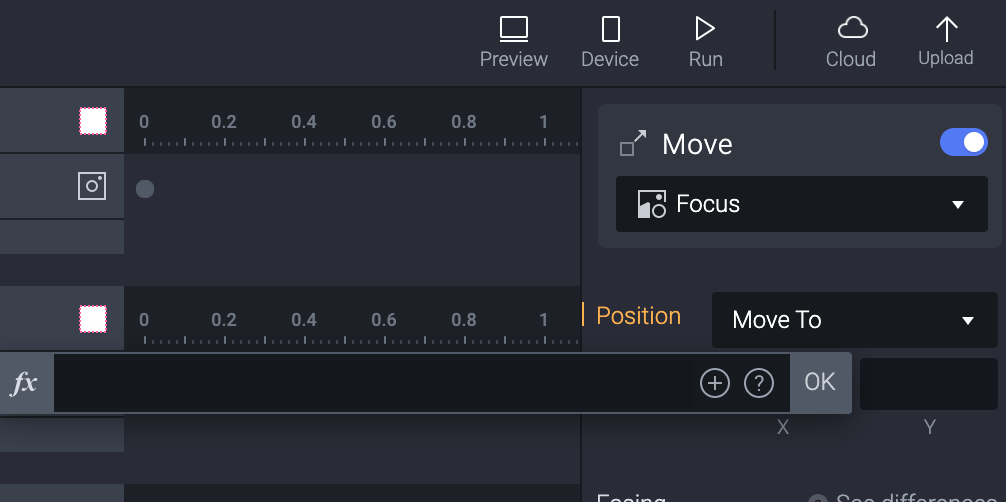
这会在你的浏览器里面打开跟 Fomula 相关的文件,可以稍微看一下。
连结:https://www.protopie.io/learn/docs/formulas/getting-started
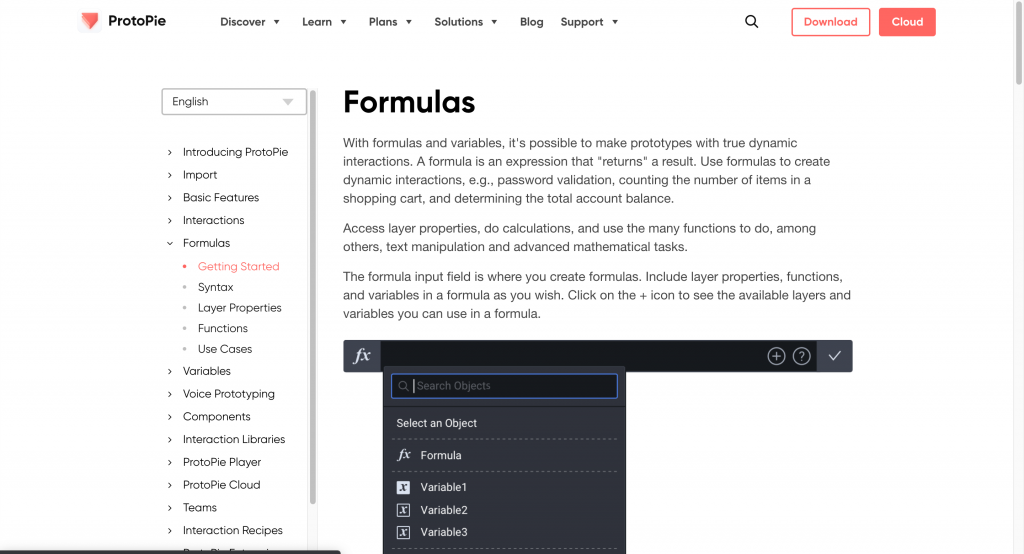
这时候发现讲者的画面、连结通通都不一样,但明明是点同一个问号。
(这是讲者的画面。)
影片是今年 7/6 上传,隔三个月就有改版,看来他们真的很认真在打造产品呢。
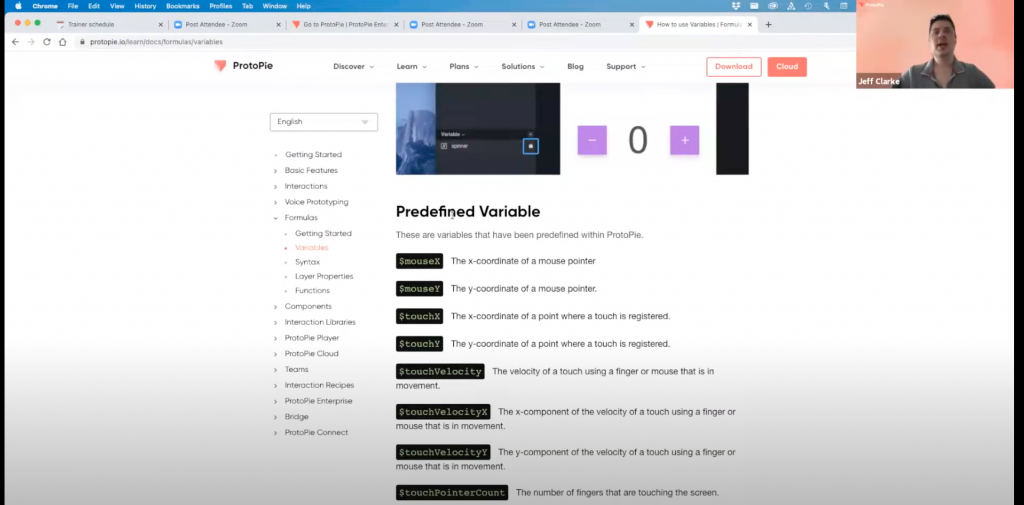
反正,我有找到 Predefined Variables 的新位置。
连结:https://www.protopie.io/learn/docs/variables/predefined-variables
看来是文件把 Variables 独立出来。
讲者是直接从上面复制 $touchX 但如果你直接在输入框里面打$符号也是可以找到的。
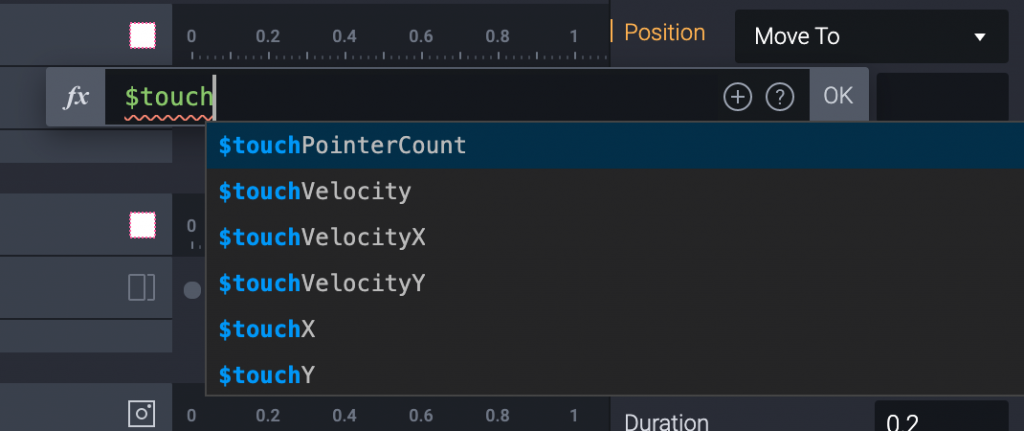
基本上这会做什麽呢?你能透过这个 Function 得到使者点萤幕的X值。
Y 也用一样的方式 用 $touchY ,记得这边的大小写是有意义的,是case sensitive 的。
如果直接复制或是从里面选择比较不会出错,我猜这也是为什麽讲者用复制贴上。
可能很多人在学的时候因为输入错误感到很挫折吧。
(例如很多年前因为没有输入分号程序跑不出来一样...)
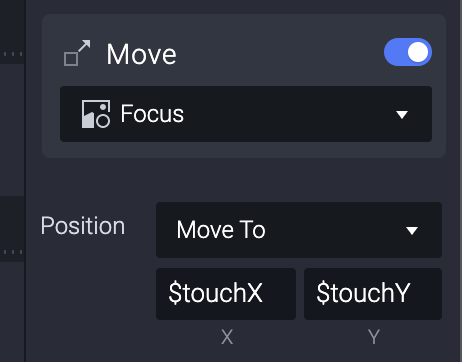
所以萤幕怎麽点就会出现在哪,不过刚刚测试发现因为 Layer 的关系,有些地方看起来能点但其实点不到,例如最上面跟最下方有按钮的地方。
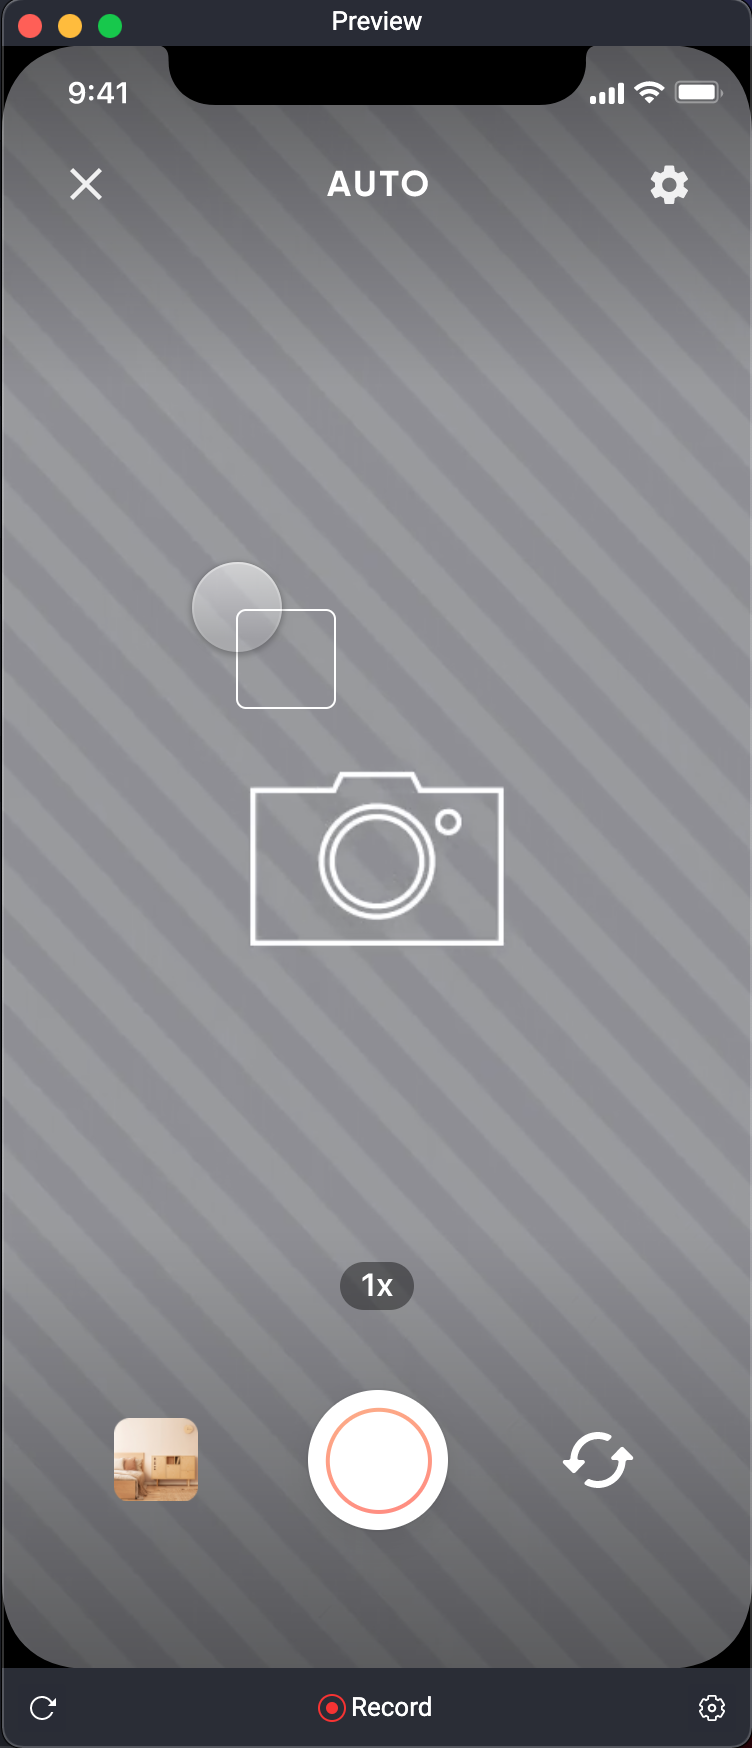
痾,要换下一个了?恩,所以这个就是教大家怎麽点击移动方块。
输入的资讯在其他页面显示
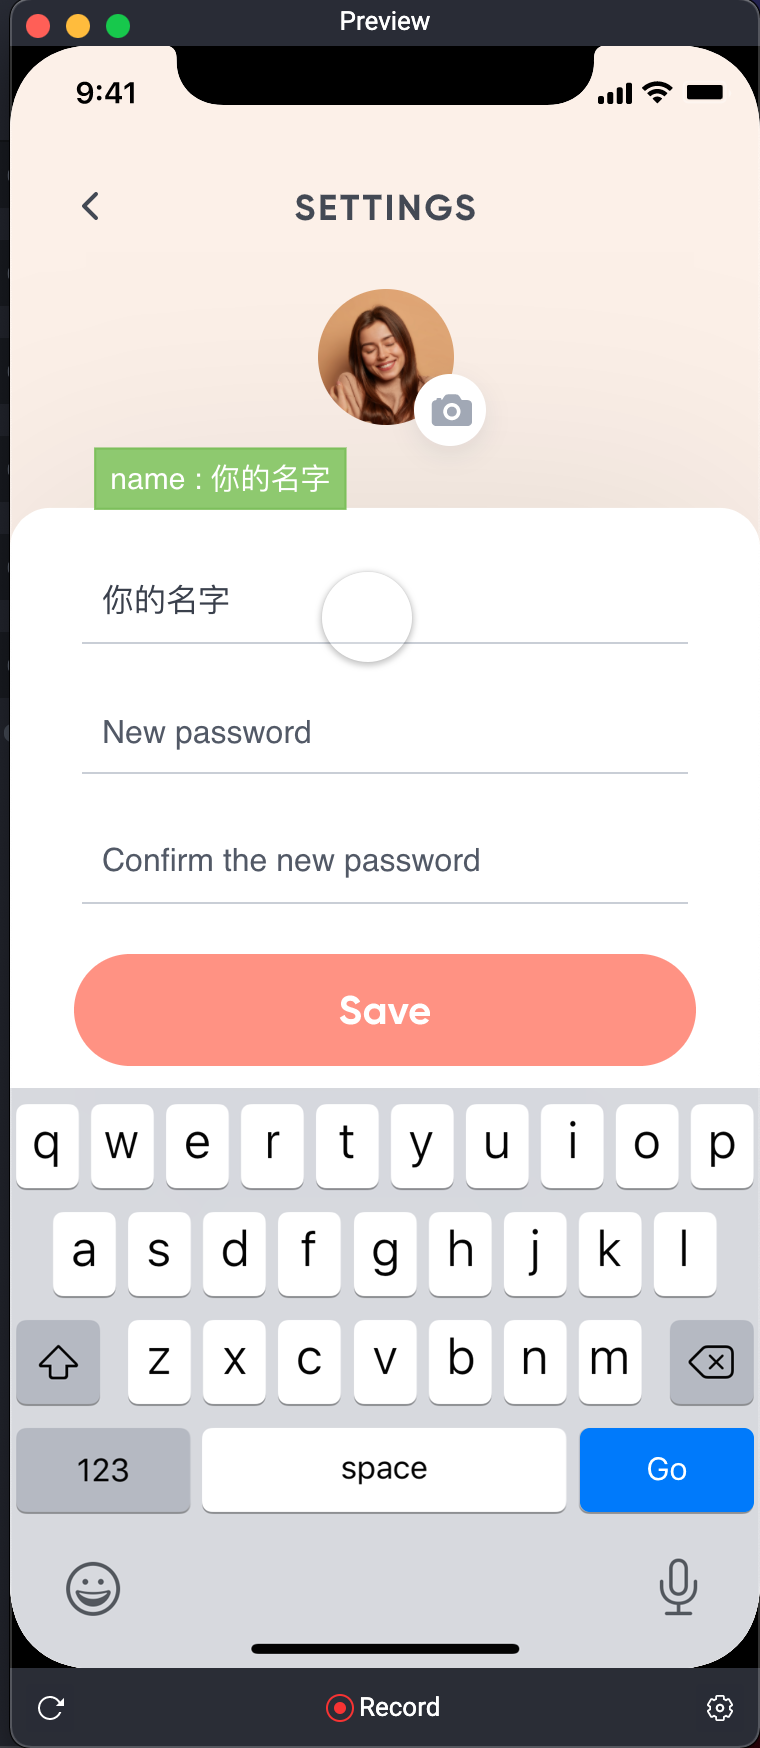
之前有做过输入密码做判断的画面,还记得吗?
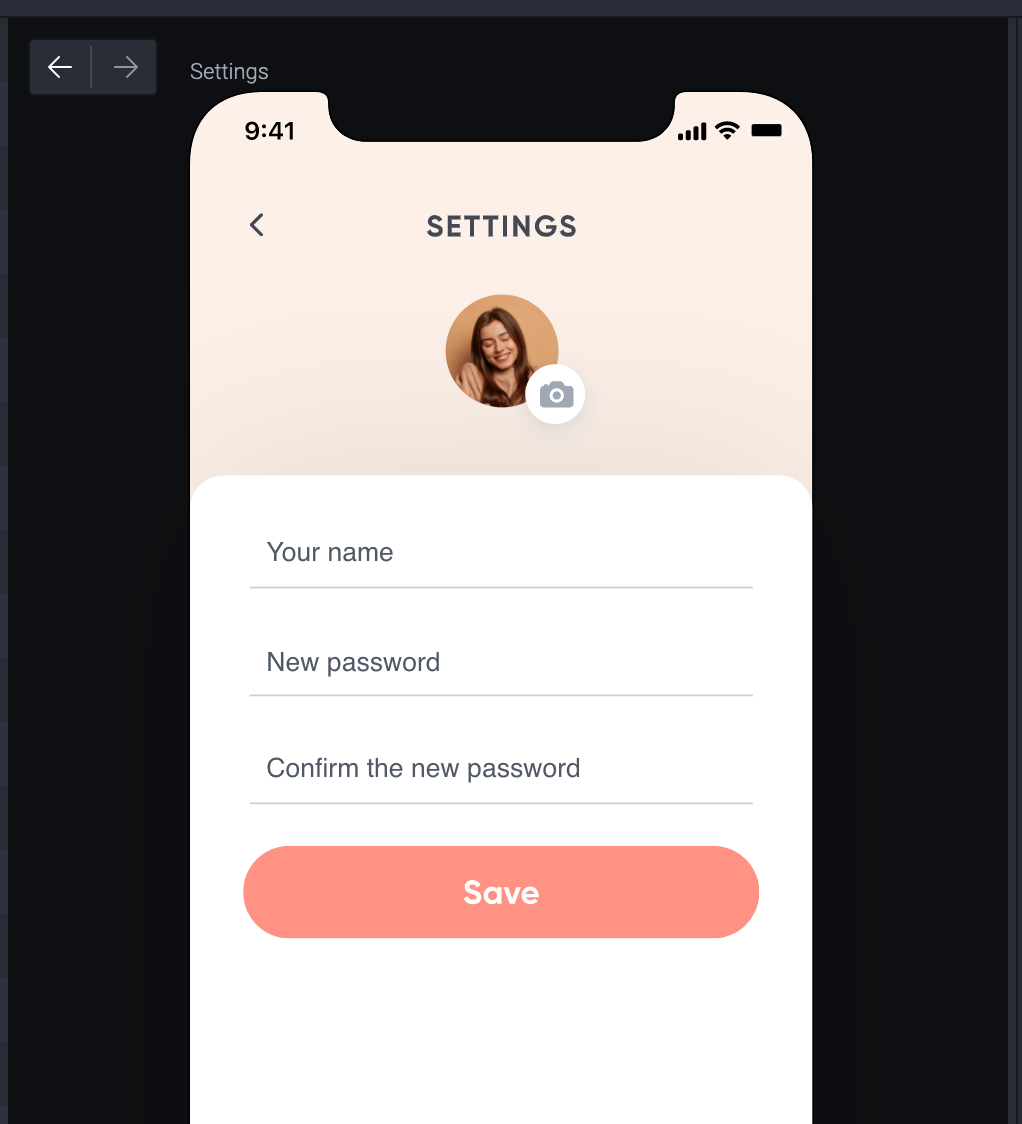
这次我们要拿这边输入的名称,用 Variable 存起来,在别的页面显示出来。
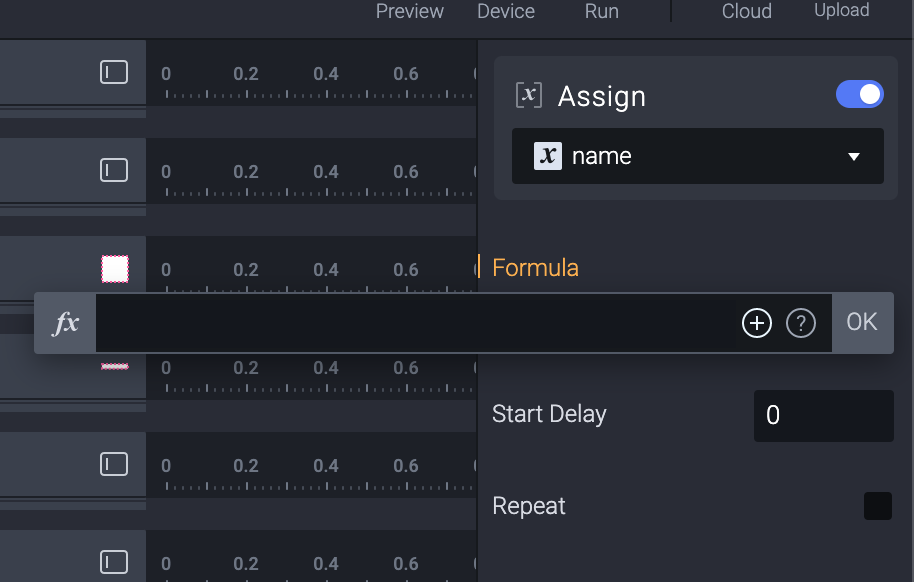
我们会用一个 Trigger 叫做 Detect ,当你在侦测的值改变,这 Trigger 就会被触发。
接着会用 assign 这个 response 把资讯存给一个 variable 。
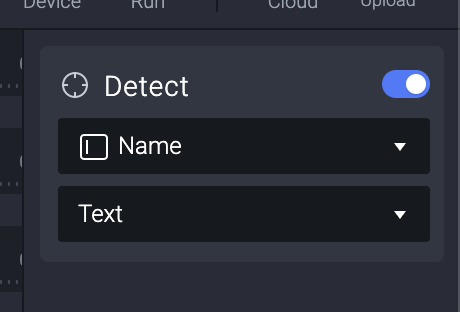
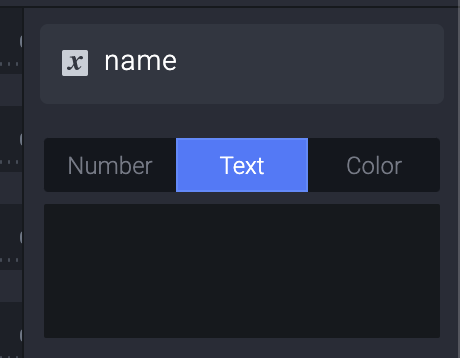
先来选择 Input 1 ,这个名字的输入框,顺便把名字改成 Name 。
(Name 比Input 1来得直觉)
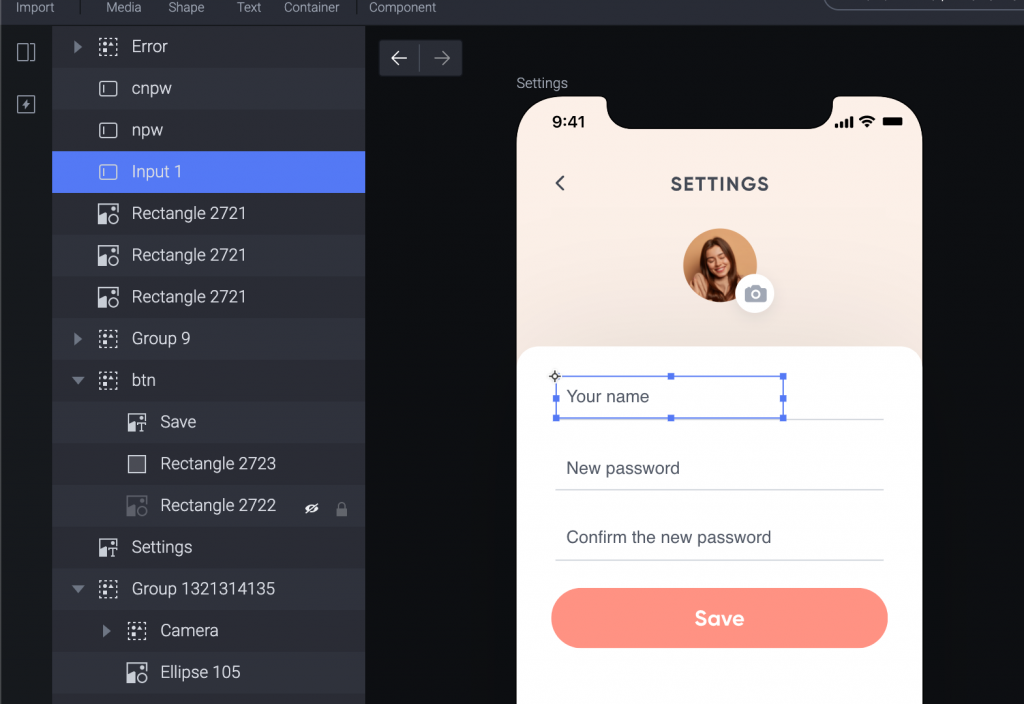
选择 Detect 这个 Trigger 。
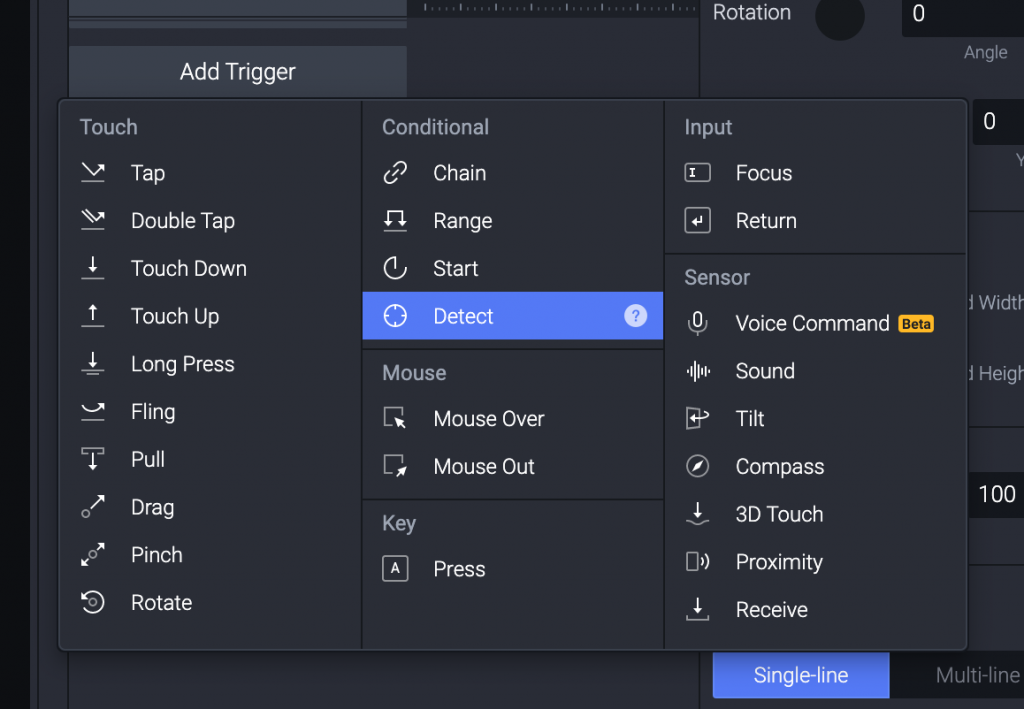
接着我们设定 Detect 当 Text 的资讯改变的时候,会被触发。
(意思就是当我们有输入东西的时候。)
接着给一个 Response ,就是 Assign 。
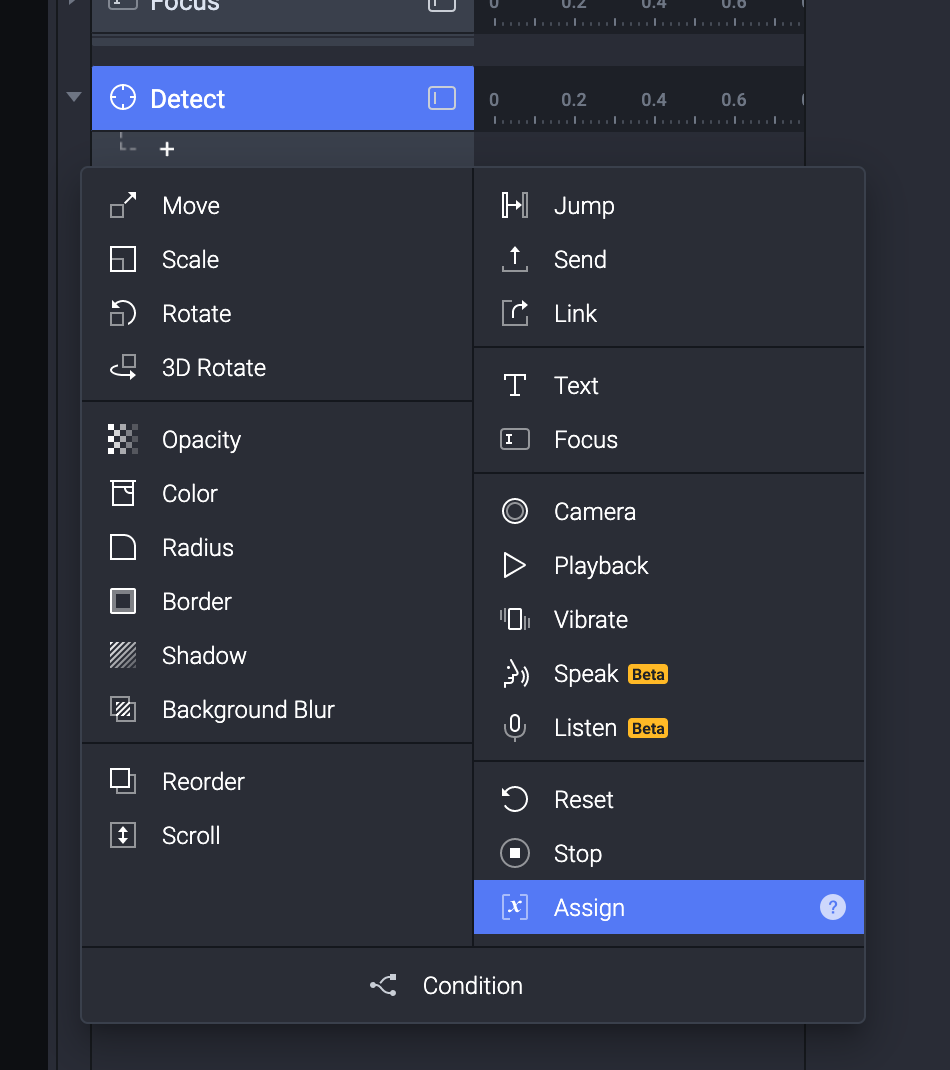
但这时候我们还没有 Variables 可以用,所以先来到左下角这边。

点选+号来新增 Variable ,此时有两个选项:
For All Scenes 和 For This Scene。
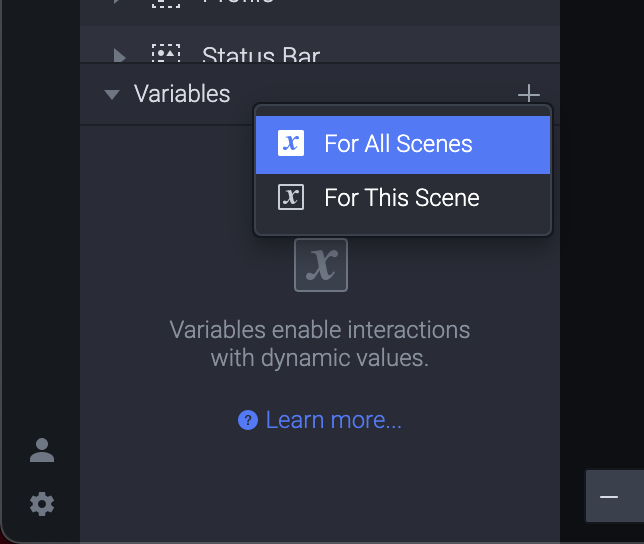
可以想像成 Global 或 Local 的 Variable ,而我们之後要在别的页面使用的时候,那就是选 For All Scenes 罗。
点两下帮忙改个名字 name 。
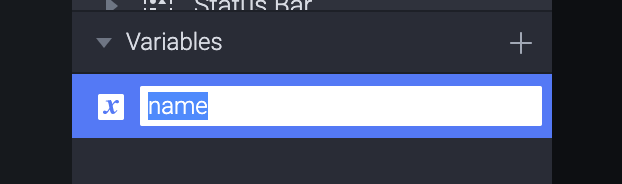
接着到右手边,因为要记录名字,设定为 Text。
你也可以在下面的方框输入预设值。
有趣的是,Variable 除了数字跟文字之外,可以记录 Color 。
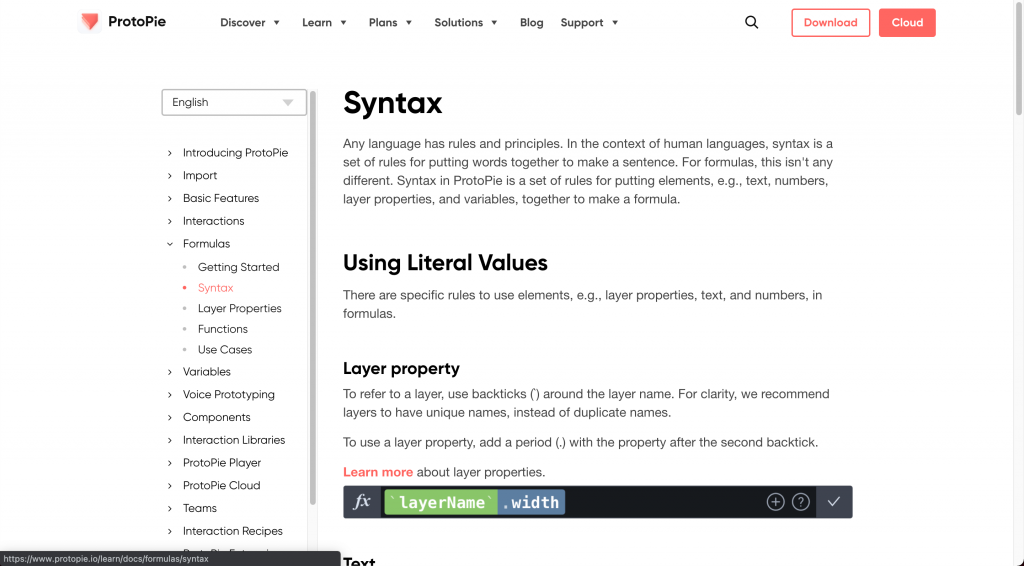
然後我们回到原本的 Formula 的文件,底下有一个 Syntax 的页面。
这边告诉我们如果要使用某一个 Layer 的时候,用 backticks (就是写 JS Template literals 会用的那种)。
然後要加上一个属性,就用 . 来隔开。
但,也有一个直接选择的方法,去 Formula 的输入框,点选 + 号。
然後选择 Name。
(记得,这边 Name 是 Layer ,而 name 是 Variable。我们要的是 Layer。)
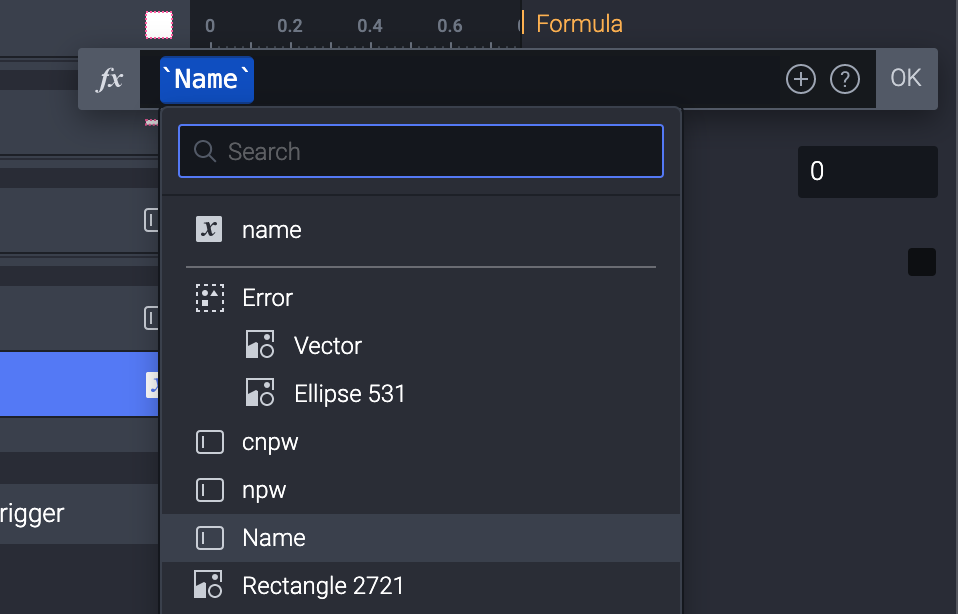
接着输入一个 . 就会出现 Name 这个Layer 下面所有的属性。
我们选择text。
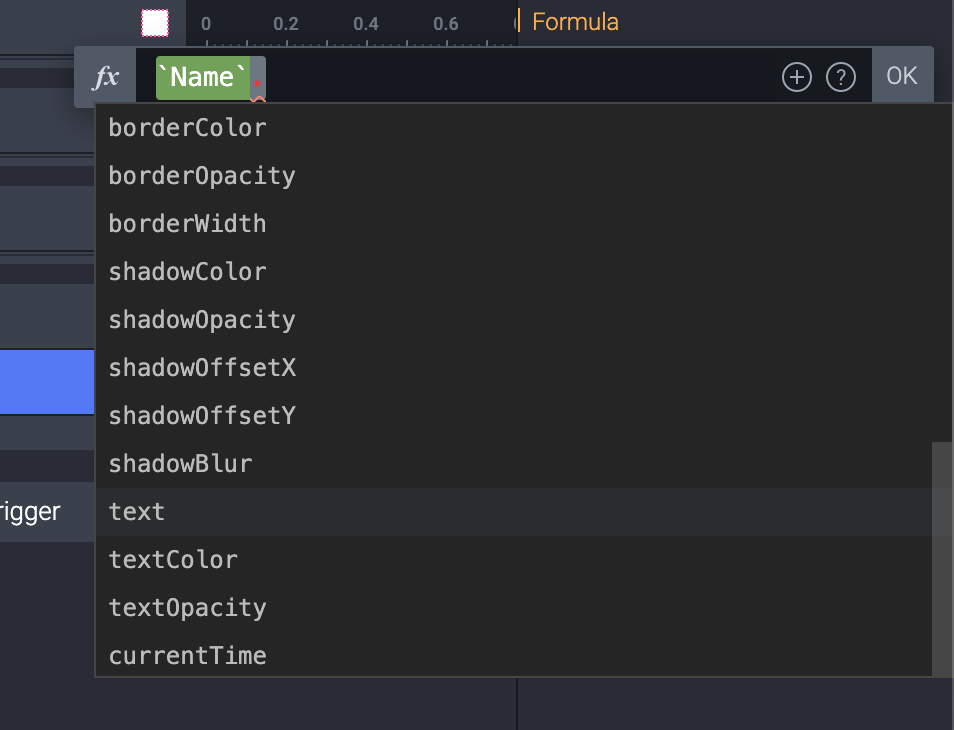
当然如果你本来就知道你要的是什麽,你也可以直接在框框里面打 Name.text 就可以了。
接着点那只虫打开我们的 Debug Tool 就会出现一个绿框可以看到 name 这个 Variable 里面存什麽。
(就跟一直 print 或 console.log 的概念很像 ker)
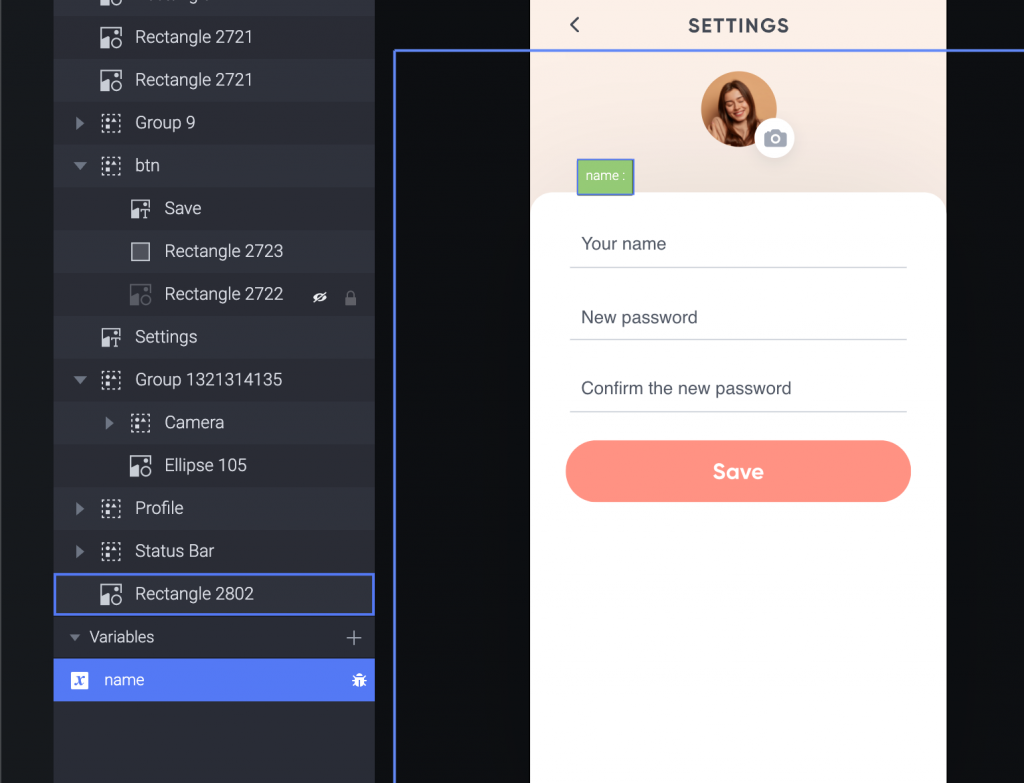
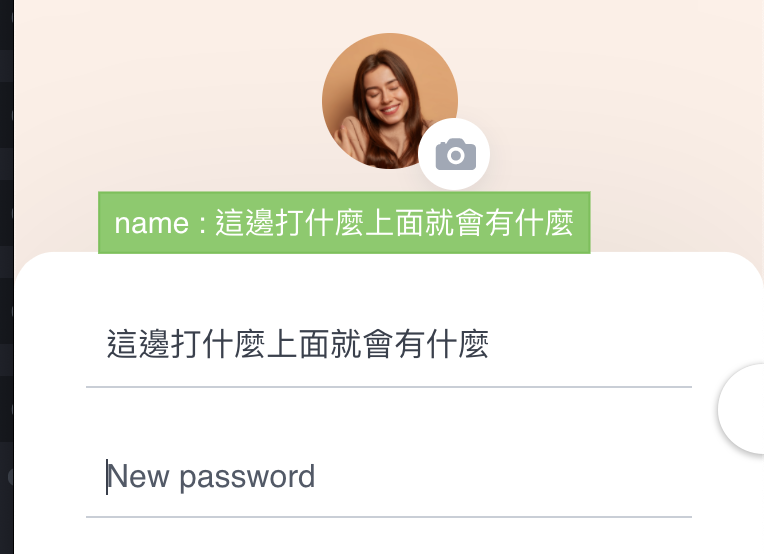
用 Preview 一看,确实能够用 name 这个 Variable 纪录目前输入的 text 。
动态改变其他页面的名字
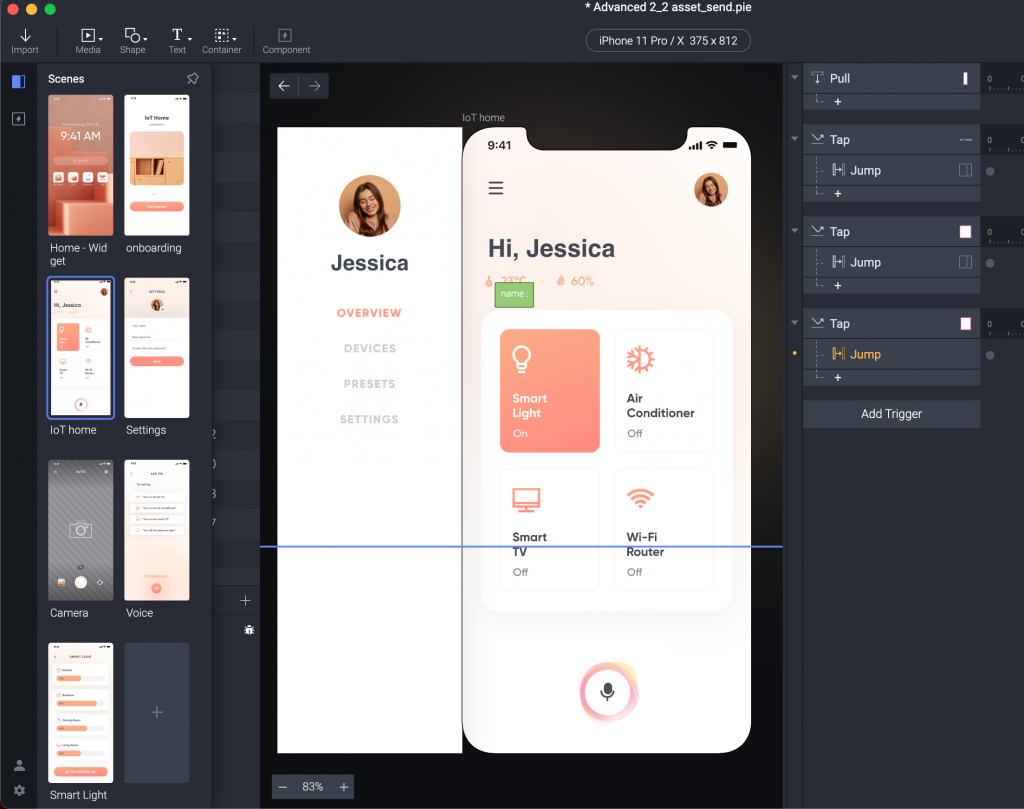
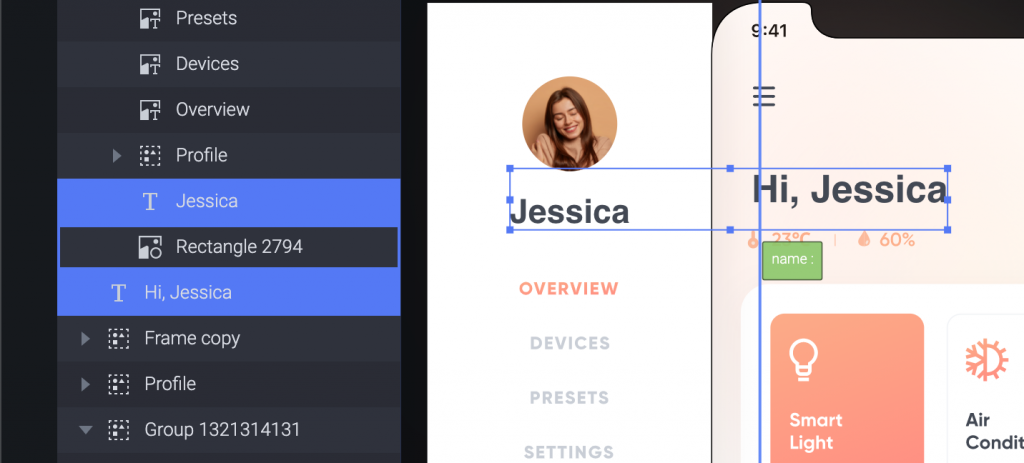
现在回来看很熟悉的 IoT Home 这个 Scene 目前上面暂时放 Jessica 这麽名字。
我们要来让这个名字根据使用者输入的不图而跟着改变。
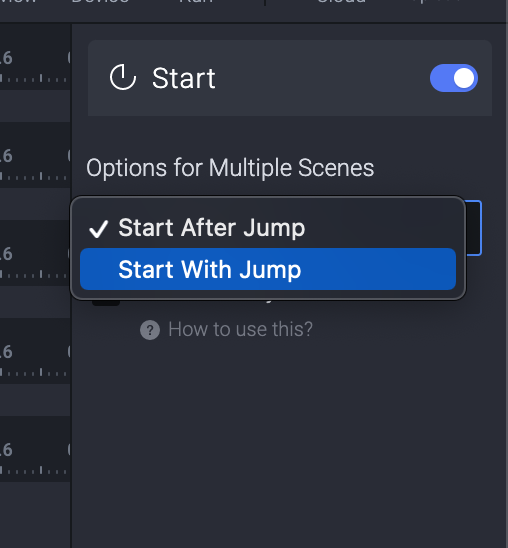
先选一个 Start Trigger ,来到这个页面就要开始改变,所以右手边也设定为 Start With Jump。
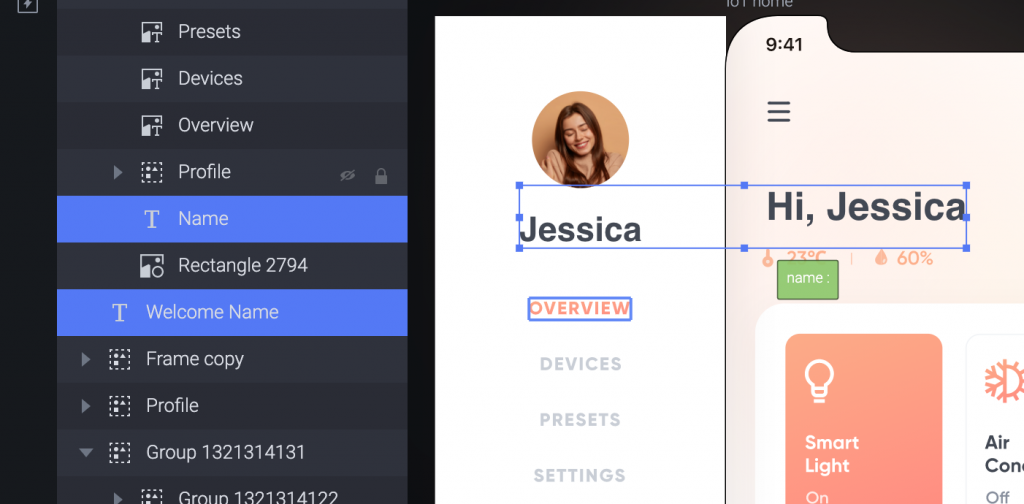
开始前我们先把图层改名,左边的 side bar 显示名字不要叫 Jessica ,改叫 Name 。
右边的欢迎就先叫 Welcome Name 。
(你想怎麽取名如果别人看越直觉越好。)
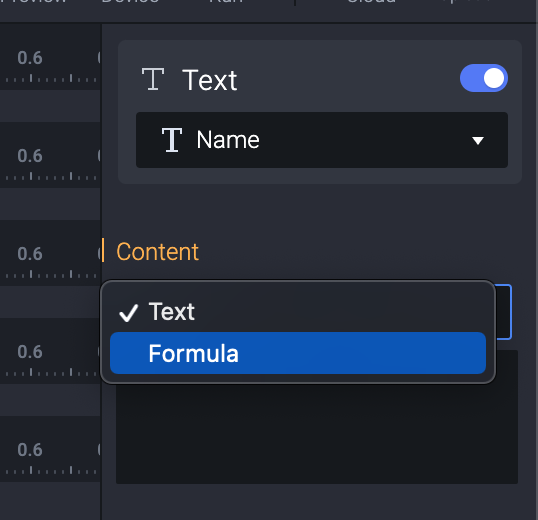
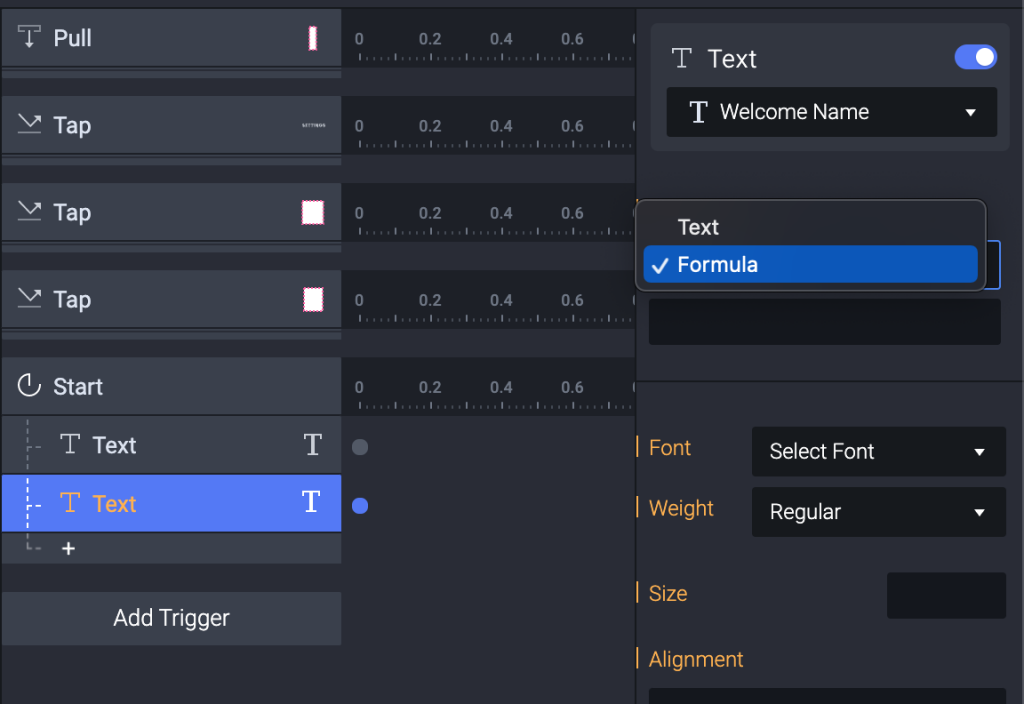
接着我们先处理 side bar 的名字,选择他并给一个 Response : Text 。
接着选择 Formula 。
而 Formula 很单纯,直接用已经做好的参数 name 。
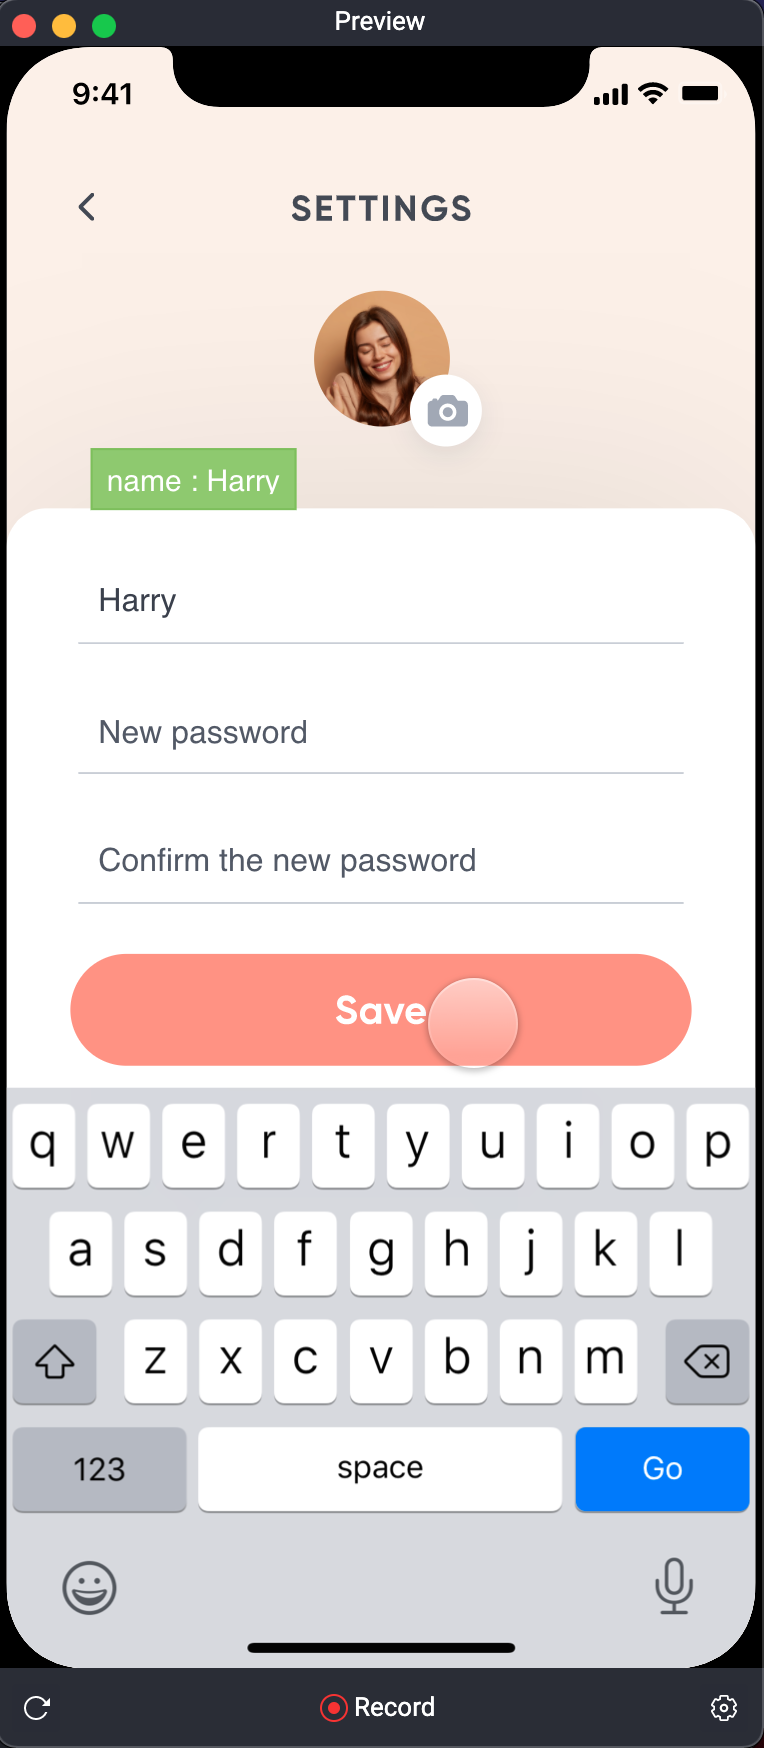
Preview 看一下,在 Settings 这一页输入你的名字。
Jump 到下一页,因为我 debug 模式开着,所以绿色的框框会显示我的 Variable 。
(这也是因为我选择 For All Scenes ,就能看到。)
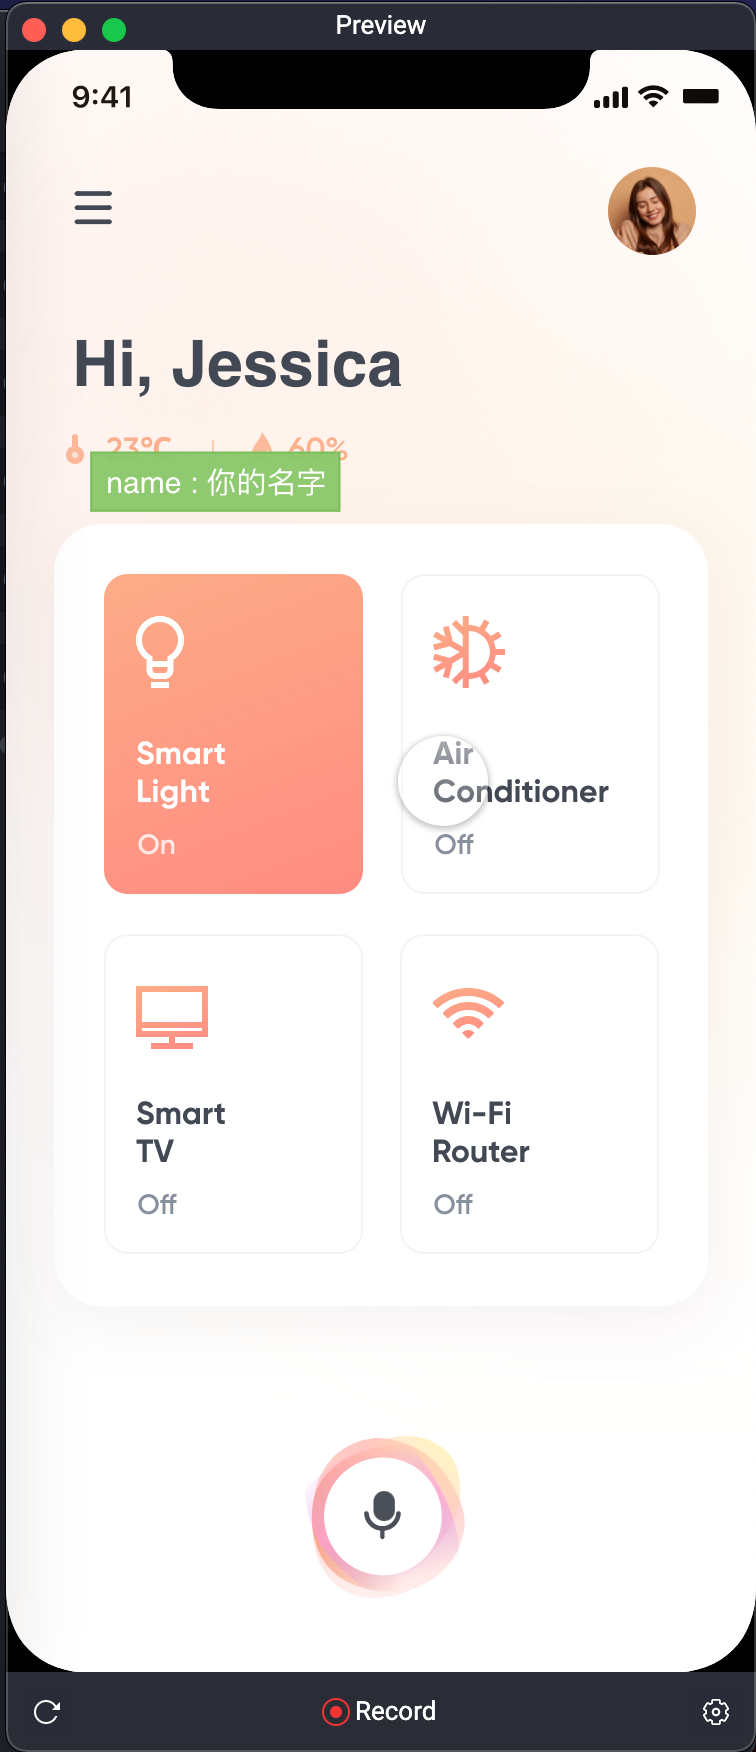
Side bar 一拉出来...就看到啦。
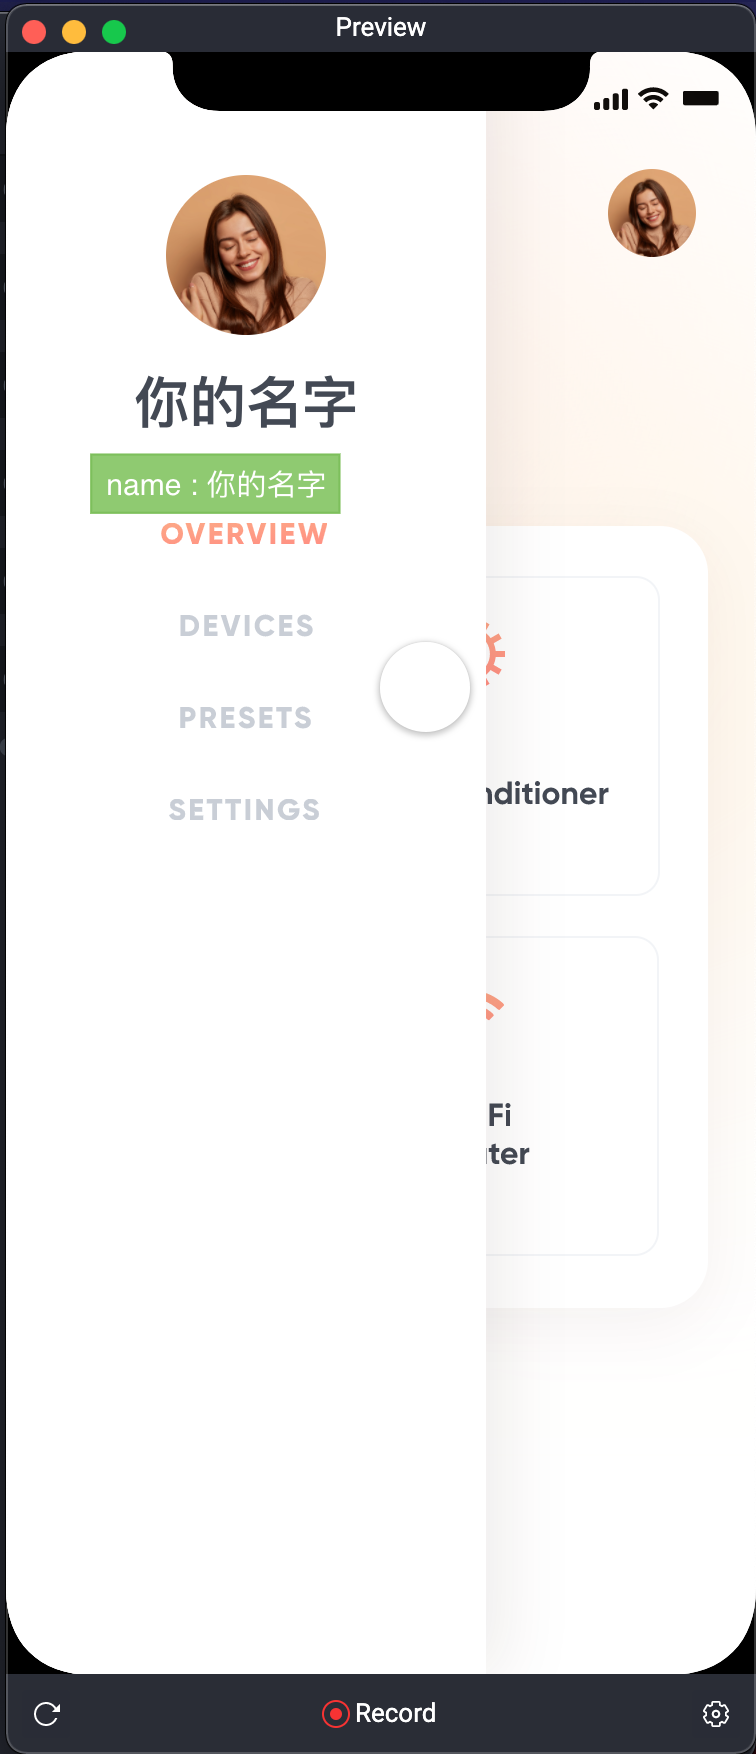
接着我们用接上第二个 Text Response 给 Welcome Name ,选择Formula 。
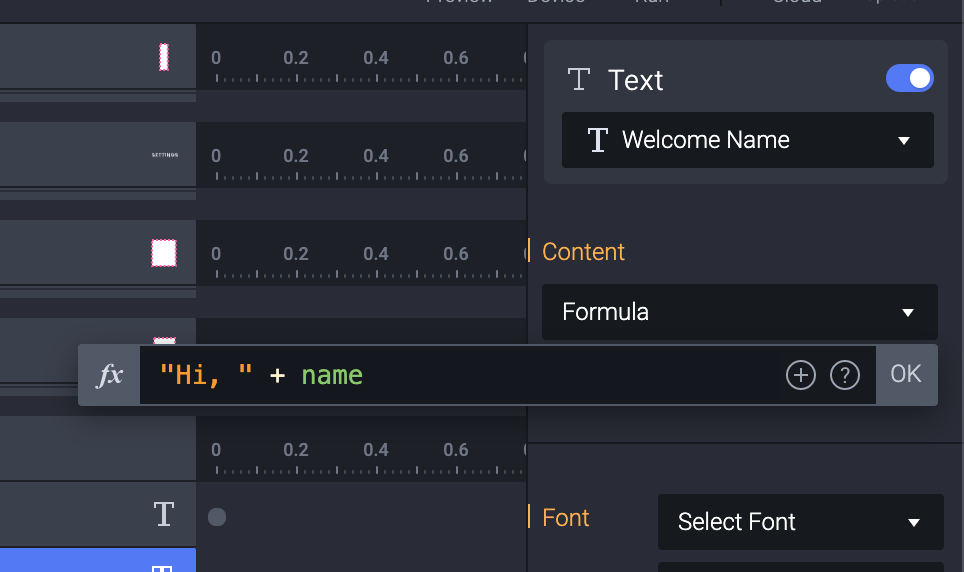
因为我们想要不管名字怎麽变,前面有个 Hi ,而这边 ProtoPie 的写法就跟平常你写程序的方法一样。
是 String 就用””包住,例如 “Hi, “ 然後可以用 + 号去把 Variable 加上去。
(记得电脑只会认得你给他的,所以 Hi, 後面有个空格,这样显示的时候才会正确。)
接着回到 Settings 输入,就会发现,後面两个都顺利把Variable 带进去啦!
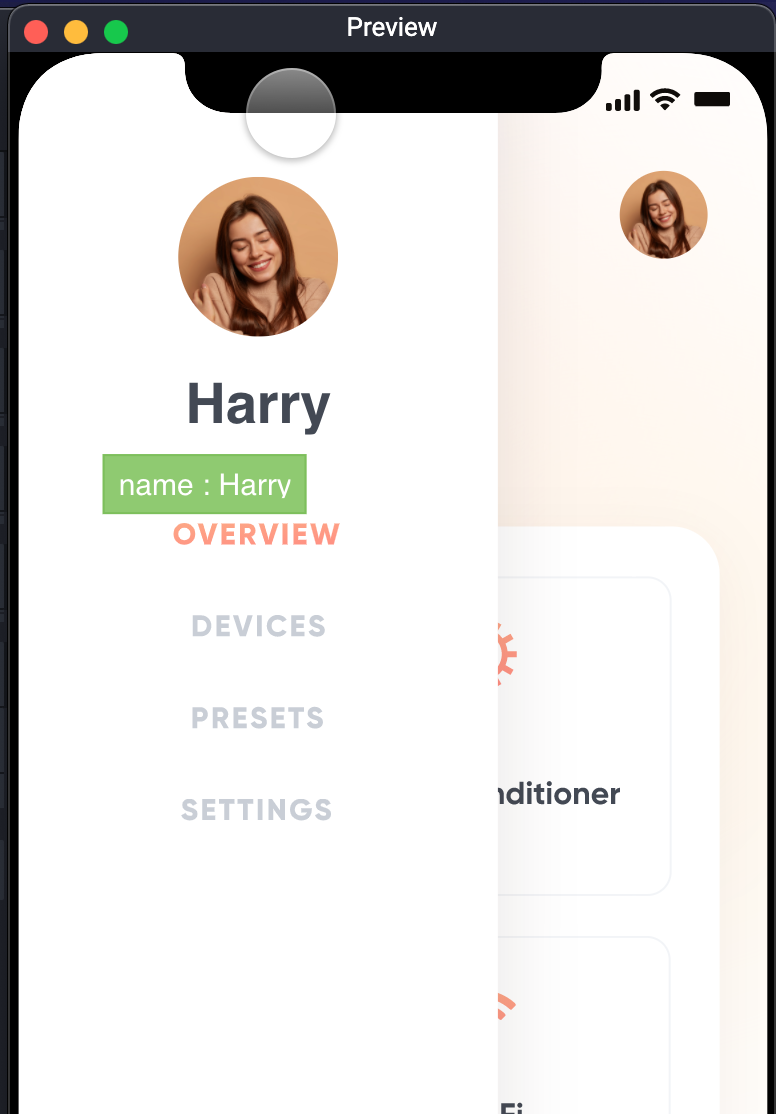
输入 Harry
跳到下一页 看 Debugger 确实 Variable 带过来了 Welcome name 也顺利更新
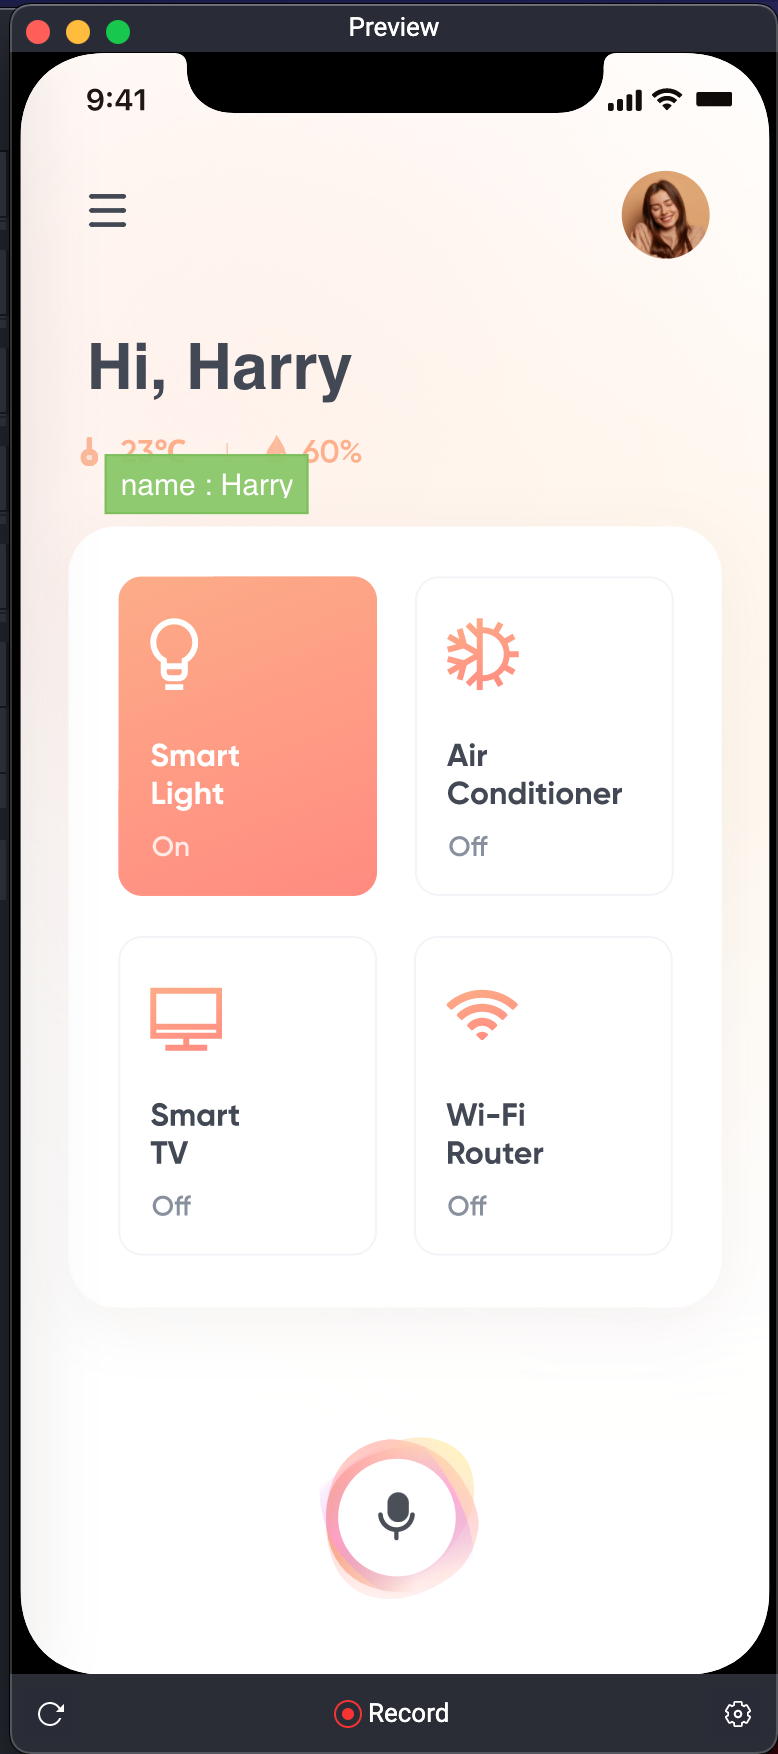
拉出来一看,名字也是正确的 Harry!
在一天 就 30 天就这样过去了。
人生短短几个秋。
<<: 【Day29-管线】ETL资料工程的必备观念与流程工具Dagster介绍
【在厨房想30天的演算法】Day 30 资讯安全与演算法 : 数位凭证
Aloha!我是少女人妻 Uerica!终於来到最後一天了!如果生命只剩一天,我想我会拿来学资料结构...
Day 20. slate × Operation × Interface
我们接下来就要进入到 slate 世界里的另一大领域: Operations 。 这一整段章节其实...
.NET Core第11天_Controller定义_附加属性_资料接收方式_返回View方式
藉由前几篇简单操作得知网址路由寻访 可以跳至Controller做相应Action Method执行...
[Day 21] Edge Impulse + BLE Sense实现唤醒词辨识(中)
=== 书接上回 [Day 20] Edge Impulse + BLE Sense实现唤醒词辨识(...
EP 13: Add/Edit the MockData in TopStore App
Hello, 各位 iT邦帮忙 的粉丝们大家好~~~ 本篇是 Re: 从零开始用 Xamarin 技...