[Angular] Day6. Sharing data between child and parent directives and components
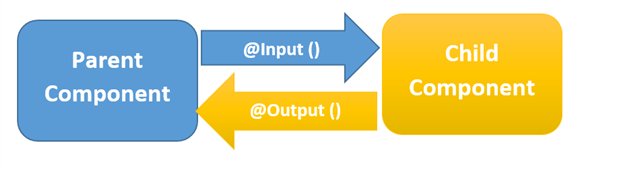
我们了解到 Angular app 是由无数个大大小小的 Component 所组成的,所以就会常常需要使用将 Component 嵌套,一个大个 Component 中包含了 10 个小的 Component 之类的,那麽让资料在父子层 Component 之间传递就非常重要,要实现这个功能就需要使用到 Angular 中的 @Input() 和 @Output()。
@Input() 是让父层更新子层 Component 中的数据,相反的 @Output() 是为让子层向父层 Component 发送数据的。
下面我们会做一个简单的例子来实际使用与讲解如使用 @Input() 与 @Output()。
Sending data to a child component
大概知道了 Angular 是如何让父子层 Component 之间传递数据的,接下来我们使用一个小小的例子来讲解与操作这个功能吧。
Create child and parent components
首先我们先透过 Angular CLI 建立两个父子层关系的 Component。
ng generate component parent
ng generate component child
创建完後,我们将在 parent.component.html 中加入 child.component .ts 中的 selector,建立两个 Component 的父子层关系。
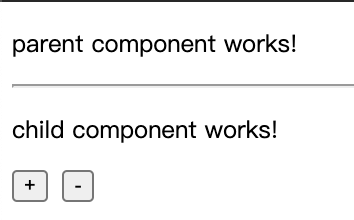
<!-- parent.component.html -->
<p>parent component works!</p>
<hr>
<app-child-component></app-child-component>
我们打开网页的开发模式,来确认一下 DOM 是不是确实有将两个 Component 建立为父子层关系。

Configuring the child component
首先第一步我们要在 child.component.ts 中使用 @Input() 装饰器,先把他透过 import 从 @angular/core 中引用进来然後使用它。
import { Component, Input } from '@angular/core';  // (1)

@Component({
  selector: 'app-child-component',
  templateUrl: './child.component.html'
})
export class ChildComponent {
  @Input() item = ''; // (2)
  constructor() { }
}
- (1): 使用 import 将 @Input 引入
- (2): 使用 @Input( ) 装饰 property "item"
可以看到我们使用了 @Input() 装饰了 ChildComponent 中的 item 这个 property, 虽然在上面的例子中是将他初始化为 string,但是不代表使用 @Input() 装饰的 property 只能是字串型态,他可以是任一种资料型态,代表着这个 property 来自父层。
接下来我们将这个 property 放在 child.component.html 中让我们可以观察他的变化。
<!-- child.component.html  -->
<p>child component works!</p>

<div>Today's item: {{ item }}</div>
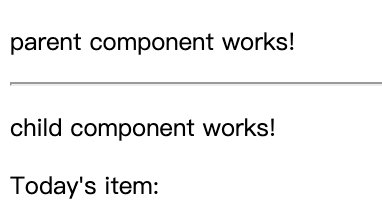
在画面中我们会看到我们打上的 Today's item 後面并没有东西(因为父层还没传资料下来啊~
Configuring the parent component
接下来我们来在父层的 HTML 中绑定属性:
- 先 parent.component.ts 中定义一个 property 并将他赋值
import { Component } from '@angular/core';

@Component({
  selector: 'app-parent-component',
  templateUrl: './parent.component.html'
})
export class ParentComponent {
  constructor() { }
  currentItem = 'Television';  // defind a property
}
- 在 parent.component.html 中使用 property binding 将父层的 currentItem property 绑定给子层
<app-child-component [item]="currentItem"></app-child-component>
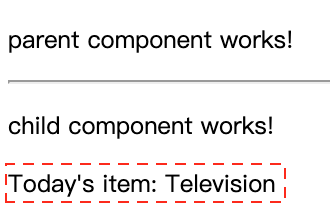
在画面中可以看到原本 Today's item 後面什麽都没有的却显示了来自 parent.component.ts 中的 property 内容,这就是透过 @Input( ) 将父层的资料传递给子层。
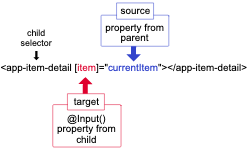
上面的图已看到,[ ] 中的目标是你在子层使用 @Input() 装饰的 property,而 source (等好右边的部分) 是父层要提供给子层数据的名称,也就是在父层中为了要传递给子层数值所定义的 property。
我们在 Lifecycle 中有提到,ngOnChange() 被调用的条件,除了 Component 刚被创建出来的第一次调用之外,其他的每一次都是在当有 input binding 发生改变时会被调用,这代表着如果父层要向下传递的 property 发生改变时,就会触发子层的 ngOnChange()。
Sending data to a parent component
讲解完如何透过 @Input() 将父层的数据传给子层後,接下来介绍如何透过 @Output() 让子层的数据传递给父层。
首先 @Output() 装饰器它可以让子层的 property 标记成为数据可以传递给父层的入口,子层透过使用被 @Output() 装饰的 property 触发 event 来通知父层数据已经被更改了,要触发事件这个子层的 property 必须是 "EventEmitter" 型别,他可以从 '@angular/core' 中引入,下面我们一样会用一个小例子举例并讲解。
Configuring the child component
我们在 child 中设置一个可以点击一个 <button> 来触发 EventEmitter,并将数据传递给父层。
import { Component, Output, EventEmitter } from '@angular/core';  // (1)

@Component({
  selector: 'app-child-component',
  templateUrl: './child.component.html',
  styleUrls: ['./child.component.css']
})
export class ChildComponent {
  @Output() newItemEvent = new EventEmitter<boolean>();  // (2)
  constructor() { }

  parentValueChange(value: boolean) {  // (3)
    this.newItemEvent.emit(value);
  }
}
- (1): 使用 import 将 @Output 与 @EventEmitter 引入
- (2): 使用 @Output( ) 装饰一个 property,上面的例子中是 newItemEvent 是一个 EventEmitter 的类型,代表他是一个 event 并会传递一个型别为字串的数值
- (3): 新增一个 method 当使用者点击画面的 button 後会触发此 method 让子层的数值传递给父层
Configuring the child's template
接着我们来更改 child.component.html 的内容,我们新增两个 <button> 让使用者可以对这两个物件进行操作
<!-- child.component.html  -->
<p>child component works!</p>

<div class="button">
    <button (click)="parentValueChange(true)">+</button>
    <button (click)="parentValueChange(false)">-</button>
</div>
我们将画面中的两个 button 都绑定一个 click event,当点击 + 这个按键就会触发并将 true 做为参数传给 parentValueChange,反之传 false。
Configuring the parent component
接着我们在父层中添加一个 property 让我们可以透过子层操控这个属性。
import { Component } from '@angular/core';

@Component({
  selector: 'app-parent-component',
  templateUrl: './parent.component.html'
})
export class ParentComponent {
  constructor() { }
  counterValue = 0;

  addOrSub(event: boolean) {       // (1)
    if (event) {
      this.counterValue++;
    } else {
      this.counterValue--;
    }
  }
}
- (1): 在 parent.component.ts 中新增一个 method,当接收到子层传递上来的数值时,判断要将 counterValue 增加或减少。
Configuring the parent's template
接着在 parent.component.html 中将 method 绑定到 child's event 上,让子层的事件可以触发到父层的 method。
<!-- parent.component.html -->
<p>parent component works!</p>
<div>parent component property counter: {{counterValue}}</div>

<hr>
<app-child-component (newItemEvent)="addOrSub($event)"></app-child-component>

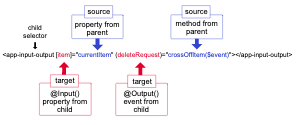
如同 @Input() 一样,在 () 内的是在子层利用 @Output() 装饰的 property,因为他是一个 event,所以当子层触发 event 後会将子层更改的值透过 event 传递给父层的 method,而 source( 等号右边 ) 是父层定义用来接子层传上来数值的 method。
当你要对同一个子层同时使用 @Input() 和 @Output() 时,可以使用 Tow-way Binding [()],就可以不用像上面一样写得这麽长了,这个方法会在之後详细讲解。
Parent calls an @ViewChild()
介绍完 @Input() 与 @Output() 後,接着要来介绍 @ViewChild() 这个东西,他的存在是因为在 Angular 中父层 Component 无法访问到子层的 Component,因为每个 Component 都是一个个独立的 Class instance,所以在没有互相连接的情况下是不能访问到子层的 property 和 method,所以当开发时遇到这类型的状况时,需要将子层 Component 作为 ViewChild inject 给父层,在下面举一个简单的例子。
Configuring the child component
首先先在 child.component.ts 新增一个 property 与 method,让使用者点击画面的 button 时可以加减这个值。
import { Component } from '@angular/core';

@Component({
  selector: 'app-child-component',
  templateUrl: './child.component.html',
  styleUrls: ['./child.component.css']
})
export class ChildComponent {
  childCounter = 0;       // (1)
  constructor() { }

  parentValueChange(value: boolean) {     // (2)
    if (value) {
      this.childCounter++;
    } else {
      this.childCounter--;
    }
  }

  childCounterValue() {                   // (3)
    return this.childCounter;
  }
}
- (1): 新增一个 property 让他可以被增加或减少
- (2): 新增一个 method,当使用者点击画面按钮时触发
- (3): 新增一个 method,他将回传子层的 property
Configuring the child's template
接着我们在 child.component.html 中新增两个 <button> 并将我们的 childCounter 显示出来。
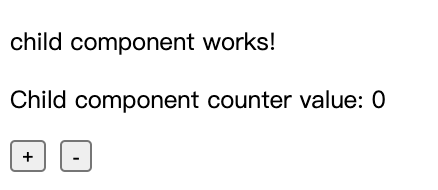
<!-- child.component.html  -->
<p>child component works!</p>

<p>Child component counter value: {{childCounter}}</p>
<div class="button">
    <button (click)="parentValueChange(true)">+</button>
    <button (click)="parentValueChange(false)">-</button>
</div>
Configuring the parent component
接着我们在父层在 '@angular/core' 中引入 ViewChild 并将他绑定在子层上
import { Component, AfterViewInit, ViewChild } from '@angular/core';  // (1)
import { ChildComponent } from '../child/child.component';            // (2)

@Component({
  selector: 'app-parent-component',
  templateUrl: './parent.component.html'
})
export class ParentComponent implements AfterViewInit {
  @ViewChild('childComponent')                                        // (3)
  childComponent!: ChildComponent;

  constructor() { }
  counterValue = 0;

  ngAfterViewInit() {}

  getChildCounterValue() {                                            // (4)
    this.counterValue = this.childComponent.childCounterValue();      // (5)
  }
}
- (1): 透过 import 将 ViewChild 引入
- (2): 透过 import 将 sub-component 引入
- (3): 使用 @ViewChild 将 childComponent property 装饰为可以获得子层内容,并将这个 property 的型态设定为 ChildComponent
- (4): 新增一个 method,当使用者点击画面按钮时触发
- (5): 将子层的 property 赋予给父层的 property
Configuring the parent's template
接着我们在 parent.compoent.html 中新增一个 <button>,当使用这点击时触发将子层的 property 赋值给父层的 property 并将他显示出来。
<!-- parent.component.html -->
<p>parent component works!</p>
<div>Get child component counter value: {{counterValue}}</div>
<button (click)="getChildCounterValue()">Get child value</button>
<hr>
<app-child-component #childComponent></app-child-component>
可以看到当我们更改了子层的 property 後, 我们点击了父层的 button 後,父层的 component 透过利用 ViewChild inject 到 parent.component.ts 的方法直接获得了子层中的 method,并将内容赋予在父层的 property 上。
要注意的是,当要用这个方法获得子层的 property 或 method 时,需要在 ngAfterViewInit( ) 结束之後才拿得到,因为需要 Angular 需要完整的初始化完自身 Component 和 sub-component 的 view 之後才能拿到 sub-component 的内容,这点要非常注意。
结论
在本篇章中介绍了如何透过 @Input( ) 进行从父层传递资料给子层的动作,也介绍了如何使用 @Output( ) 将子层的事件向上传递给父层, Component 之间的沟通再开发 Angular app 之间是非常重要的,所以一定要知道该如何使用,最後也介绍了如何将 sub-component inject 给父层,让父层可以直接调用到 sub-component 的 property 和 method,下一篇要来介绍 ng-content,就是将一个 component 投影到另一个 component 上,那我们就下一篇再见吧。
Reference
DAY17 - 第五个小范例 : 图片加浮水印
前言 今天是铁人赛的第十七天,要来做一个临时的side project : 批次在图档上加浮水印 动...
Day 14 JavaScript interop
虽然 Blazor 不需要用到 JavaScript,但某些已有的 library 还是很方便,不能...
如何快速上手第三方套件
在现在这种讲求快速开发的开发模式,我们通常不太会自己将所有功能都自己硬刻出来,而是会去使用第三方的套...
用React刻自己的投资Dashboard Day6 - 建立图表区元件,串接API取得数据
tags: 2021铁人赛 React 上一篇使用静态的资料,将多张数据资料表画成线图呈现在网页上,...
#23 数据中中的特徵相关性(2)
相关距离(Correlation Distance) 相关距离定义: python实现相关系数 im...