Day21 Android - Retrofit(Post)
昨天所说的(Get)主要用於取得api的资料,像是昨天https://jsonplaceholder.typicode.com/posts 的网址资料,但今天的post比较属於我去new一个资料然後透过interface接口去建立、新增资料,实作起来最主要差在接口的部分,其他都大同小异,那麽就开始今天的主题(Post)。
Post的部分主要是要new资料,透过接口去置入资料,那麽就接续昨天的程序来做修改的动作,如果还没看过前一篇的可以点选Retrofit(Get)。
主要会有差异的是Internet接口及主程序,因为是套用同一个网站的资料,所以Model(data一样)及manager(要连到的地方一样)可以套用昨天的部分,我在这边还是再贴一次。
首先一样添加依赖、权限。
依赖
    //retrofit资源
    implementation 'com.squareup.retrofit2:retrofit:2.7.2'
    //gson转换器
    implementation 'com.squareup.retrofit2:converter-gson:2.7.2'
权限
<uses-permission android:name="android.permission.INTERNET" />
接着开始看到Model的部分。
Model
Model->data、getter、setter。
public class posts {
    //定义有什麽资料(型态要注意)
    private int userId;
    private int Id;
    private String title;
    private String body;
    //从manager->interface使用call後,使this(这边)定义的资料=取得的资料
    public posts(int userId,int Id,String title,String body){
        this.userId=userId;
        this.Id=Id;
        this.title=title;
        this.body=body;
    }
    //这边是我们熟称的getter、setter,可用於其他class的资料取得或处理
    public int getUserId(){
        return userId;
    }
    public void setUserId(int userId) {
        this.userId = userId;
    }

    public int getId(){
        return Id;
    }
    public void setId(int Id) {
        this.Id = Id;
    }

    public String getTitle(){
        return title;
    }
    public void setTitle(String title) {
        this.title = title;
    }

    public String getBody(){
        return body;
    }
    public void setBody(String body) {
        this.body = body;
    }
}
Manager
//连线基底
public class posts_manager {
    //mInstance为连线转换(Builder)的物件
    private static posts_manager mInstance = new posts_manager();

    private posts_interface Posts_interface;

    private posts_manager() {
        //使用Builder,Url为要连到的网址,之後addConverterFactory的部分就是加入Gson的转换器,然後建立在这个retrofit的物件
        Retrofit retrofit = new Retrofit.Builder()
                .baseUrl("https://jsonplaceholder.typicode.com/")
                .addConverterFactory(GsonConverterFactory.create())
                .build();
        Posts_interface = retrofit.create(posts_interface.class);
    }
    //回传Builder方法
    public static posts_manager getInstance() {
        return mInstance;
    }

    //回传interface的内容(可以使用里面定义的连线名称进行连线)
    public posts_interface getAPI() {
        return Posts_interface;
    }
}
Interface接口
昨天设计的Get是这个样子
GET
import retrofit2.Call;
import retrofit2.http.GET;

public interface posts_interface {
    @GET("posts/1")// posts/1:posts的第一笔资料路径
    Call<posts> getpost();//取得连线後的回传资料给posts物件,後者getpost()为此连线的方法名称
    @GET("posts")//posts多笔资料的路径 用List包
    Call<List<posts>> getposts();//取得连线後的多笔回传资料给posts物件并包装成List,getPosts()为此连线的方法名称
}
POST
而今天要设计的是POST,所以要用的是@POST。
import retrofit2.Call;
import retrofit2.http.Body;
import retrofit2.http.POST;

public interface posts_interface {
    @POST("posts")//将资料传送新增
    Call<post> posts_data(@Body posts post);//传送@Body型态的posts资料物件
}
稍後我们可以透过posts_data这个名称来将我们new的一笔资料传入新增,型态为@Body。
主程序(MainActivity)
public class MainActivity extends AppCompatActivity {
    posts_interface Posts_interface;
    @Override
    protected void onCreate(Bundle savedInstanceState) {
        super.onCreate(savedInstanceState);
        setContentView(R.layout.activity_main);
        Posts_interface=posts_manager.getInstance().getAPI();
        posts Post = new posts(21,21,"this is a title","this is a body");//new一笔资料
        Call<posts> call = Posts_interface.posts_data(Post);//发送到posts_data函数中,资料Post型态为@Body发送
        call.enqueue(new Callback<posts>() {//建立call连线
            @Override
            public void onResponse(Call<posts> call, Response<posts> response) {//连线成功,取得回传的东西
                Log.d("Post_TAG","response call:"+response.code());
                Log.d("Post_TAG", "Userid:"+response.body().getUserId());
                Log.d("Post_TAG", "Id:"+response.body().getId());
                Log.d("Post_TAG", "Title:"+response.body().getTitle());
                Log.d("Post_TAG", "Body:"+response.body().getBody());
            }

            @Override
            public void onFailure(Call<posts> call, Throwable t) { //连线失败
                Log.d("Post_TAG","fail");
            }
        });
    }
}
post主要在发送资料到後台进行新增,像是我现在已经有100笔资料在里面,透过post我可以进行新增,可能是一笔也可能是多笔(我这边是新增一笔,也可透过回圈新增等),而get主要在取得api资料,但都算是蛮重要的两个应用,那麽明天我就先来提提rxjava的Observe和Observable,之後会让这部分一起和rxjava做应用!
成果
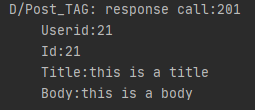
请求成功,状态码201。
[Day-8] if判断条件式
今天要来练习的是新东西~ 就是「if、else 条件判断」 在程序里面使用if条件判断 可以让程序有...
[Day-15] R语言 - 分群应用(一) 补值前处理 ( Fill.NA with Clustering in R.Studio )
您的订阅是我制作影片的动力 订阅点这里~ 影片程序码 ## 应用一: 分群补数值 #### libr...
Day-19 PyTorch 怎麽读取资料? Dataset and DataLoader
今天来聊聊怎麽读取资料和调整资料集,你可能会问说奇怪我们前两天不是就已经可以使用资料了吗?这边有啥...
Day 9 - 元件的资料传输(1)
在Vue中,元件间资料沟通传递的方式,一直都是个不容忽视的问题,妥善处理资料流,也是身为工程师的必学...
Day-21 SONY 的刁蛮三公主、PS3 步步艰辛的复兴之路
以 PS1 和 PS2 称霸於前两个世代的 SONY、在新的世代推出的主机当然就叫做 PS3。然而身...