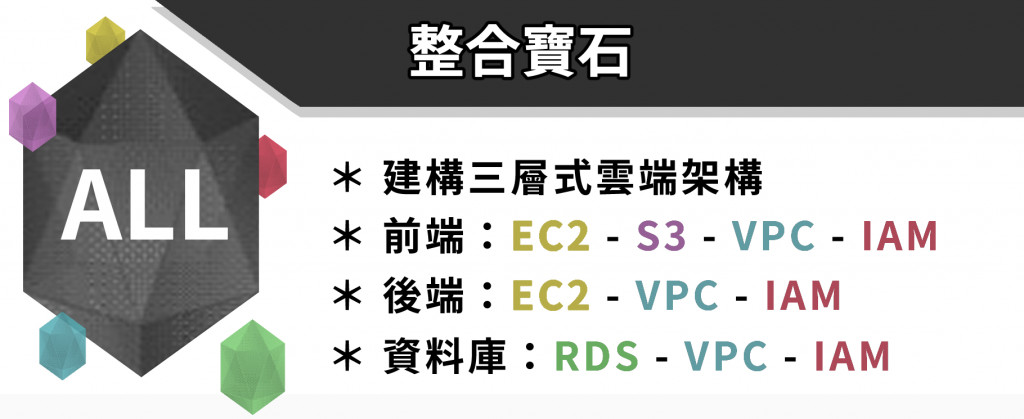
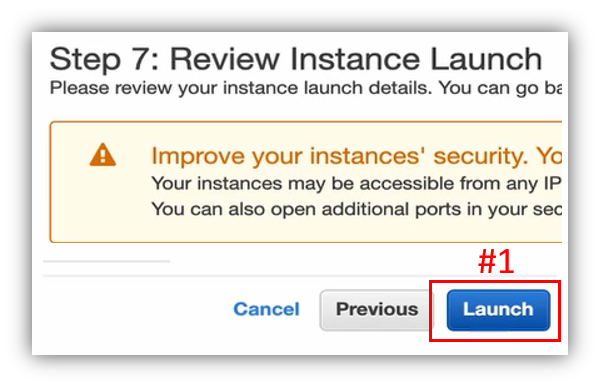
Day 30 整合宝石:【Lab】建构三层式云端架构 (EC2+VPC+S3+RDS+IAM) (下)
本文将继上篇 【Lab】建构三层式云端架构(上),实作下半部分的内容,包含档案控管、RDS/EC2/S3 的节省成本、备份还原与资源清理。
预防误删
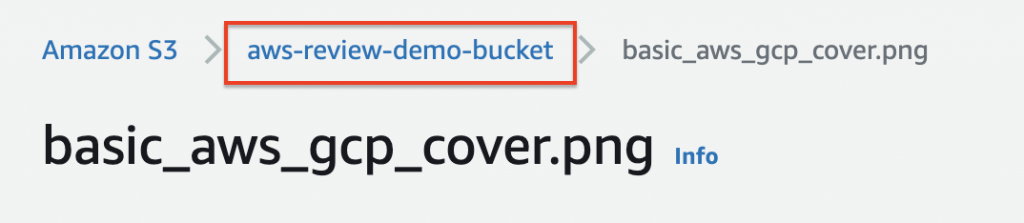
想预防有人误删图片,首先要回到 S3 的介面,切回 Bucket 阶层,如下图:
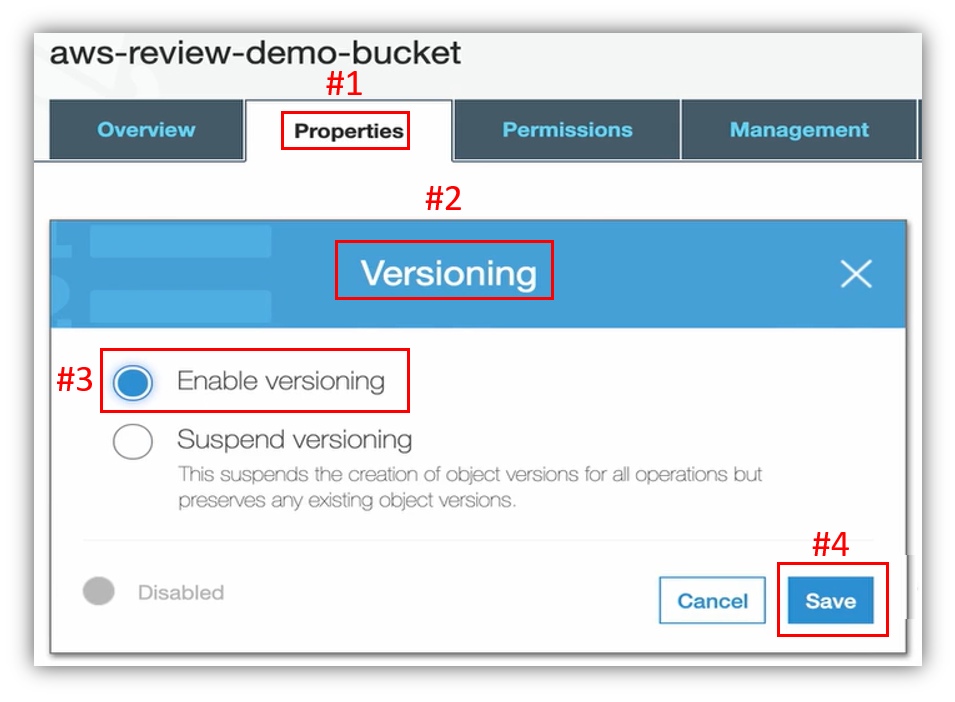
切换至 Properties (下图#1),进入 Versioning 设定(下图#2),点选 Enable 开启(下图#3),按下 Save 储存设定(下图#4)。
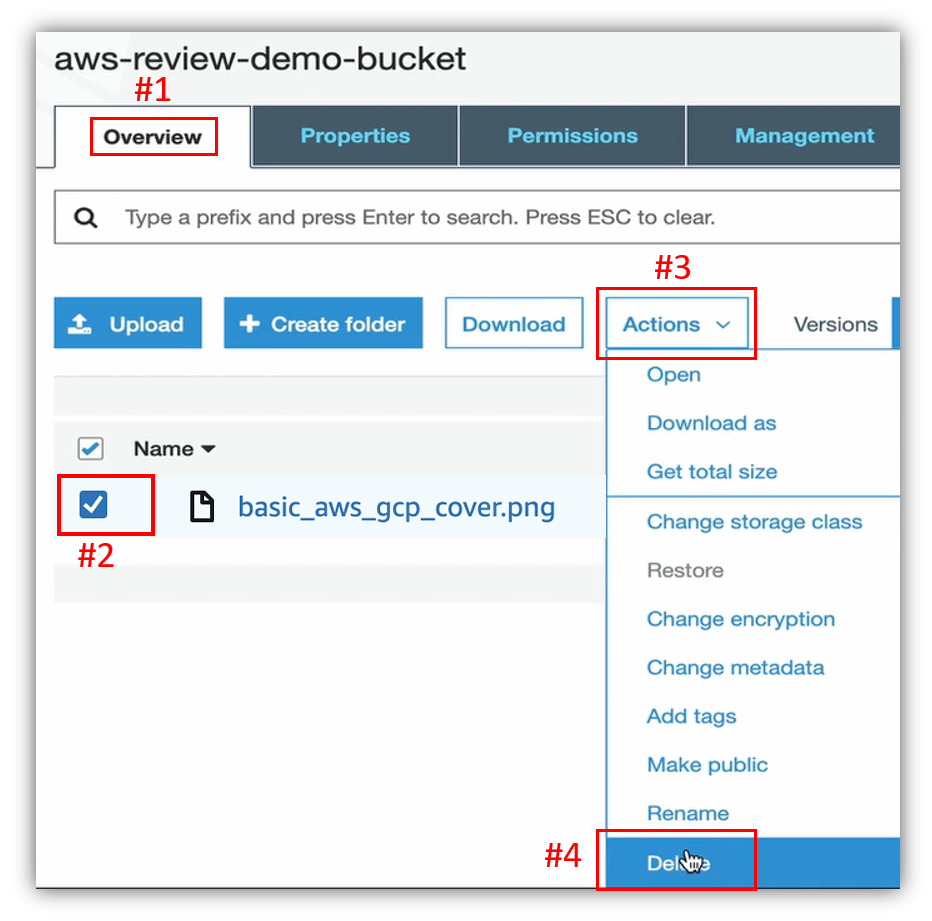
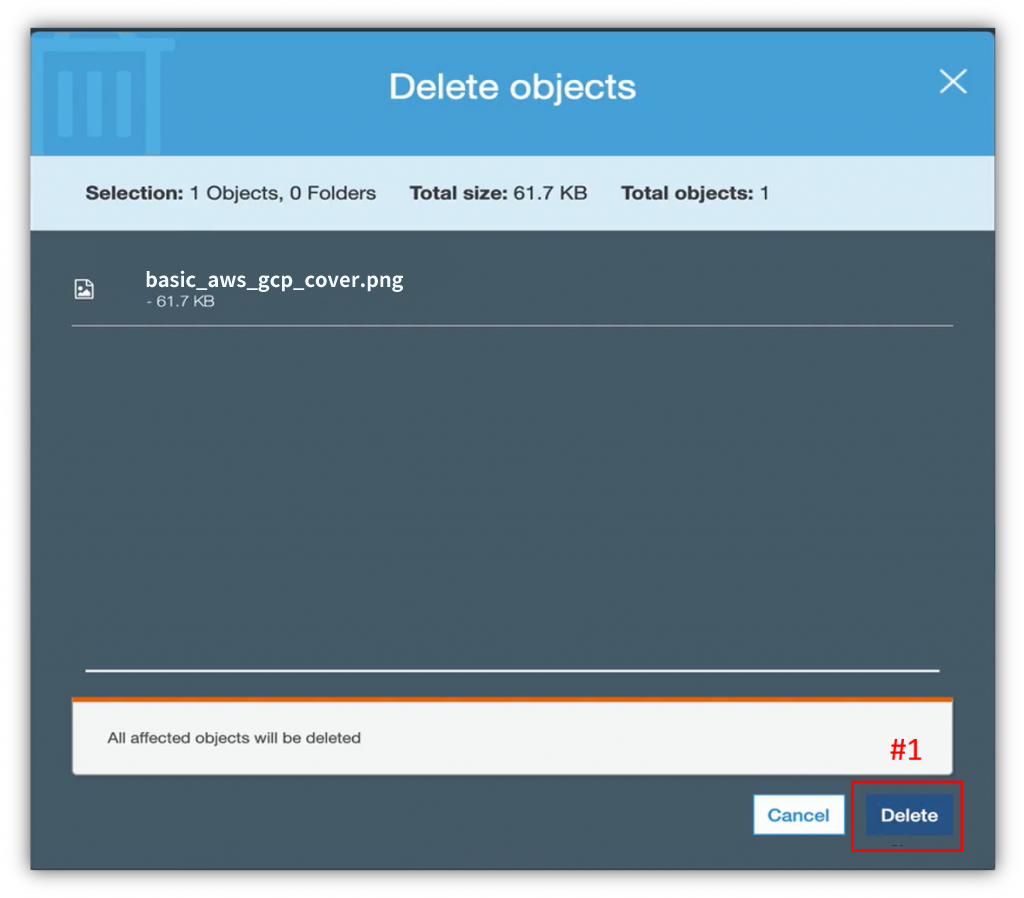
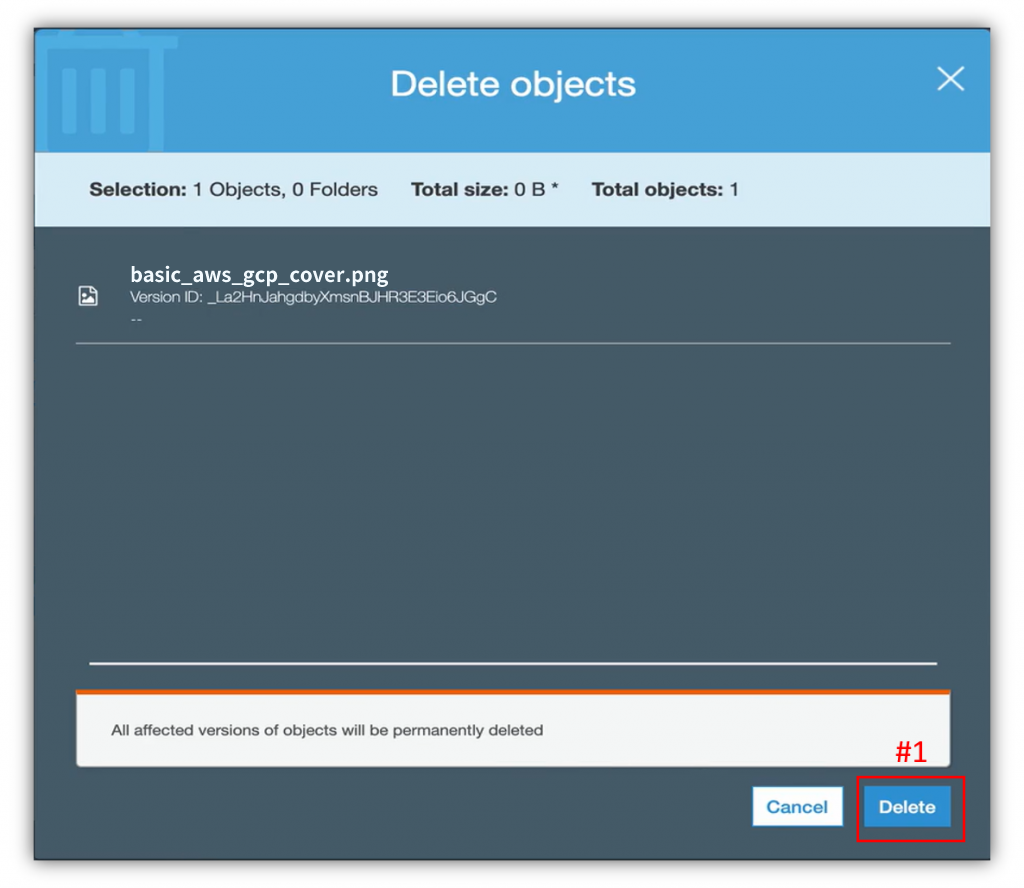
切回 Overview (下图#1),假设同事不小心把档案砍掉,勾选档案(下图#2),从 Action (下图#3),按下 Delete (下图#4)。
点击 Delete 确认删除(下图#1)。
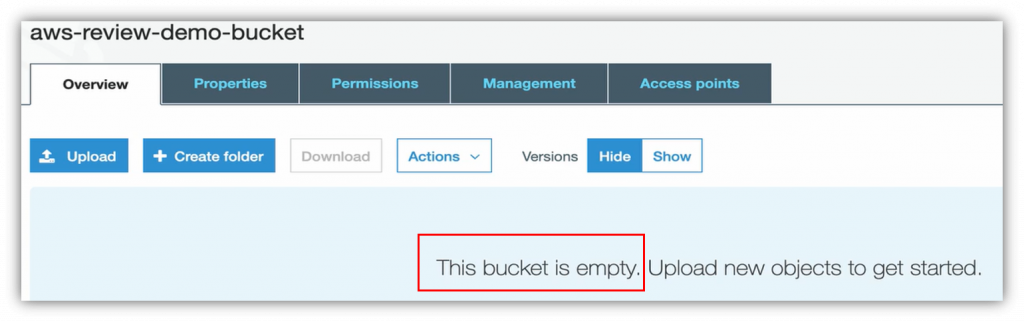
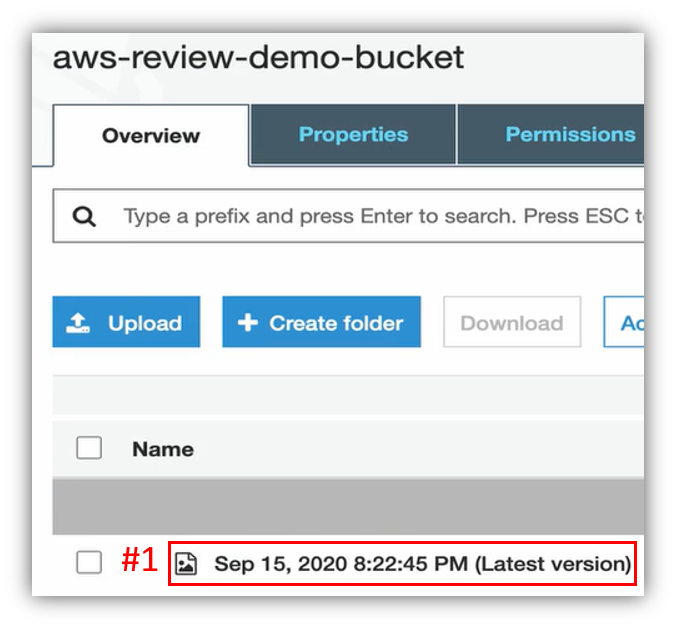
图片被删除,Bucket 变成空的,如下图:
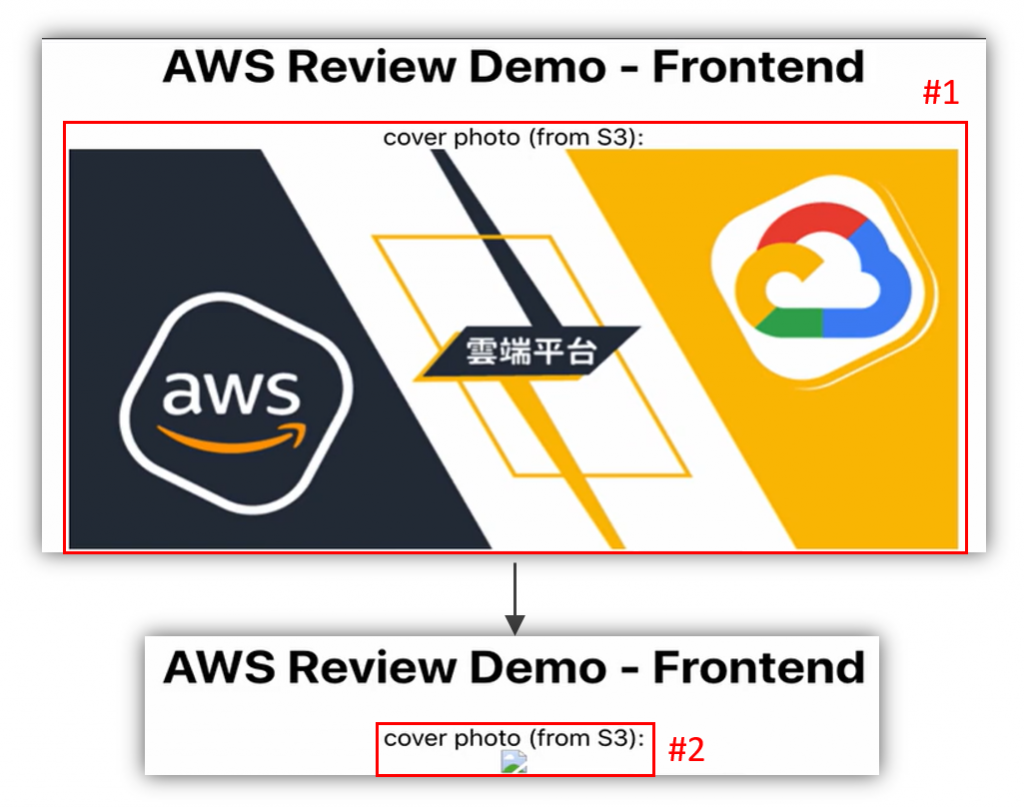
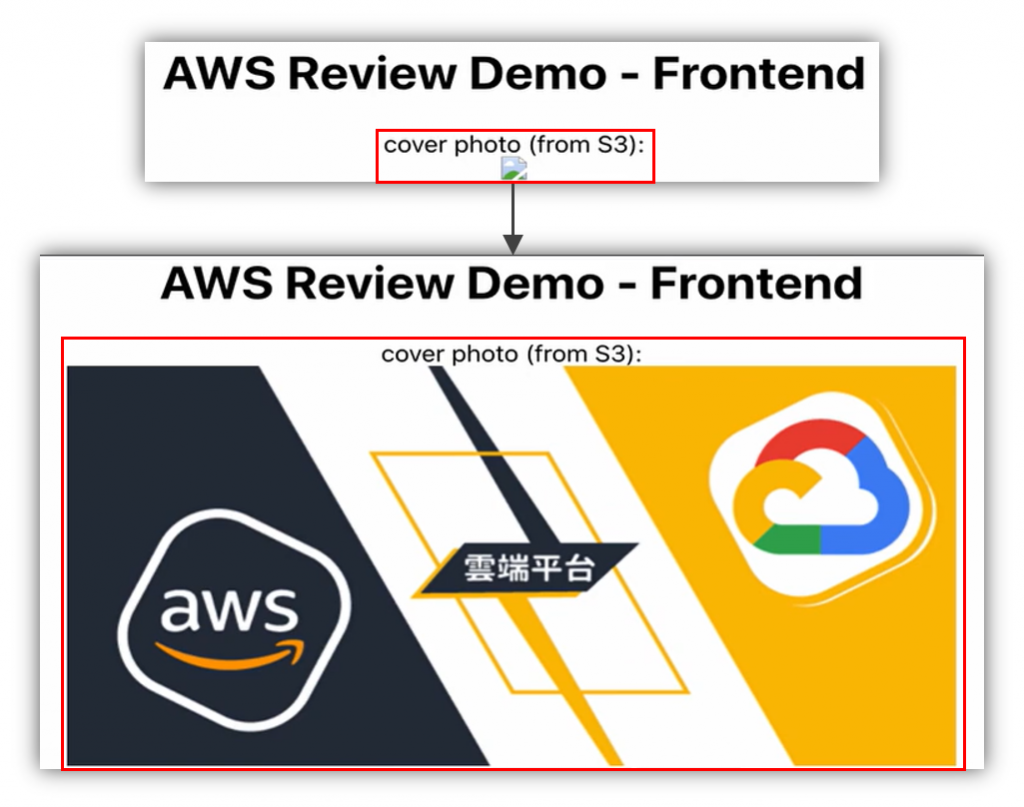
回到前端首页,重新整理,会发现图片还在(下图#1),这是因为目前存有 Cache,所以清除 Cache 後再一次重新整理,也就是说,在 S3 上的图片误删後,未来使用者进入首页就会看不到图片(下图#2)。
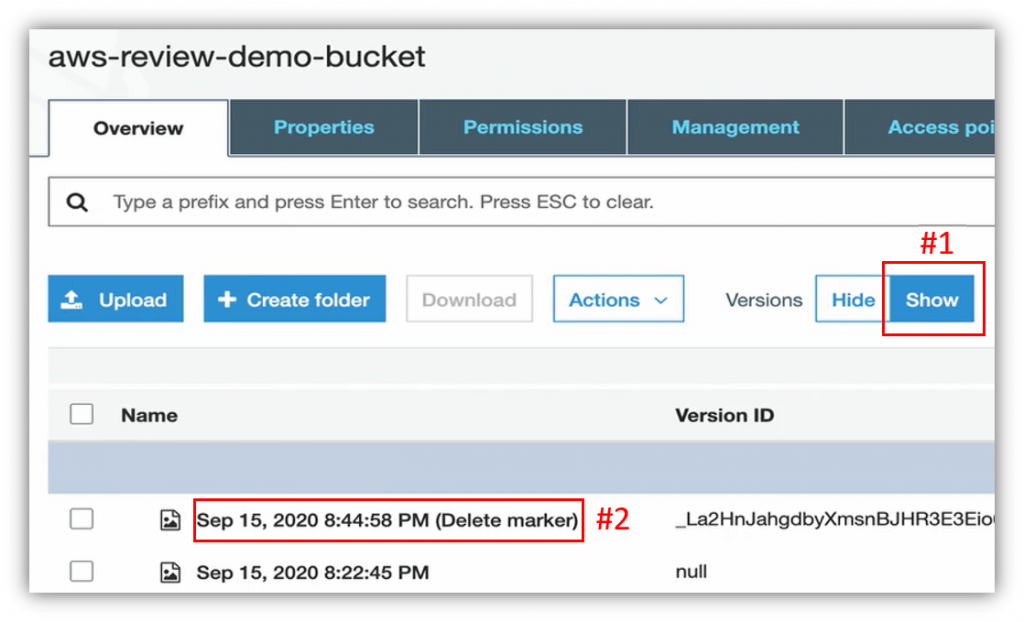
回到 S3,由於有即时开启 Versioning 功能,所以按下 Show (下图#1),被删除的档案又会出现,只是多出 Delete marker (下图#2)。
想回复档案,删除 Delete marker 档案即可;勾选 Delete marker 档案(下图#1),点 Action(下图#2),按下 Delete (下图#3)。

点击 Delete 确定删除 Delete marker (下图#1)。
可以看到 Bucket 页面剩下之前的版本(下图#1)。
回到前端首页,清空 Cache 并重新整理,便能看到首页图又回来了,如下图:
节省成本与备份
假设现在大环境经济萧条,这间公司决定把所有营运项目都先暂停个半年,身为工程师的我们可以做些什麽来帮公司节省一些成本呢?这边就来示范我们一连串已经学过的备份还原功能,首先是把跟运算资源相关的资源给停掉,甚至砍掉。
节省成本与备份 —— RDS
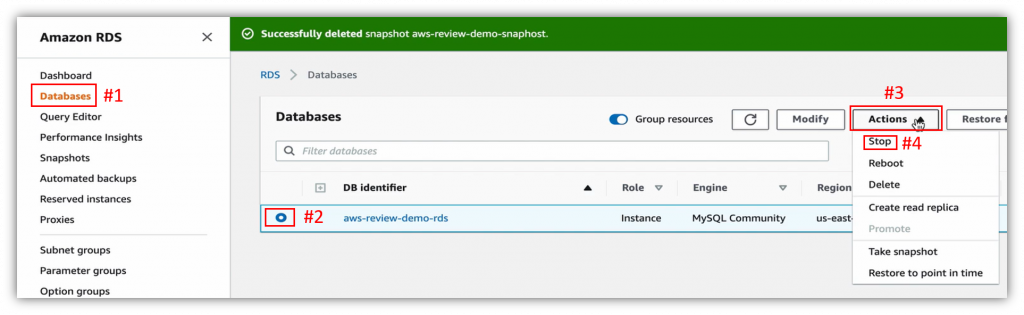
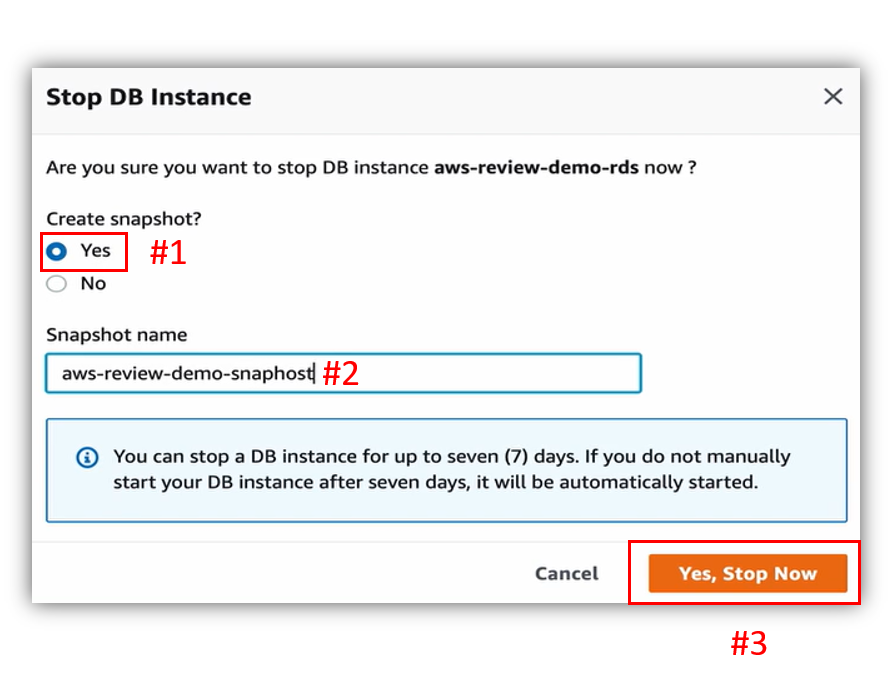
首先到 RDS 介面,切换至左方列表 Databases (下图#1),选择资料库(下图#2),透过右方 Actions (下图#3),选择 Stop 设定停止动作(下图#4)。
选择 Yes 建立 Snapshot (下图#1),并给予名称(下图#2),再点击右下 Yes, Stop Now 确定停止(下图#3)。
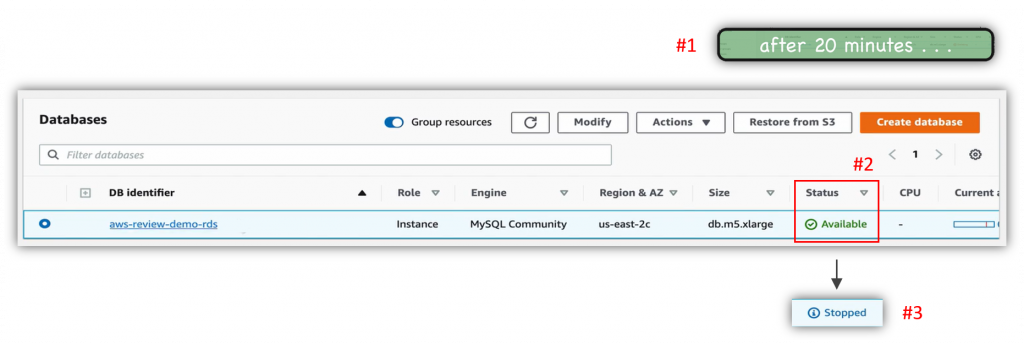
等待大约 20 分钟後(下图#1),Database 的状态就会从 Available (下图#2)转为 Stopped 停止(下图#3)。
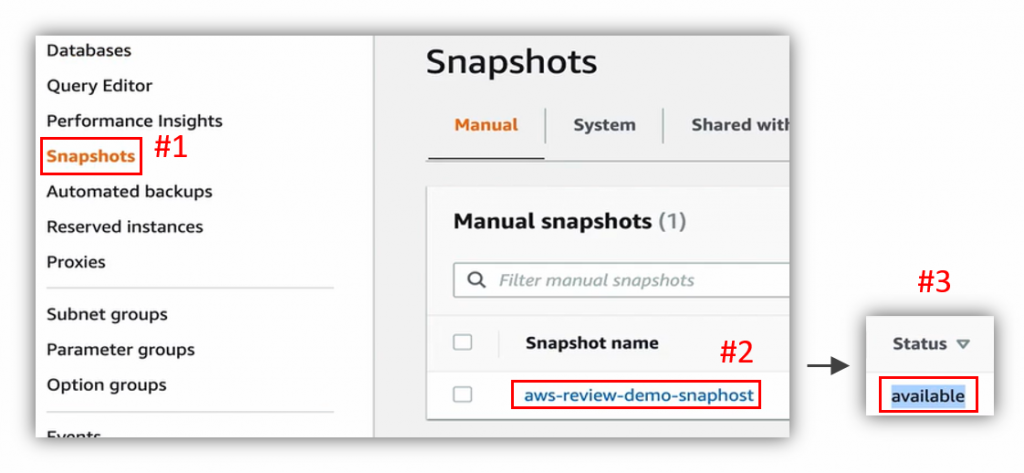
再来进入左方列表 Snapshots (下图#1),可以看到右方页面有刚才创建的 Snapshot (下图#2),里面有资料库所有的备份资料,再往右看可以看到 Status 是 available 状态(下图#3),这是代表 Snapshot 建立成功的意思。
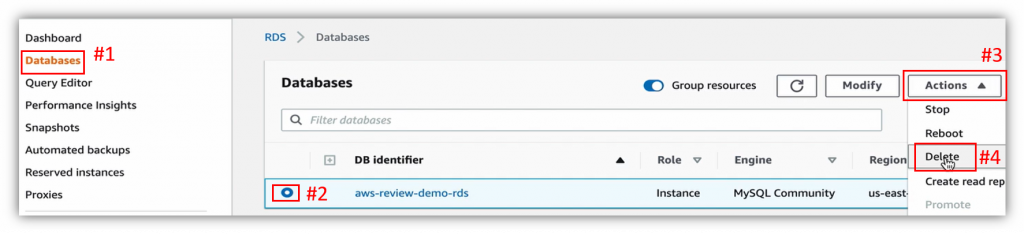
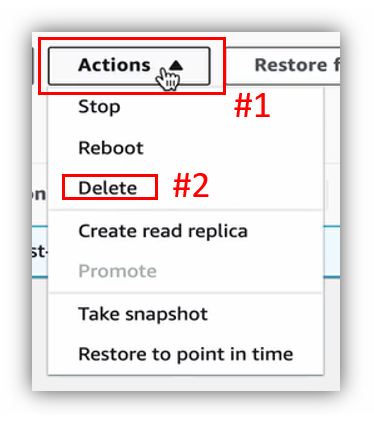
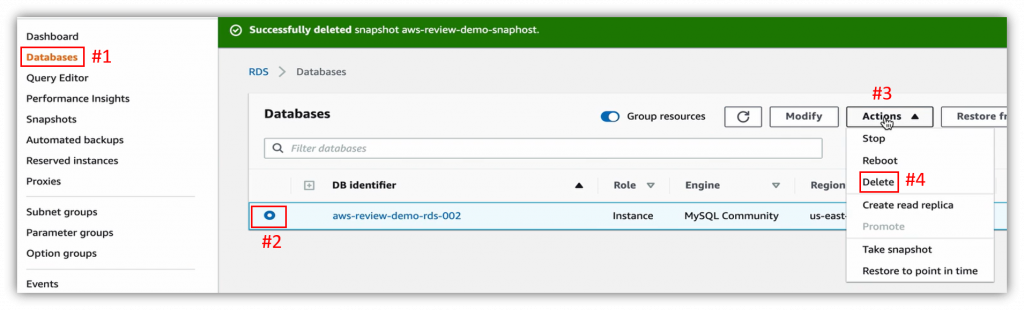
再从左方列表回到 Databases (下图#1)。这边来讨论一下,当 Stop 一个 RDS Instance 的时候,就可以节省运算资源的部分花费,但底下的 EBS Volume 还是会继续算钱,所以如果真的要省钱,假设要半年不做事的话,选择资料库(下图#2),从 Actions (下图#3),直接整个 Delete 掉(下图#4)。
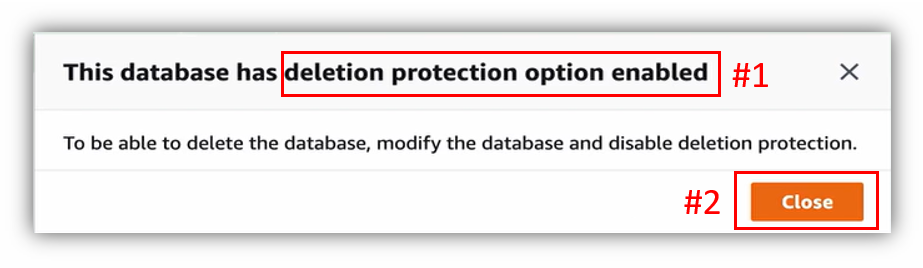
但进行 Delete 前,会发现 deletion protection 是启动状态(下图#1),按 Close 关闭提示讯息(下图#2)。
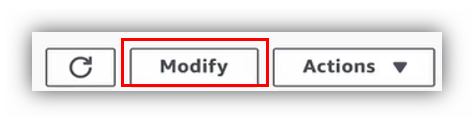
进入 Modify 设定,如下图:
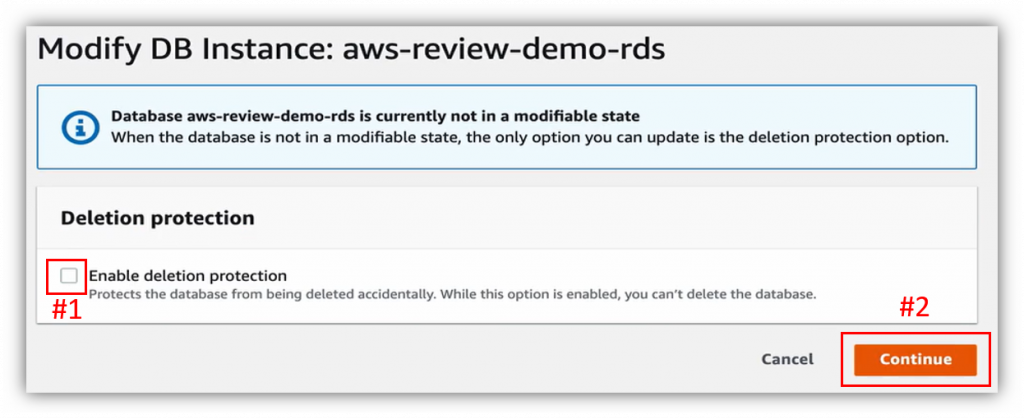
把 Enable deletion protection 取消(下图#1),点击右下 Continue (下图#2)。
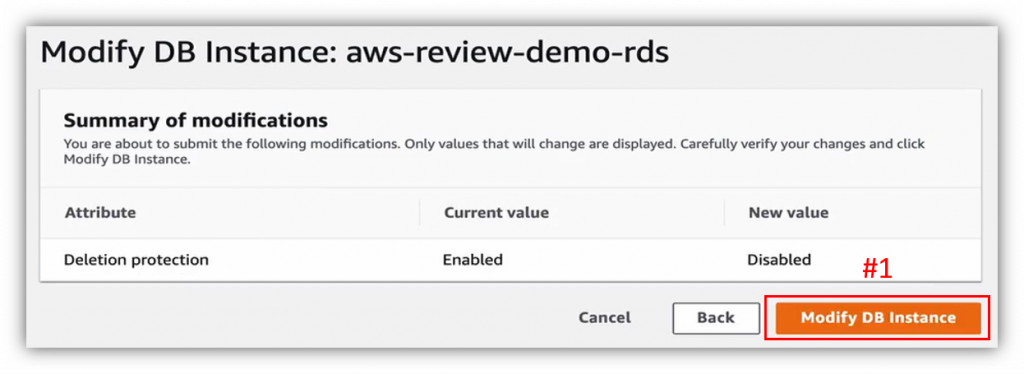
点击右下 Modify DB Instance 确认 Modify (下图#1)。
展开 Actinos,点选 Delete,进行刚才无法进行的设定删除动作。
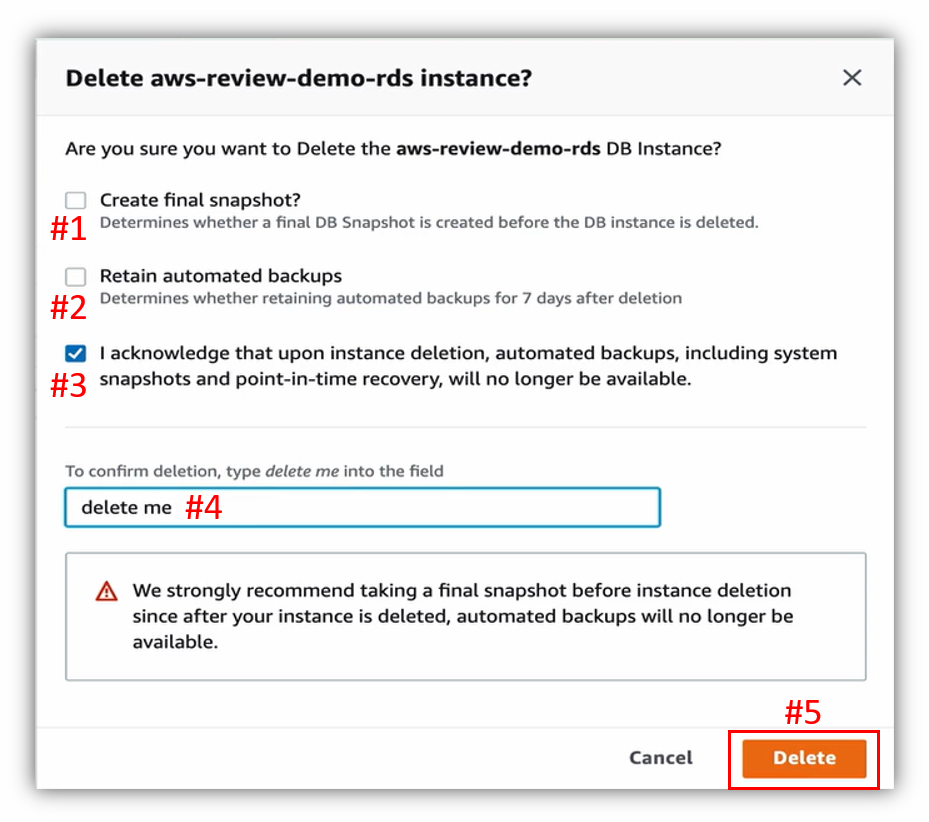
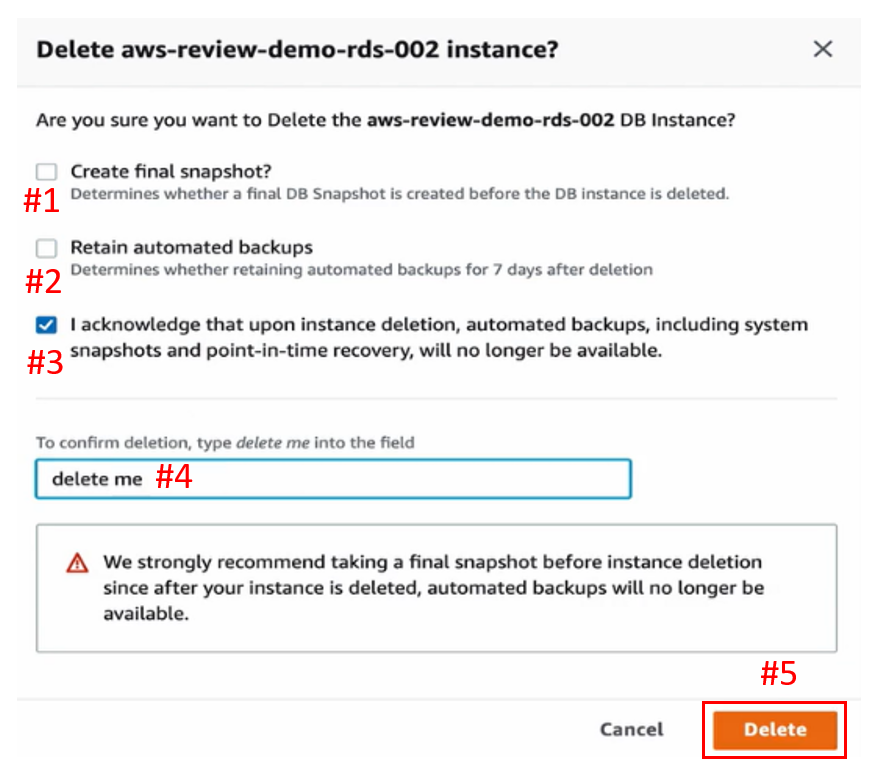
由於先前已创造过 Snapshot,所以取消 Create Snapshot 的选项(下图#1),不需要再创造一个 Snapshot,也不用保留自动备份(下图#2),勾选 Acknowledge 确认(下图#3),输入 delete me (下图#4),点击 Delete 删除(下图#5)。
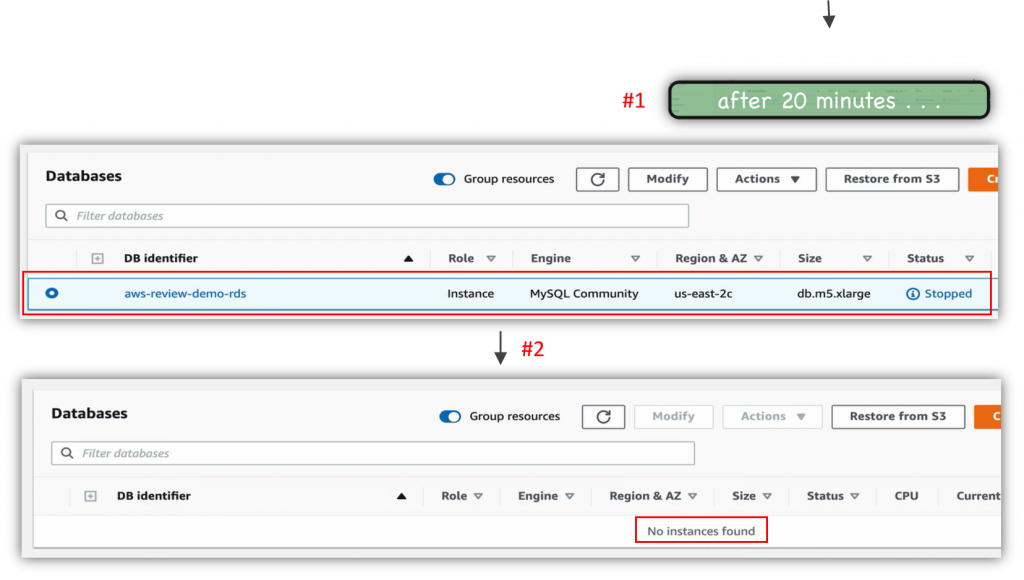
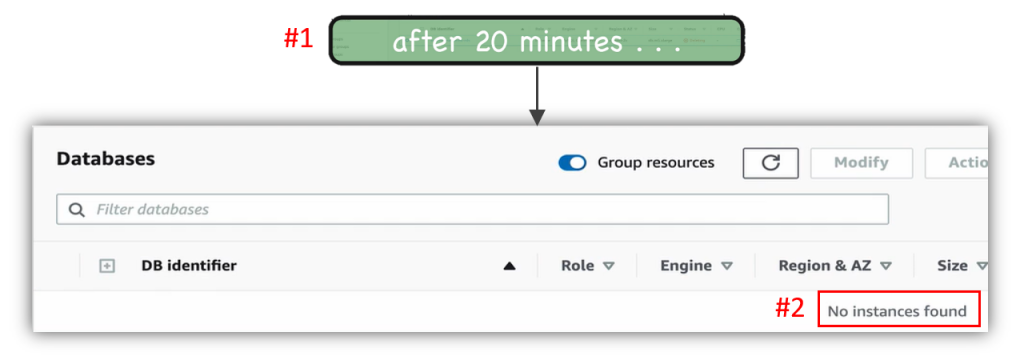
等待大约 20 分钟後(下图#1),即完成 RDS 的部分停机准备(下图#2)。
节省成本与备份 —— EC2
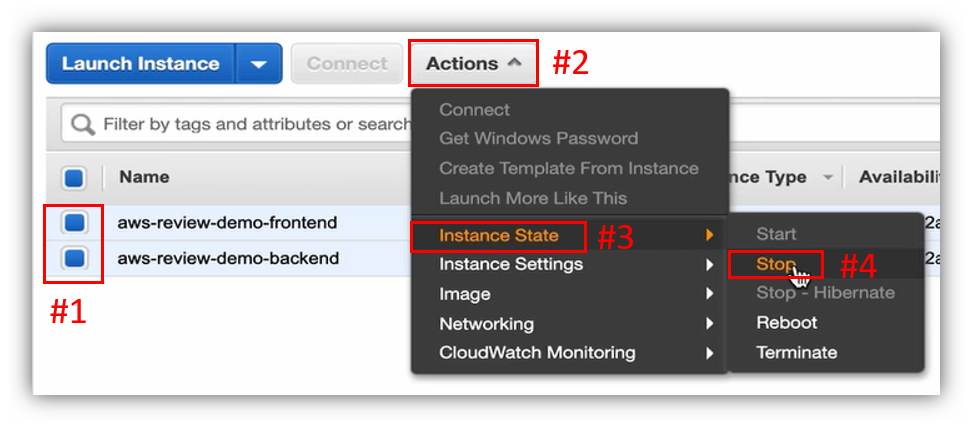
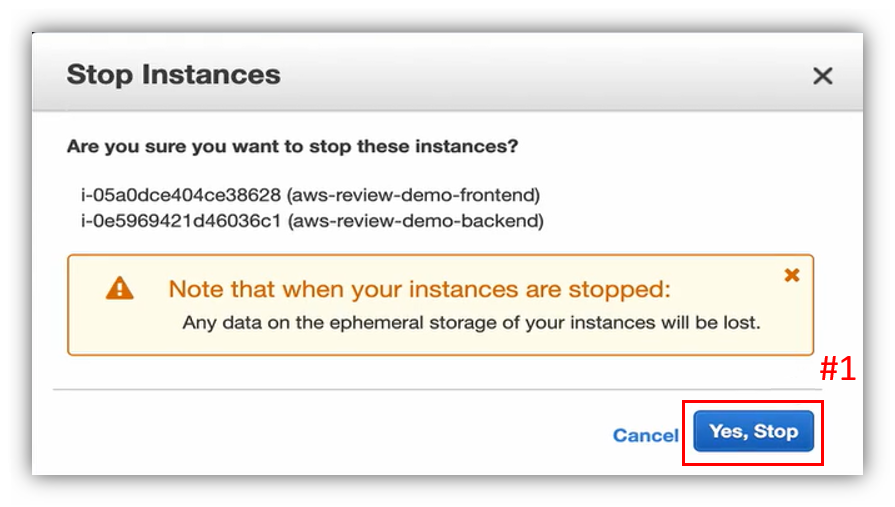
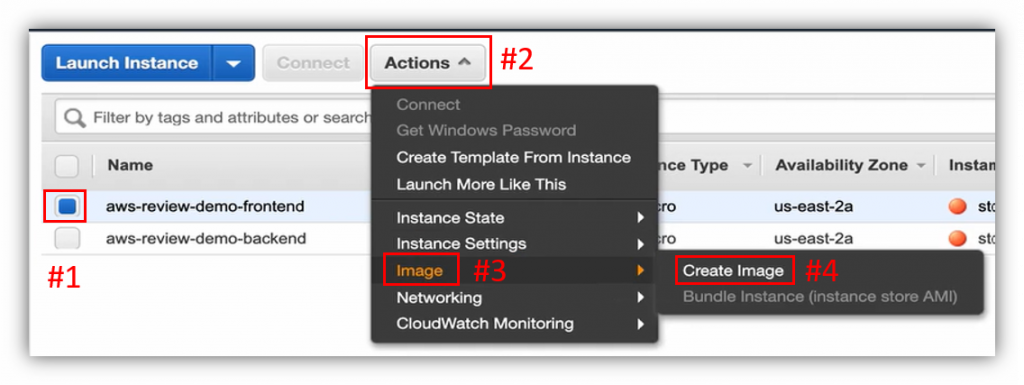
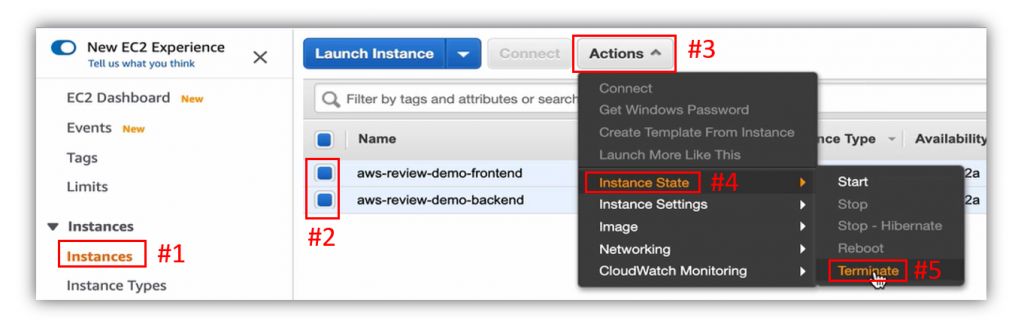
到 EC2 Instances 页面,勾选前端及後端服务器(下图#1),从 Actions (下图#2),选到 Instance State (下图#3),点击 Stop (下图#4),进行停止动作。
点击 Yes, Stop 确定停止(下图#1)。
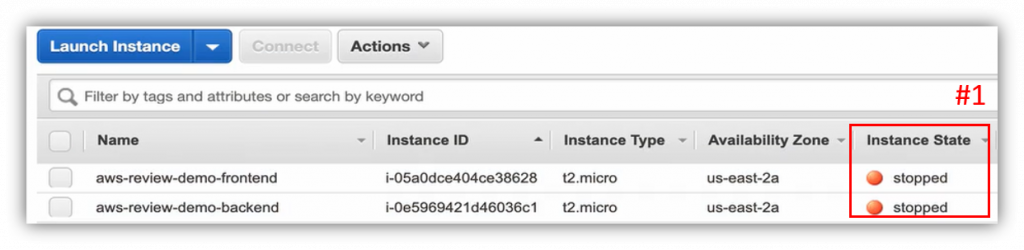
EC2 Instance 停止後(下图#1),接下来再对各自的 EC2 建立 AMI 做永久备份。
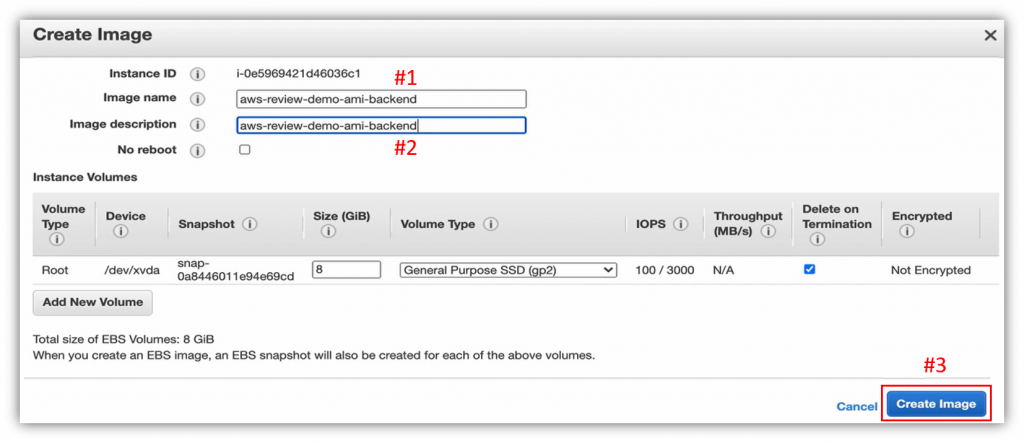
选择後端服务器(下图#1),从 Actions (下图#2)选 Image (下图#3),按下 Create Image (下图#4)。

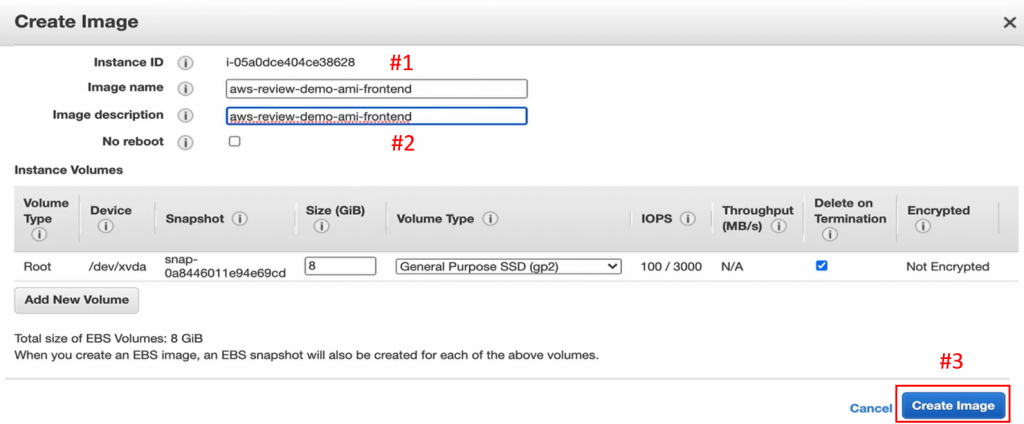
给予名称(下图#1),叙述与名称相同(下图#2),直接点击右下 Create Image (下图#3)。
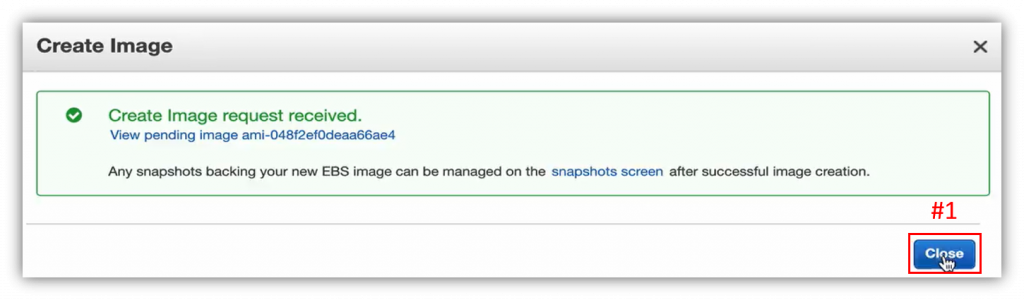
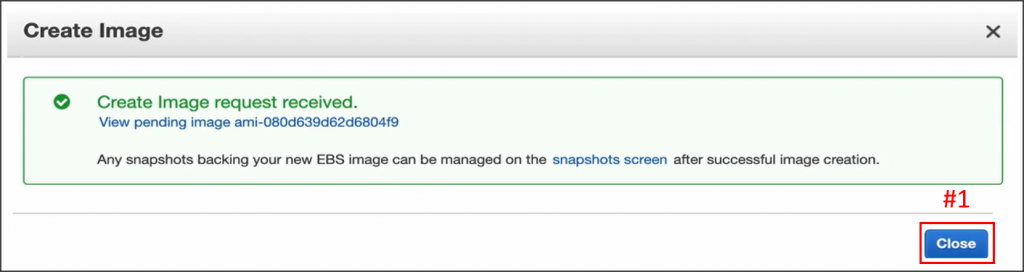
按下 Close (下图#1),关闭视窗。
选择前端服务器(下图#1),从 Actions (下图#2)选 Image (下图#3),按下 Create Image (下图#4)。
给予名称(下图#1),叙述与名称相同(下图#2),直接点击右下 Create Image (下图#3)。
按下 Close (下图#1),关闭视窗。
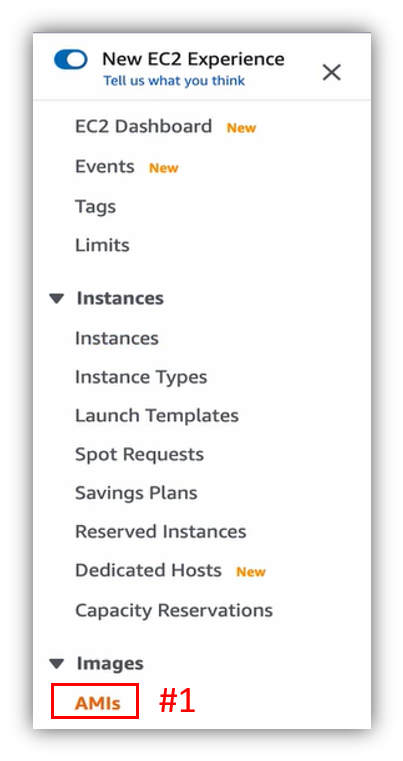
切换至左方列表 AMIs (下图#1)。
等右方 Status 从 pending 转为 available,便完成 AMI 建立,如下图:

由於停止了 EC2,便省下了运算资源的成本,但是 EC2 底下的 EBS Volume 仍然计费中,所以真的要省长期的话,就必须全部砍掉。
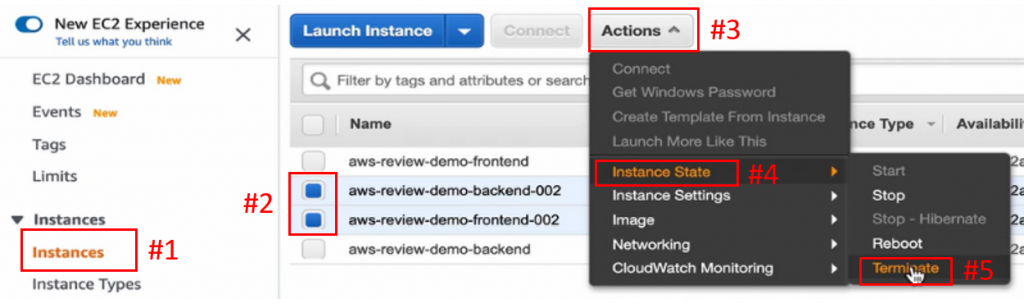
勾选前端及後端 EC2 (下图#1),从 Actions (下图#2)到 Instance State (下图#3),按下 Terminate (下图#4),进行整个清掉的动作。
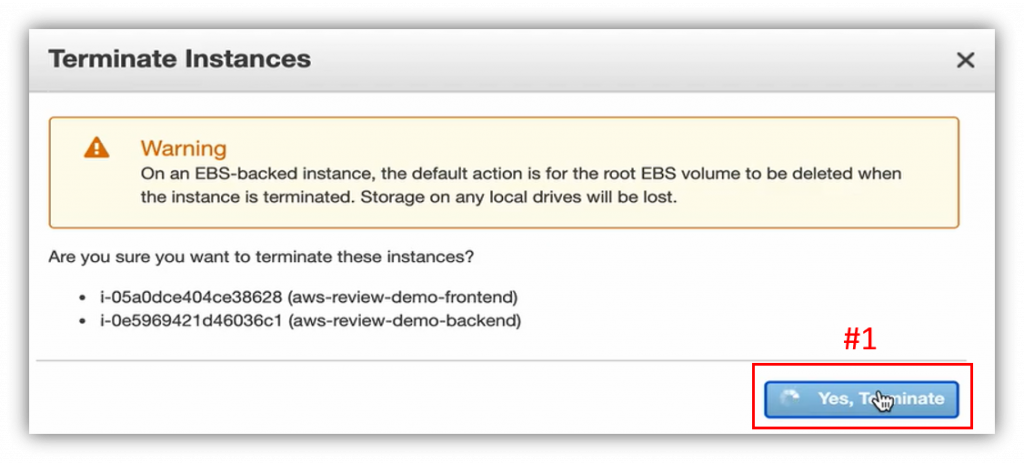
点击 Yes, Terminate 确定(下图#1)。
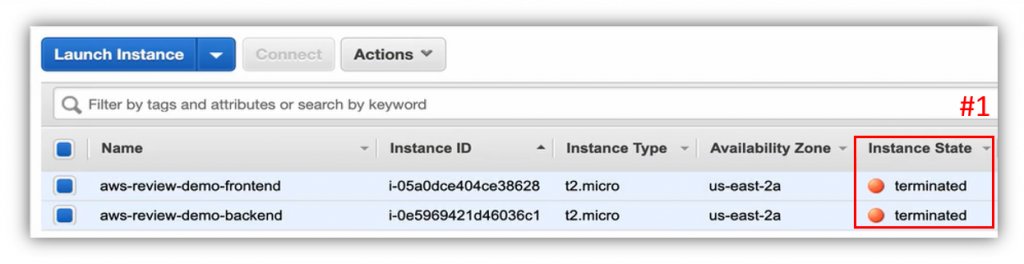
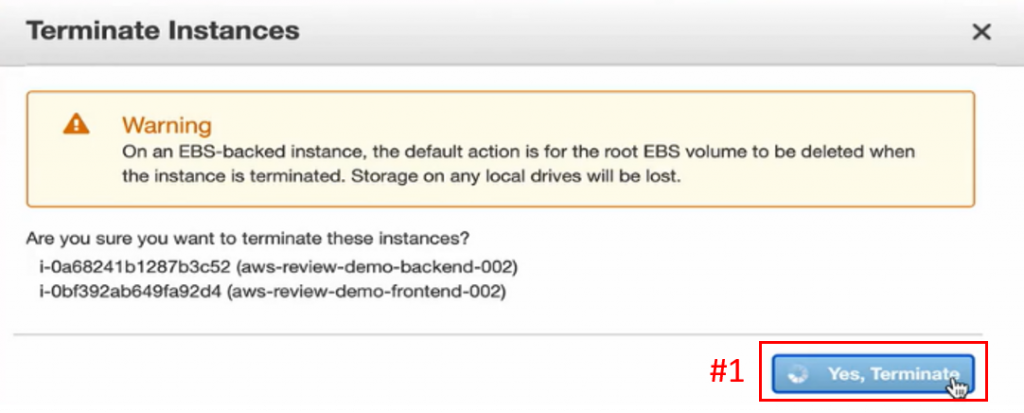
状态变为 Terminated (下图#1),如此便完成了 EC2 的永久保存机制,最後留下的就是先前所创建的两个 AMI 而已。
备份还原 —— RDS
假设就这样过了大半年,经济慢慢恢复,公司决定把专案重新启动。
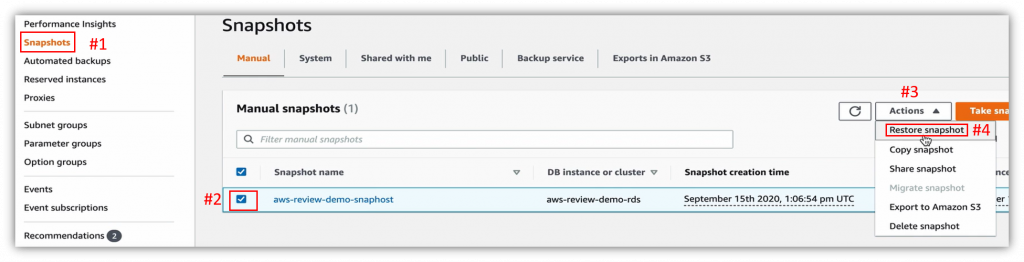
首先,回到 RDS 介面,切至左方列表 Snapshot,右方页面勾选先前为 RDS 建立的 Snapshot,从 Actions 点 Restore snapshot,进行还原动作设定。
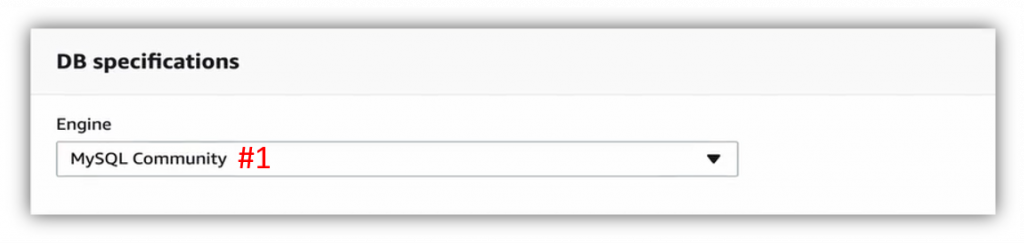
Engine 选择 MySQL Community (下图#1)。
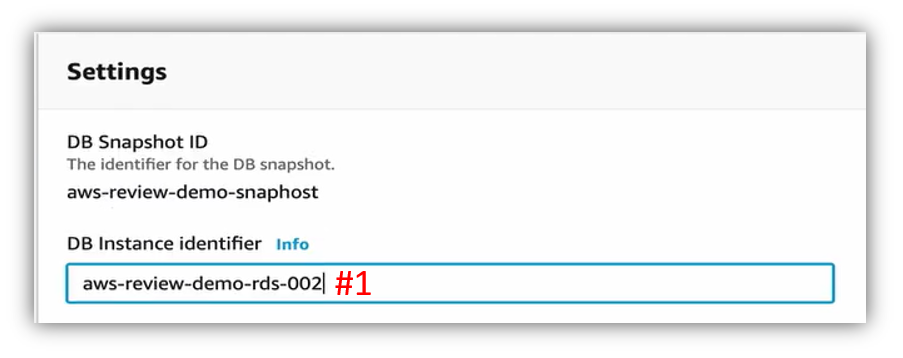
建立名称(下图#1)。
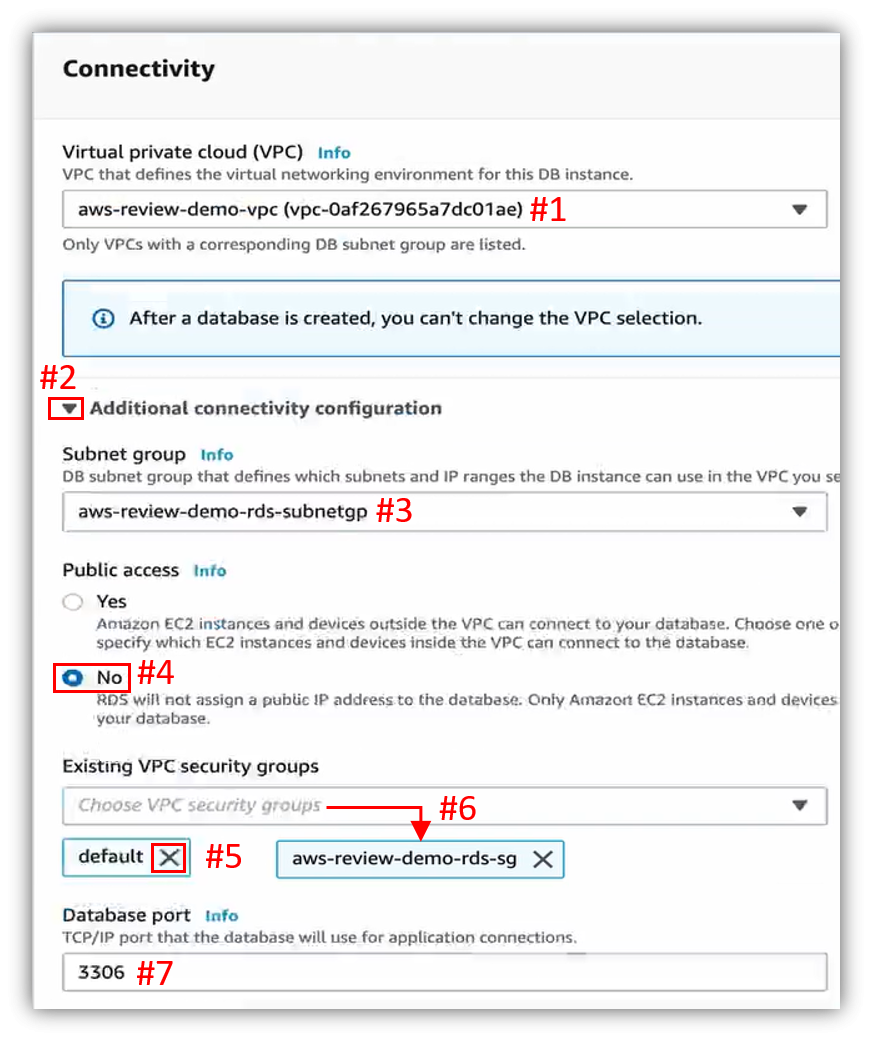
网路选择先前创建的 VPC (下图#1),展开 Additional connectivity configuration (下图#2),选择 Subnet Group (下图#3),不需要 Public access (下图#4),Security Group 取消掉 default (下图#5)并加上之前建造的 Security Group (下图#6),Port 维持 3306 (下图#7)。
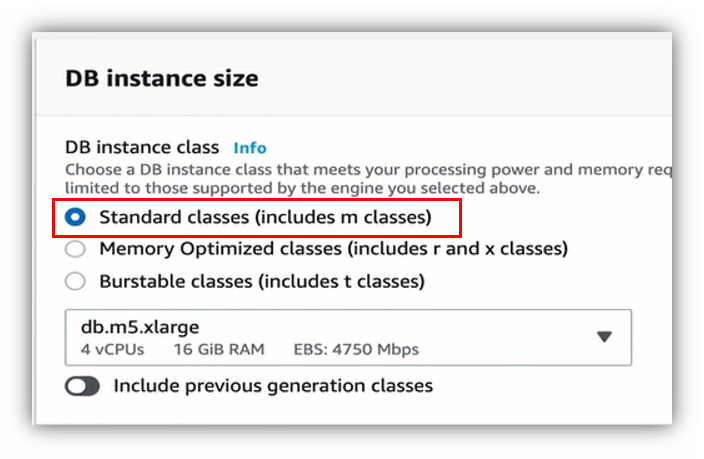
底层 EC2 选择标准的即可,如下图:
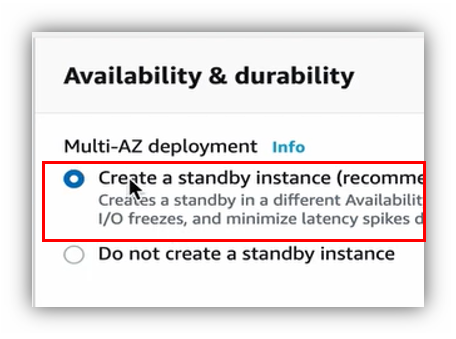
Availability 一样使用 Multi-AZ,如下图:
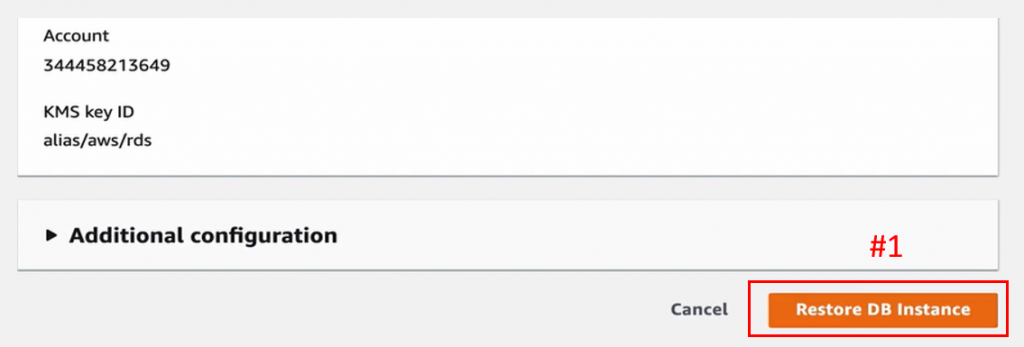
其余设定照旧,拉到页尾,点击右下 Restore DB Instance (下图#1)。
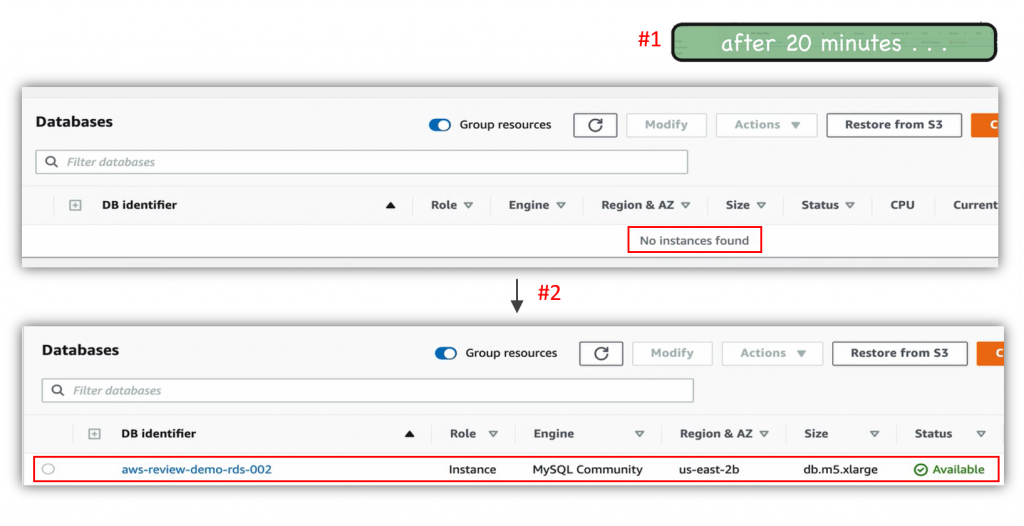
等待大约 20 分钟(下图#1),资料库即完成复原(下图#2)。
备份还原 —— 後端 EC2
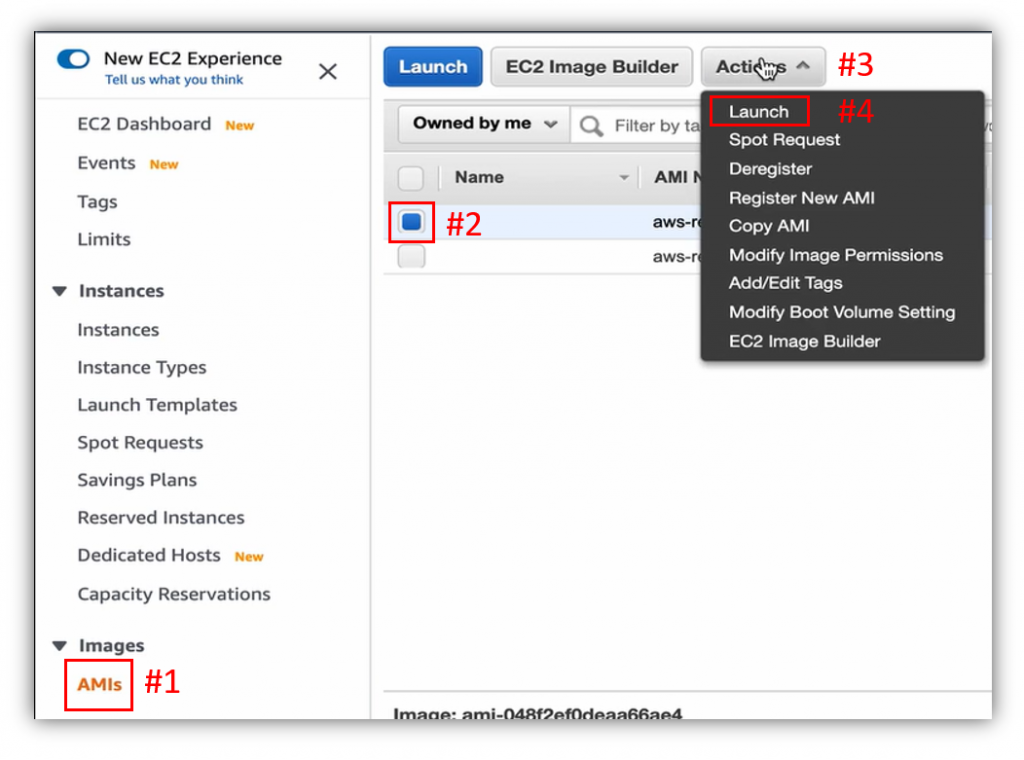
到 EC2 介面的 AMIs 页面(下图#1),勾选後端 AMI (下图#2),从 Actions 按 Launch (下图#3)。
Instance Type 预设即可,点击 Next: Configure Instance Details 下一步(下图#1)。
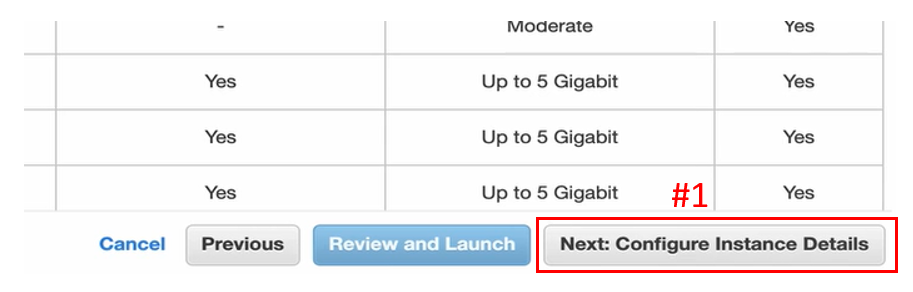
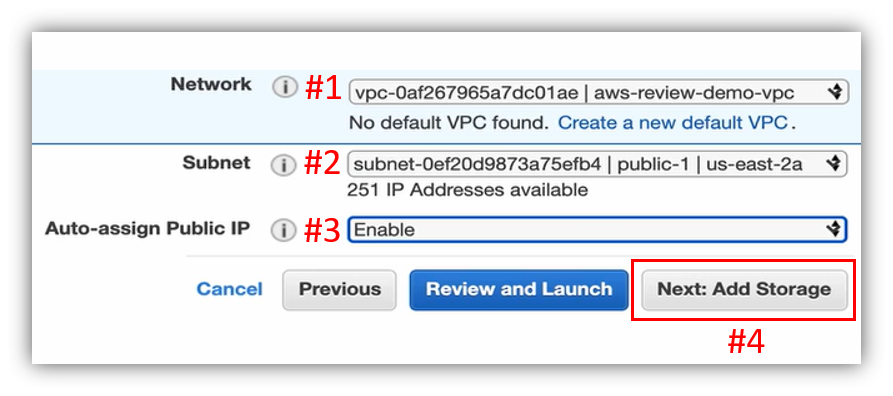
Network 选择先前创造的 VPC (下图#1),Subnet 选择 Public Subnet (下图#2),Enable Public IP (下图#3),点击右下 Next: Add Storage 下一步(下图#4)。
此处的 Snapshot (下图#1)是从 AMI 上面拿下来的,所以会包含之前所拥有的所有档案以及套件下载,点击 Next: Add Tags 下一步(下图#2)。

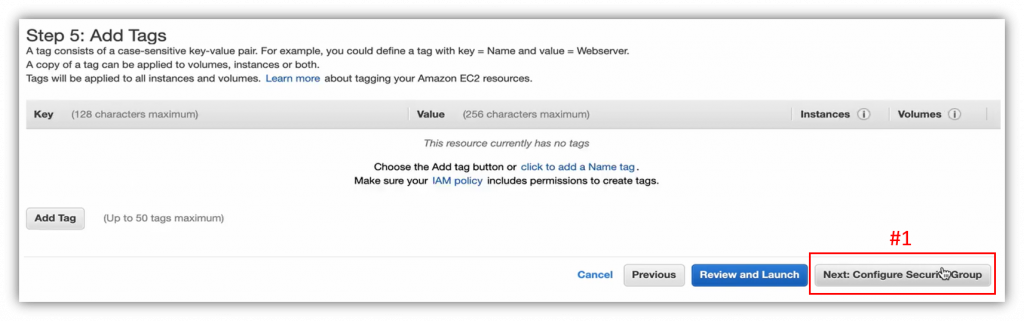
跳过 Tags 设定,点击 Next: Configure Security Group 下一步(下图#1)。
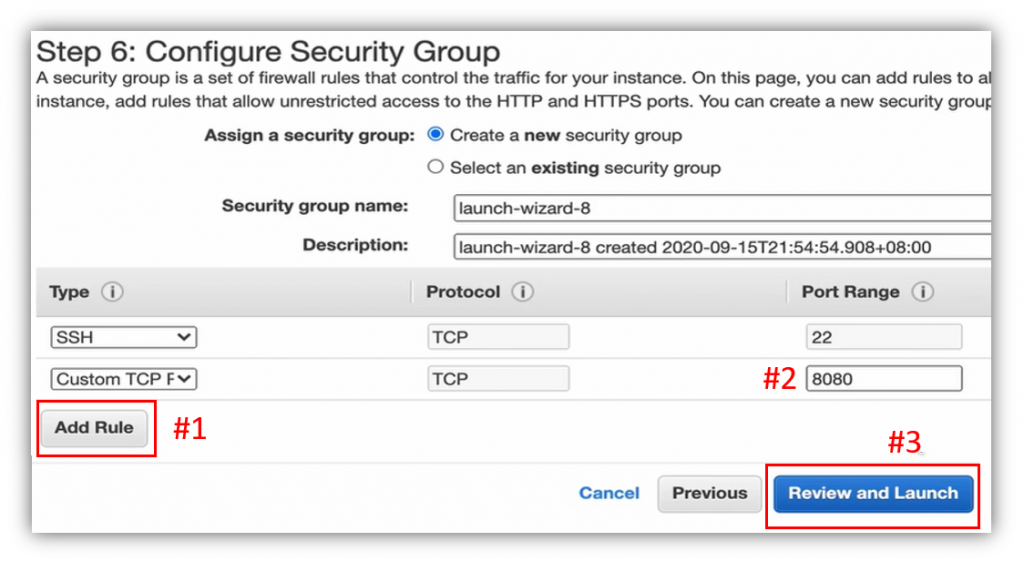
Security Group 的部分,按下 Add Rule 新增(下图#1),开放 8080 Port (下图#2),点击 Review and Launch 下一步(下图#3)。
点击 Launch (下图#1)。
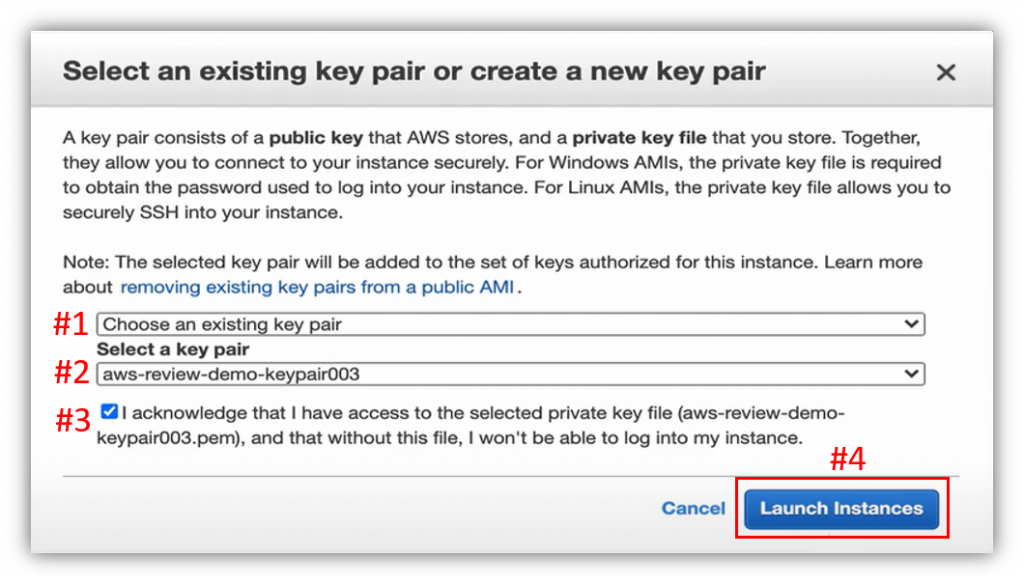
选择一个已存在的 Key Pair (下图#1),选之前使用过的 Key Pair (下图#2),勾选 Acknowledge 确认(下图#3),点击 Launch Instance (下图#4)。
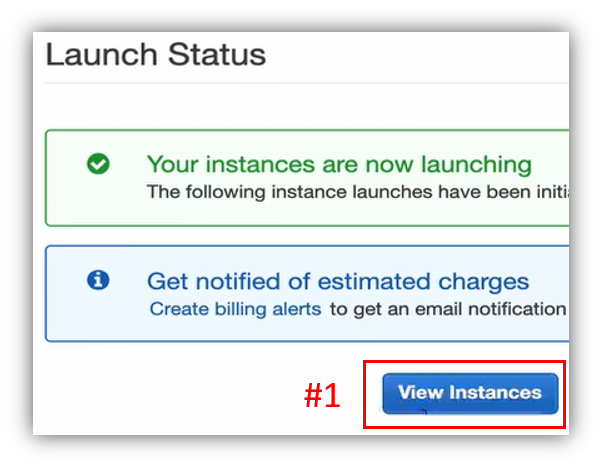
点击 View Instance (下图#1)。
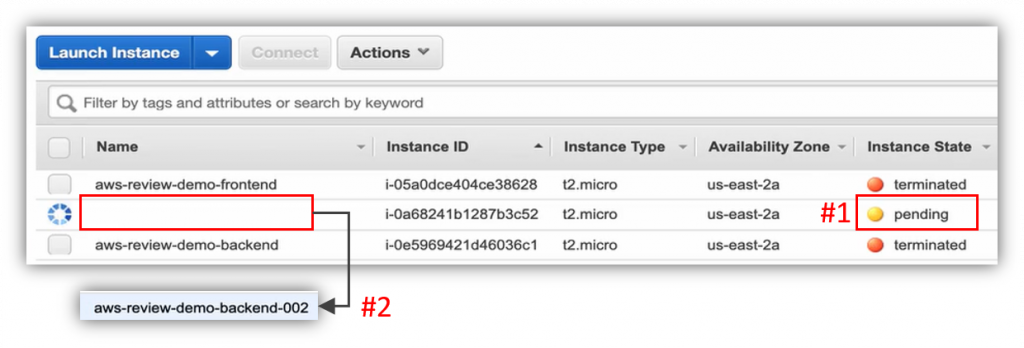
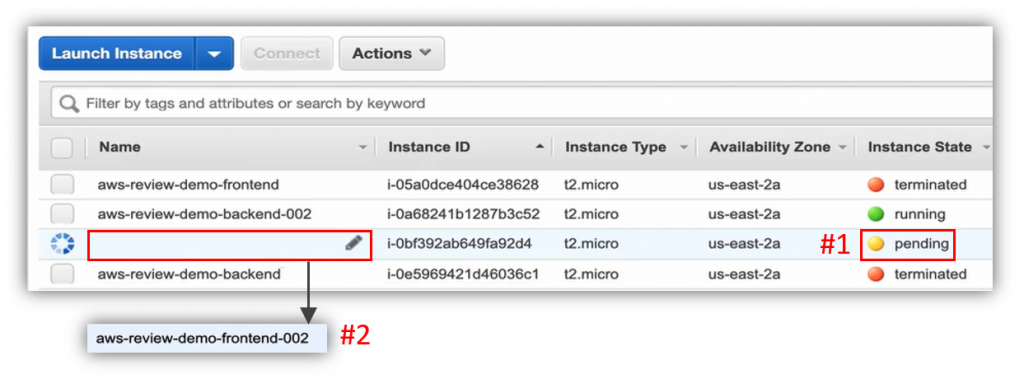
在後端启动的过程中(下图#1),可以先建立名称(下图#2)。
後端启动後(下图#1),勾选启动的後端(下图#2),再点击 Connect (下图#3)。
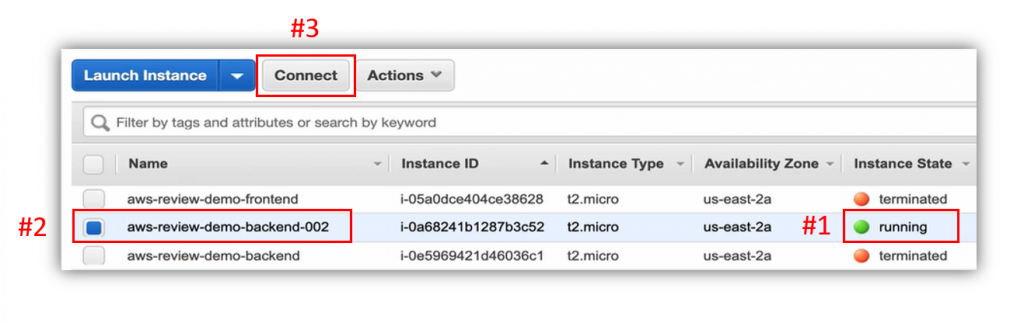
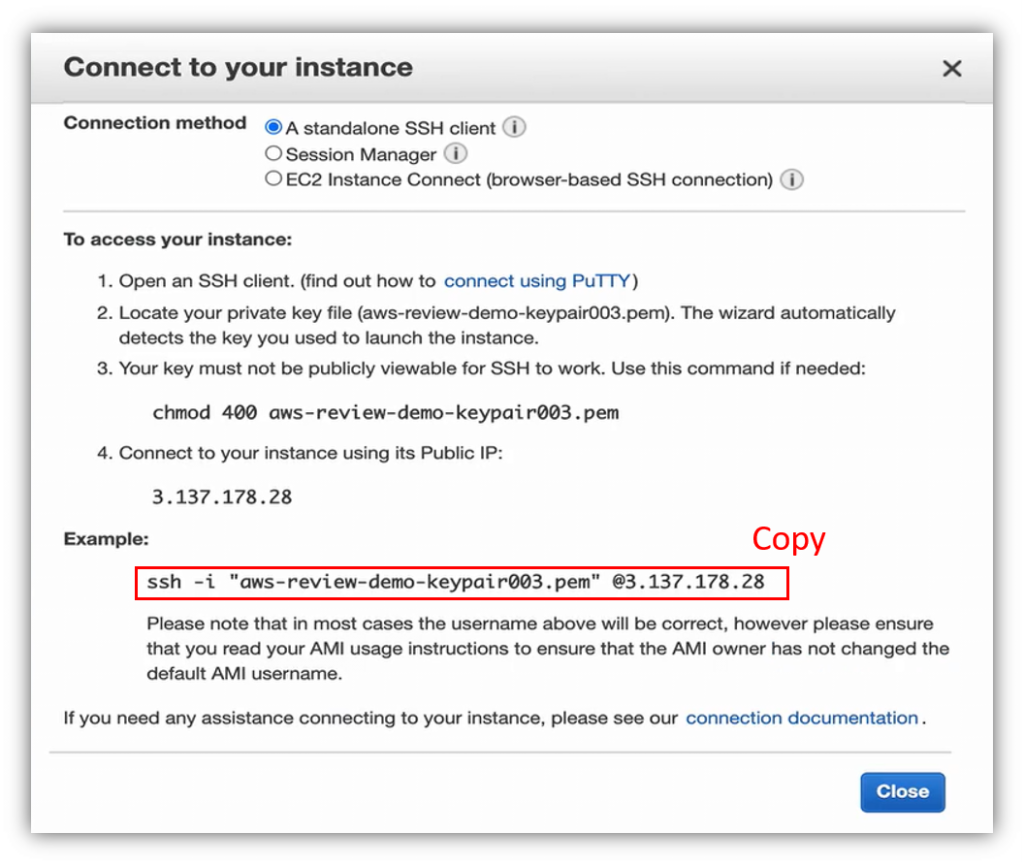
复制 ssh 指令,如下图:
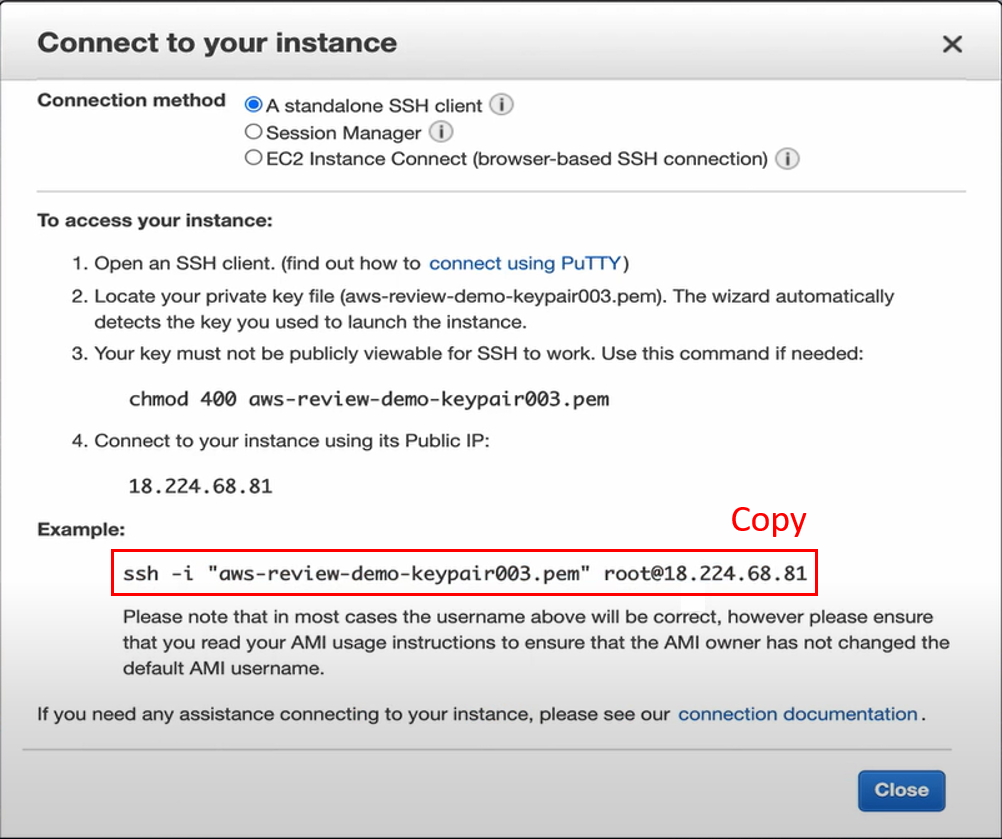
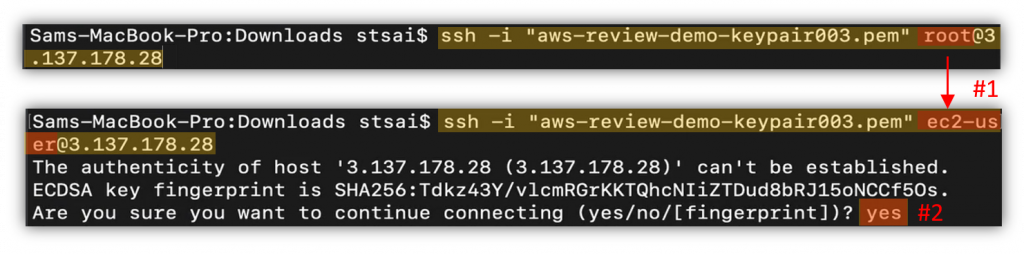
回到後端 Terminal,贴上 ssh 指令,把 root 改为 ec2-user (下图#1),Enter 後输入 yes (下图#2)。

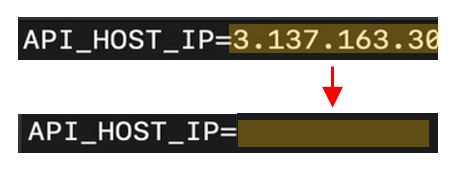
由於 Instance 是从 AMI 复原的,故所有的套件、专案都还在,直接 cd 到 app_new 的位置(下图#1),sudo vi .env 修改参数(下图#2)。

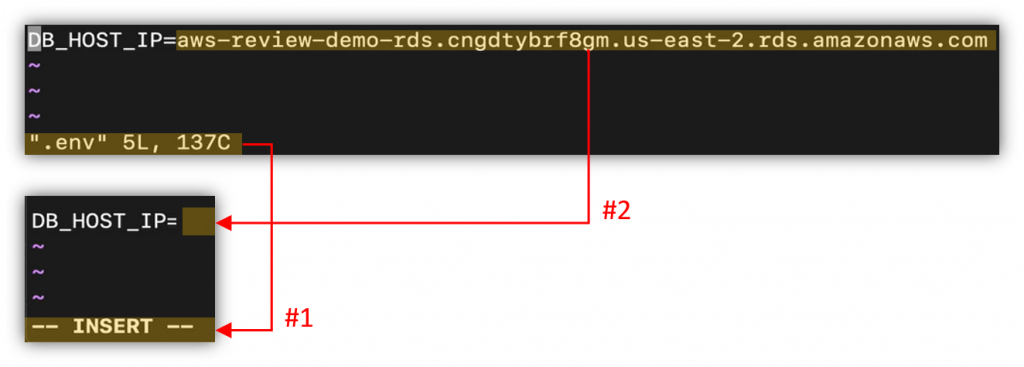
小写 a 进入编辑模式(下图#1),修改 DB_HOST_IP 为空(下图#2)。
回到 RDS 的 Databases 页面(下图#1),点进新的 RDS (下图#2)。
复制 Endpoint,如下图:
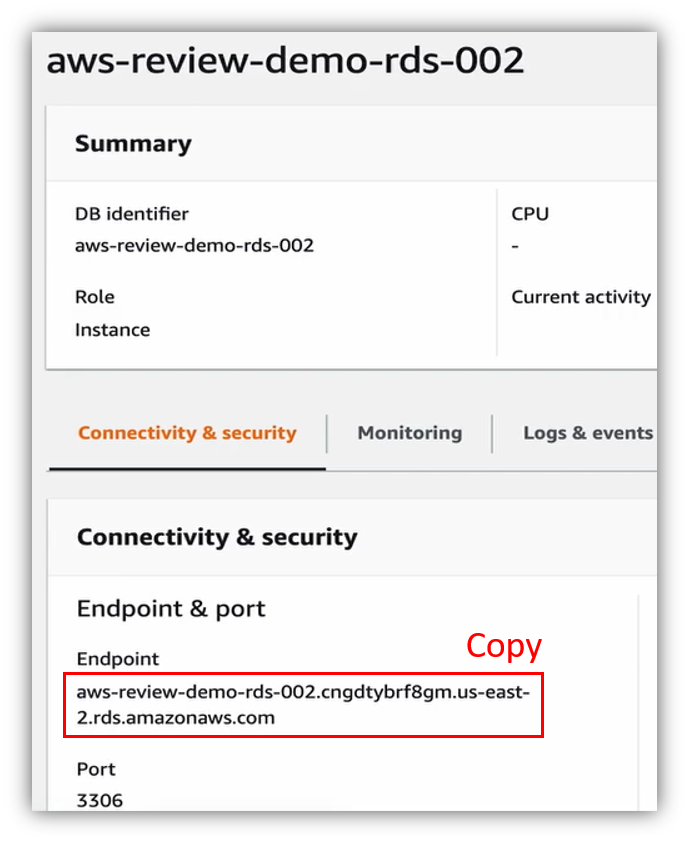
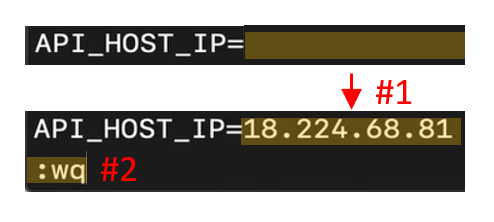
回到後端 Terminal,在 DB_HOST_IP 贴上 Endpoint (下图#1),ESC 离开编辑模式,:wq (下图#2)写入并结束修改。

利用 sudo service docker start 指令(下图#1),启动 Docker Service (下图#2)。

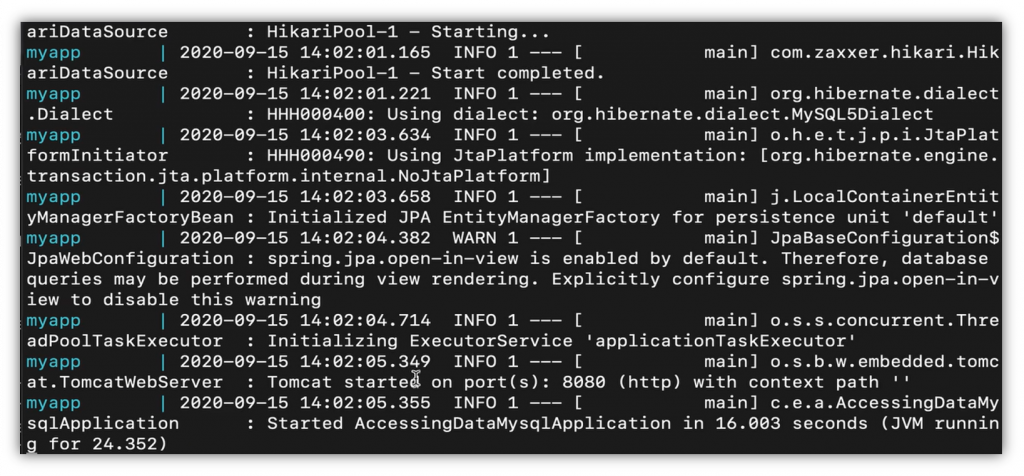
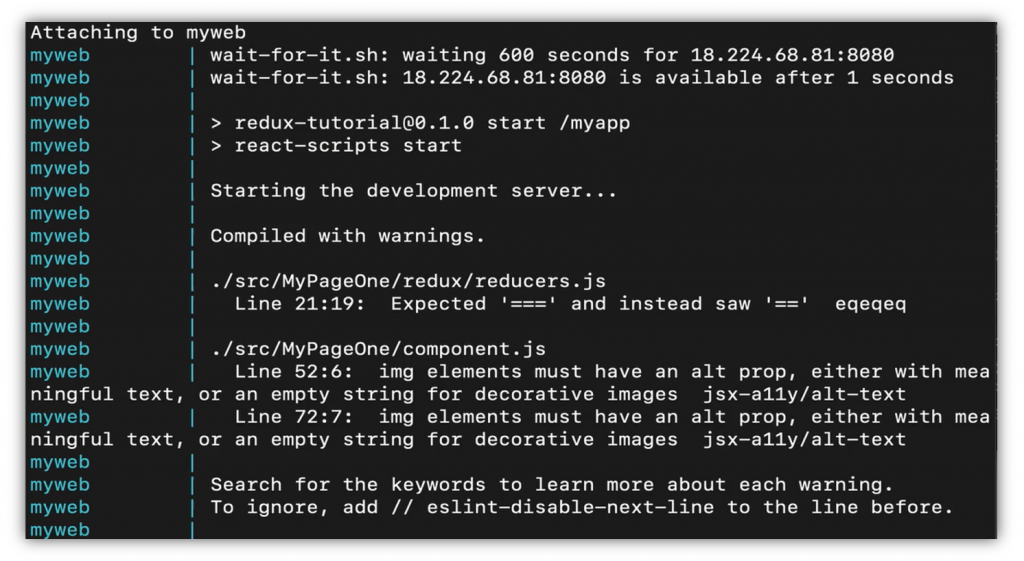
透过 docker-compose up 指令启动後端应用程序,如下图:

等待後端应用程序启动完毕,如下图:
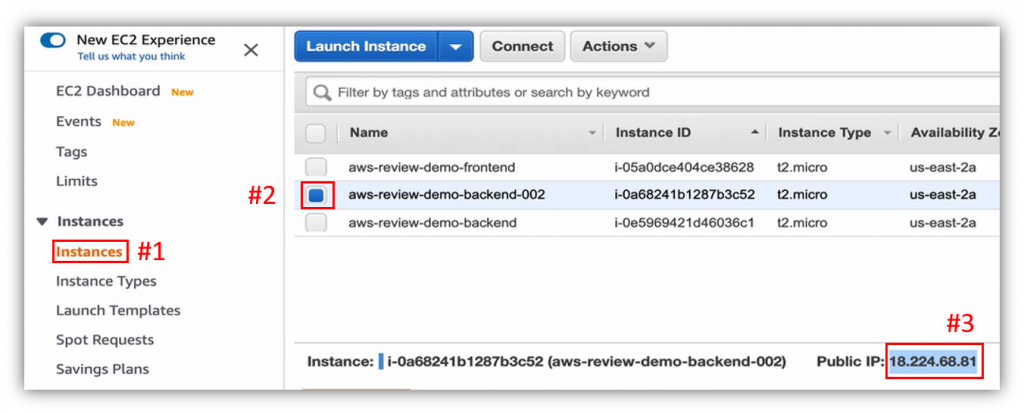
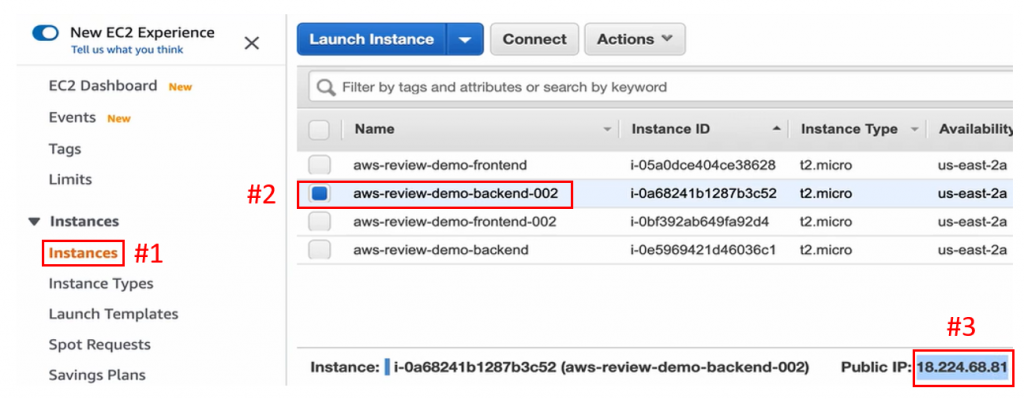
回到 EC2 的 Instance (下图#1),勾选新复原的後端 EC2 Instance (下图#2),复制 Public IP (下图#3)。
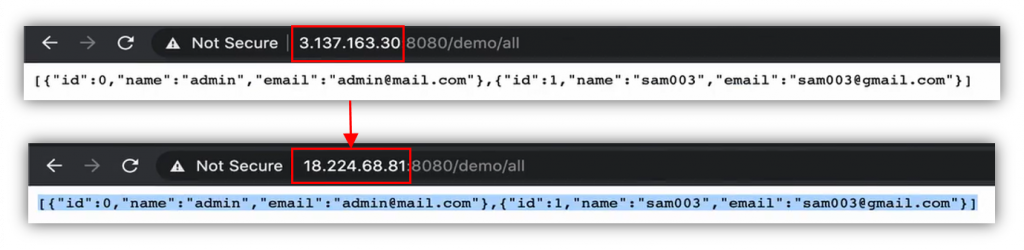
到後端分页,把先前的 IP 位置取代为新复制的 Public IP,也就成功透过 API 拿到资料库里面的资料,如下图:
备份还原 —— 前端 EC2
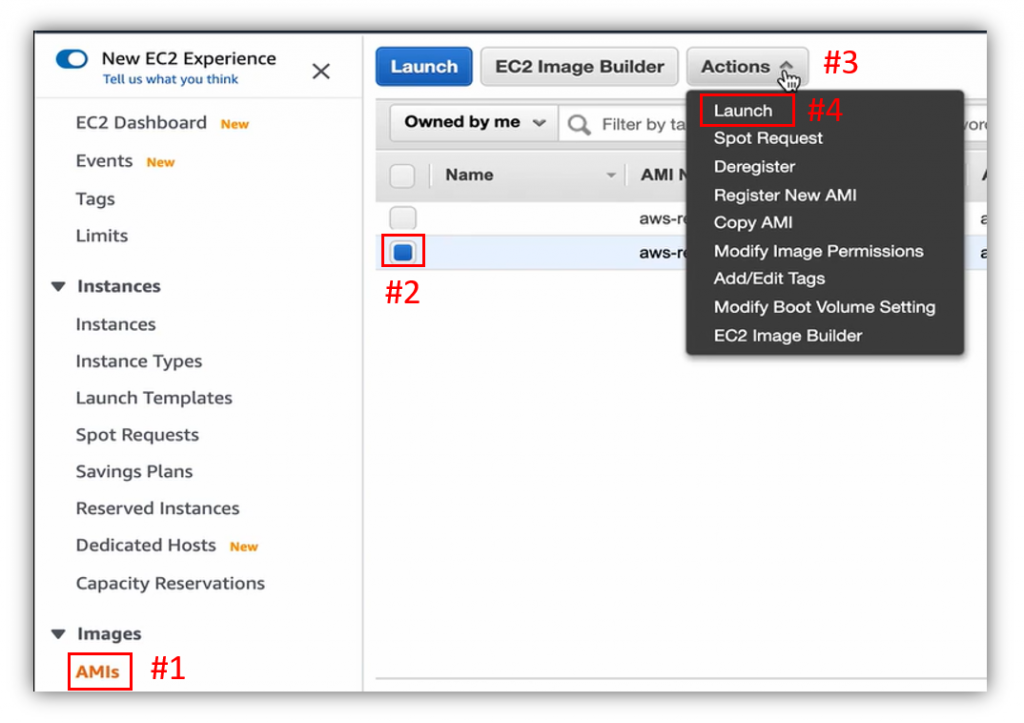
回到 EC2 的 AMIs (下图#1),选择前端 AMI (下图#2),点击 Actions (下图#3)的 Launch (下图#4)。
Instance Type 预设即可,点击 Next: Configure Instance Details 下一步(下图#1)。
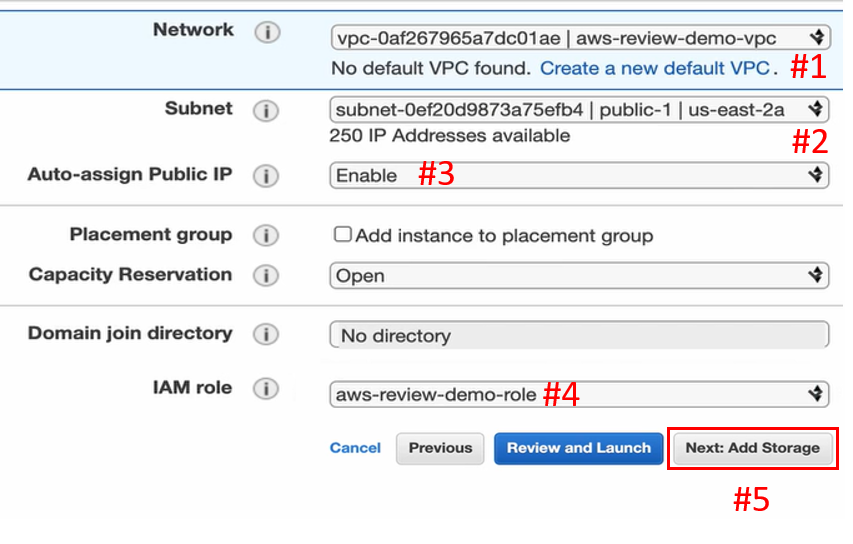
Network 选择先前创造的 VPC (下图#1),Subnet 选择 Public Subnet (下图#2),Enable Public IP (下图#3),IAM Role 选择先前创建的 Role (下图#4),点击右下 Next: Add Storage 下一步(下图#5)。
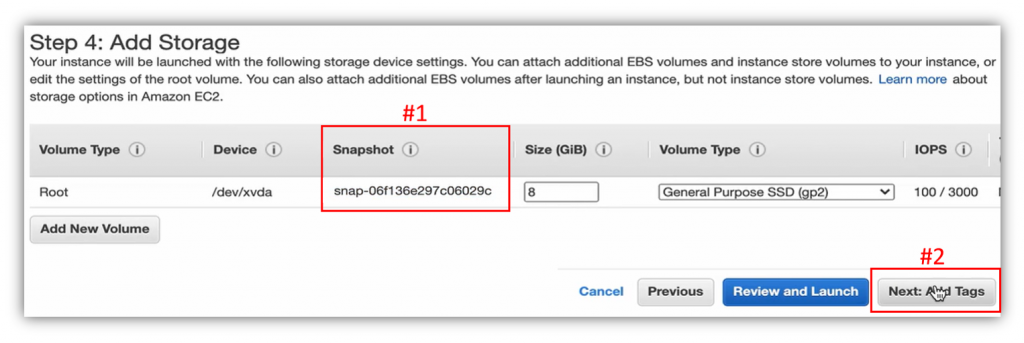
此处的 Snapshot (下图#1)是从 AMI 上面拿下来的,所以会包含之前所拥有的所有档案以及套件下载,点击 Next: Add Tags 下一步(下图#2)。
跳过 Tags 设定,点击 Next: Configure Security Group 下一步(下图#1)。
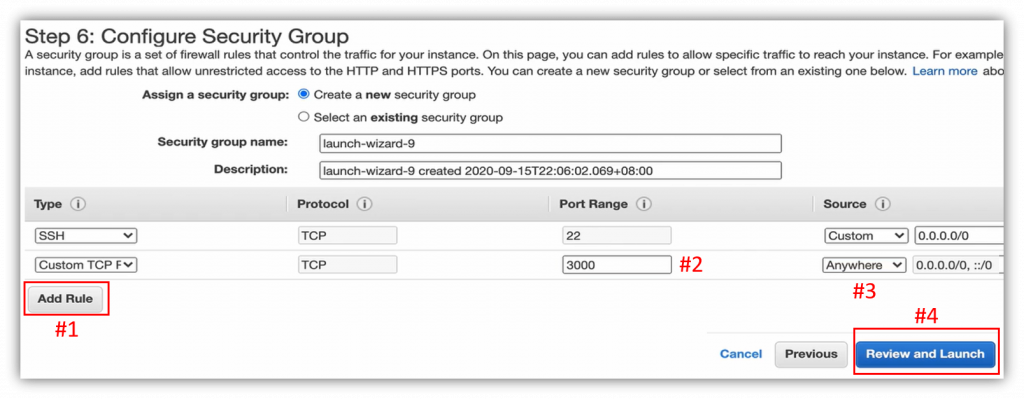
Security Group 的部分,按下 Add Rule 新增(下图#1),开放 3000 Port (下图#2),选择 Anywhere 对任何 IP 开放(下图#3),点击 Review and Launch 下一步(下图#4)。
点击 Launch (下图#1)。
选择一个已存在的 Key Pair (下图#1),使用现有的 Key Pair (下图#2),勾选 Acknowledge 确认(下图#3),点击 Launch Instance (下图#4)。
点击 View Instance (下图#1)。
在前端启动的过程中(下图#1),可以先建立名称(下图#2)。
前端启动後(下图#1),勾选启动的前端(下图#2),再点击 Connect (下图#3)。

复制 ssh 指令,如下图:
回到前端 Terminal,贴上 ssh 指令,把 root 改为 ec2-user (下图#1),Enter 後输入 yes (下图#2)。
由於 Instance 是从 AMI 复原的,故所有的套件、专案都还在,直接 cd 到 web_new 的位置(下图#1),sudo vi .env 修改参数(下图#2)。

小写 a 进入编辑模式,修改 DB_HOST_IP 为空,如下图:
回到 EC2 的 Instance 页面(下图#1),勾选复原的後端服务器(下图#2),复制 Public IP (下图#3)。
回到前端 Terminal,在 DB_HOST_IP 贴上复原的後端服务器 Public IP (下图#1),ESC 离开编辑模式,输入 :wq (下图#2)写入并结束修改。
透过 sudo service docker start (下图#1),启动 Docker Service (下图#2)。

利用 docker-compose up 启动前端应用程序,如下图:

等待前端应用程序启动,如下图:
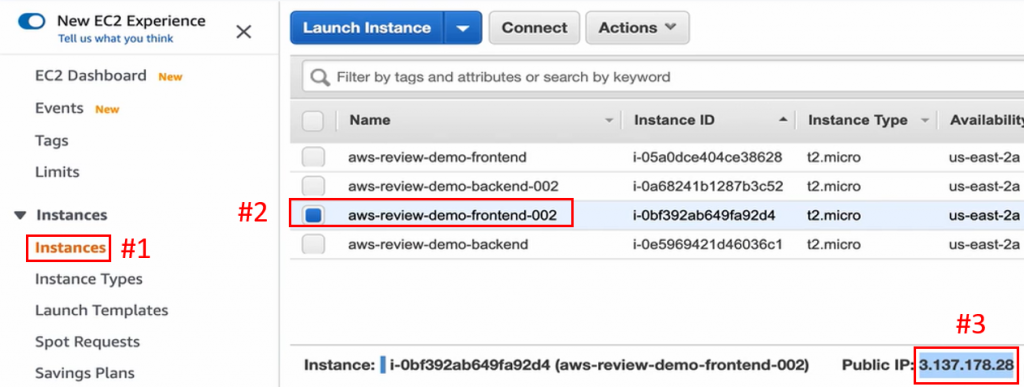
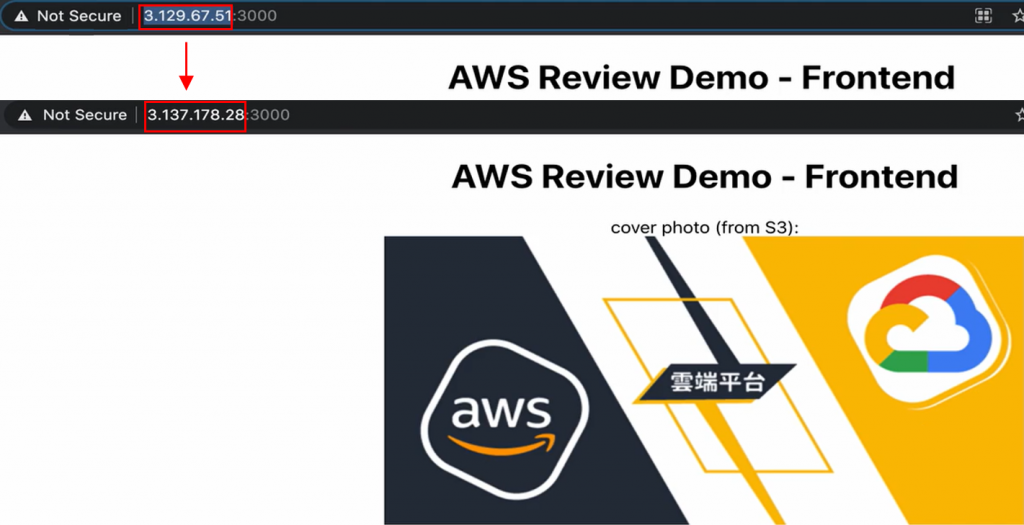
回到 EC2 的 Instance (下图#1),勾选新复原的前端 EC2 Instance (下图#2),复制 Public IP (下图#3)。
到前端首页,把先前的 IP 位置取代为新复制的 Public IP,就能看到经过半年,我们透过先前为备份所建立的 Snapshot AMI,一次还原了 3 层式的架构,前端页面从 S3 上面拿到图片档,并且透过 API 跟後端沟通,拿到资料库的资料,如下图:
以上,就是我们针对在本课程中所学到的所有 AWS 服务的一整套专案部署。
资源清理 —— RDS
进到 RDS 的 Databases (下图#1),点选 Database (下图#2),点击 Actions (下图#3)的 Delete (下图#4)进行删除动作。
取消 Create Snapshot 的选项(下图#1),也不用保留自动备份(下图#2),勾选 Acknowledge 确认(下图#3),输入 delete me (下图#4),点击 Delete 删除(下图#5)。
等待大约 20 分钟後(下图#1),即完成 Database 的删除(下图#2)。
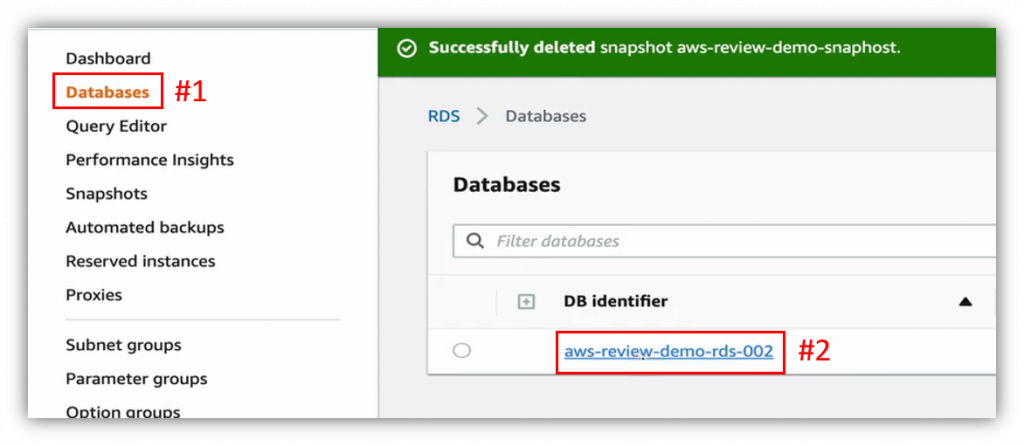
再到 Snapshots 页面(下图#1),勾选 Snapshot (下图#2),点击 Actions (下图#3)的 Delete snapshot (下图#4),进行 Snapshot 的删除动作。
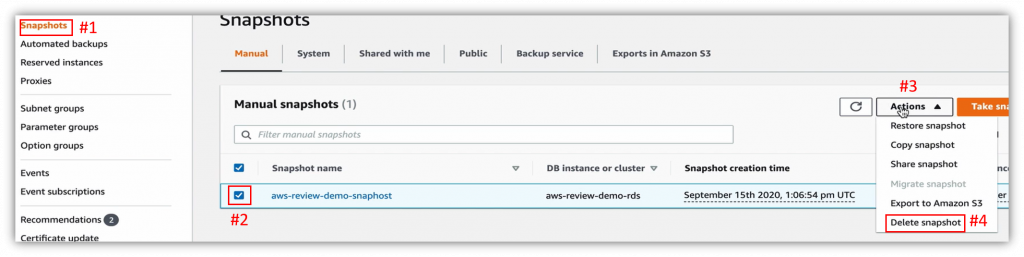
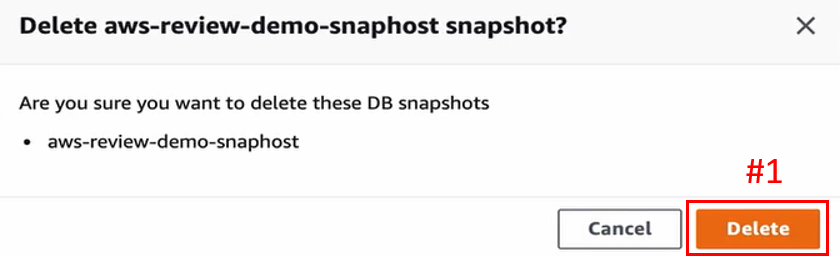
点击 Delete 删除(下图#1)。
Snapshot 就会被删除(下图#1)。

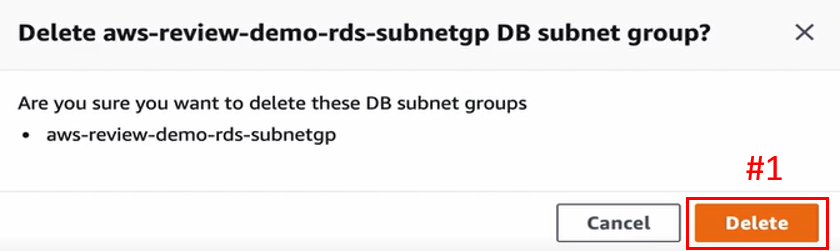
到 Subnet Groups 页面(下图#1),勾选 Subnet Group (下图#2),点击 Delete (下图#3)进行删除 Subnet Group 的动作。

点击 Delete (下图#1),确定删除 Subnet Group。
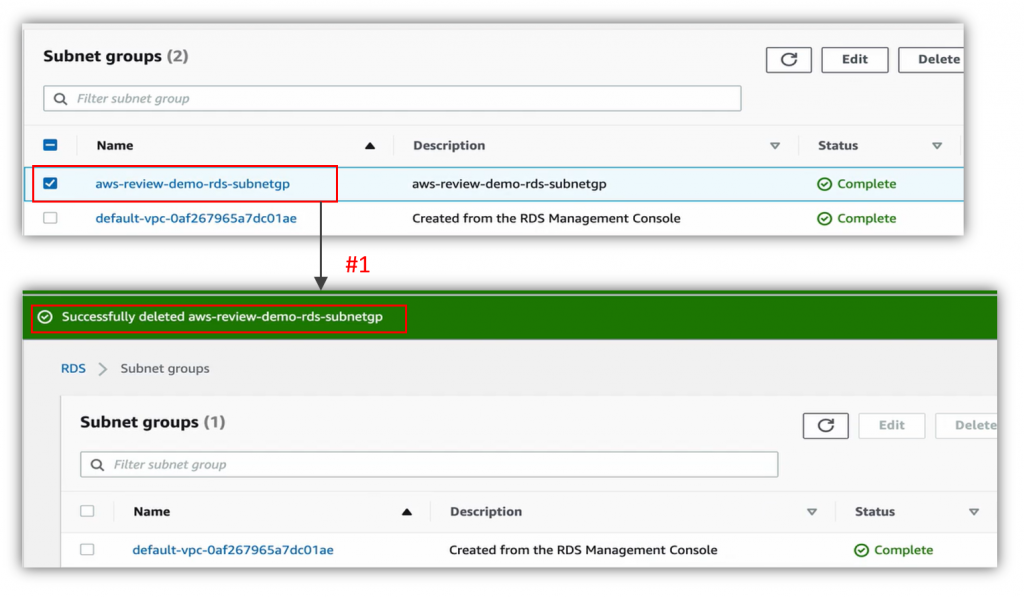
Subnet Group 就会被删除(下图#1)。
以上,便完成 RDS 的清理部分。
资源清理 —— EC2
勾选前端及後端 EC2 (下图#1),从 Actions (下图#2)到 Instance State (下图#3),按下 Terminate (下图#4),进行整个清掉的动作。
点击 Yes, Terminate 确定(下图#1)。
等待状态转为 Terminated 即成功清除 EC2 Instance (下图#1)。
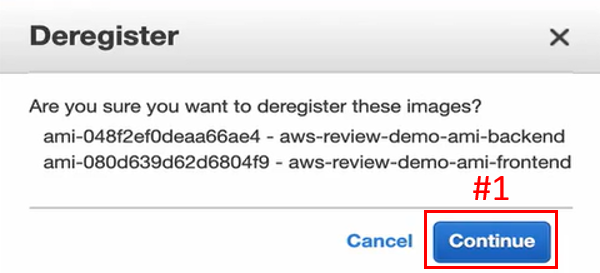
到 AMIs 页面(下图#1),勾选前端及後端的 AMI (下图#2),点击 Actions (下图#3)的 Deregister (下图#4)。
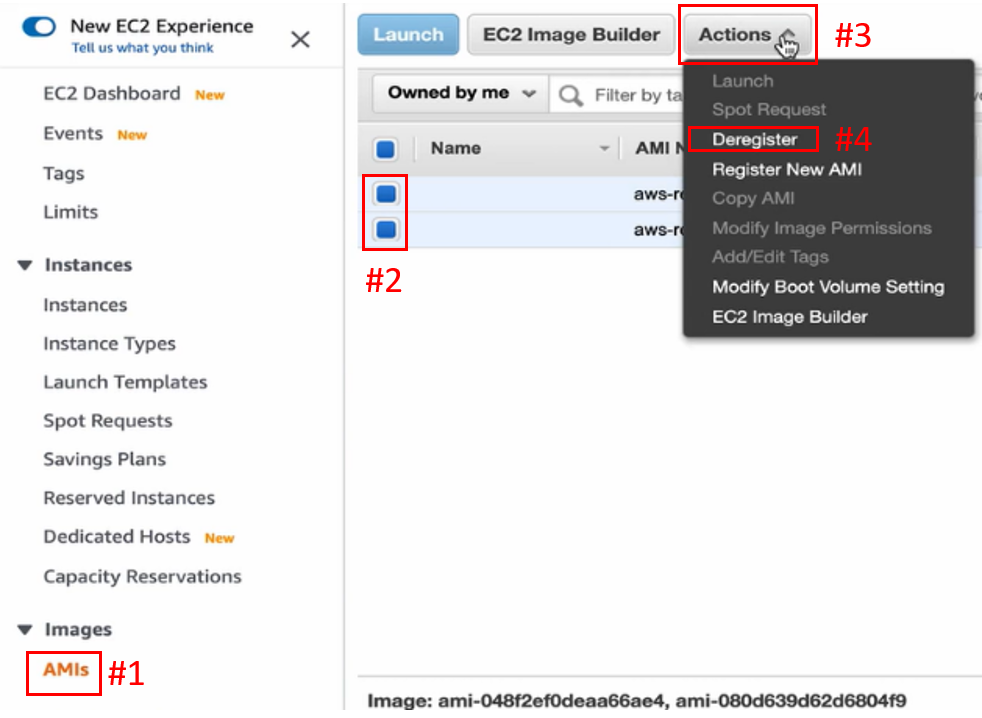
点击 Continue 继续(下图#1)。
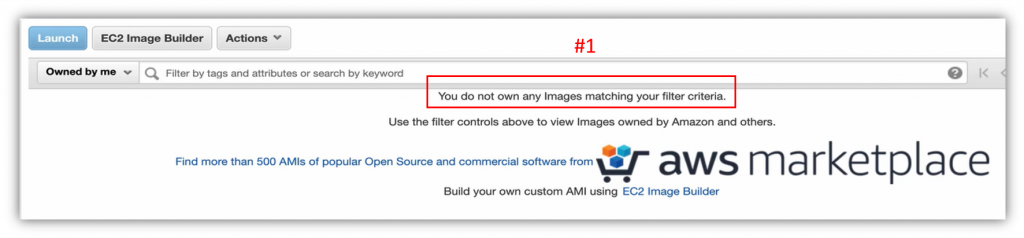
即可看到 AMIs 页面变空的(下图#1)。
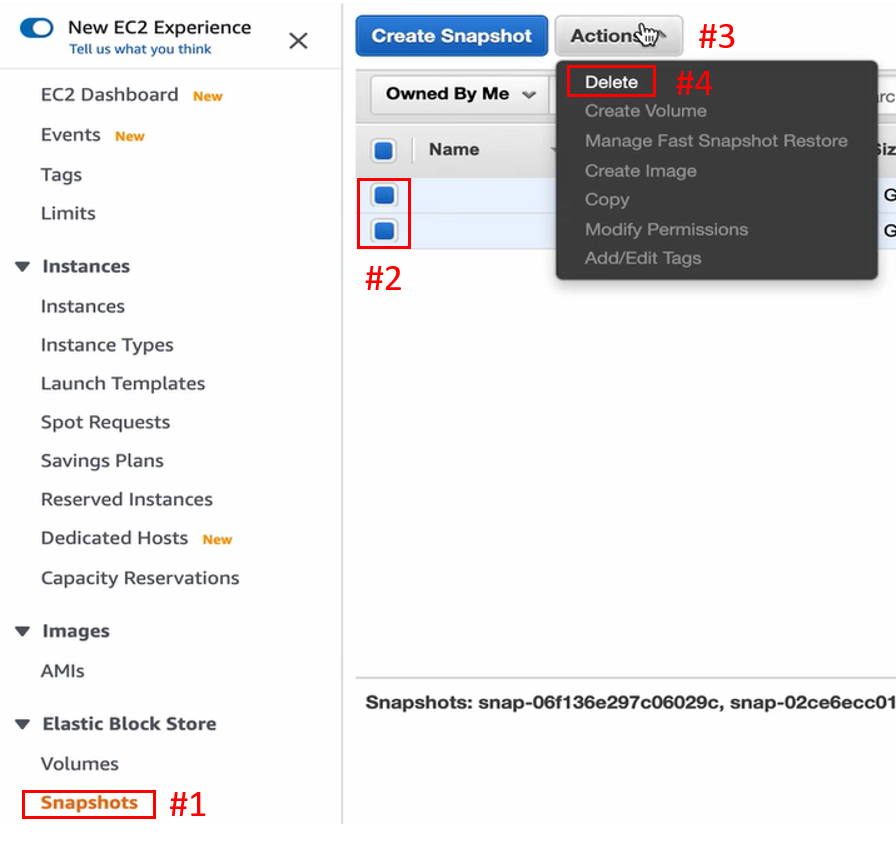
到 Snapshot 页面(下图#1),点选因为 AMI 而创造出来的 Snapshot (下图#2),点击 Actions (下图#3)的 Delete (下图#4)。
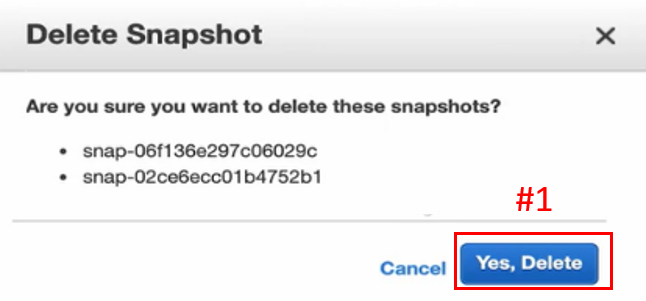
点击 Tes, Delete 确认(下图#1)。
即可完成删除 Snapshot 的动作(下图#1)。
到此,便完成 EC2 部分的资源清理。
资源清理 —— S3
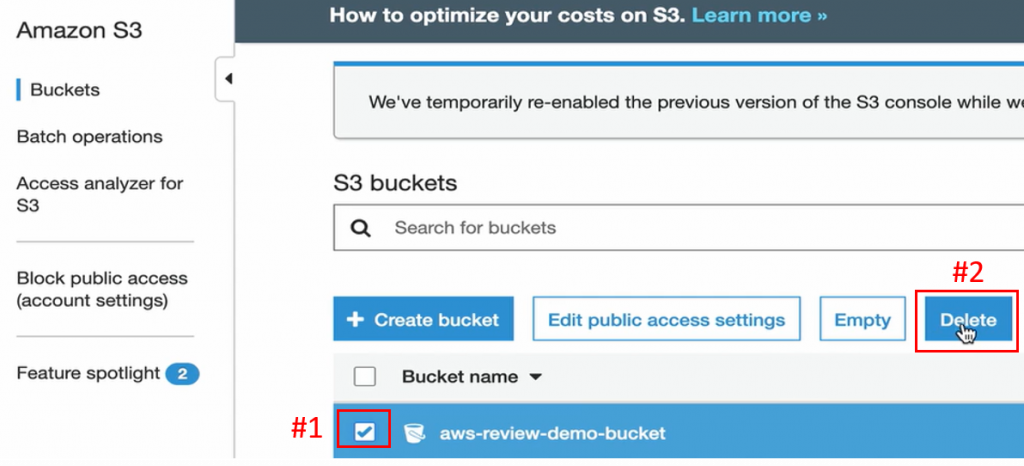
到 S3 介面的最上层,选择 Bucket (下图#1),点击 Delete (下图#2)。
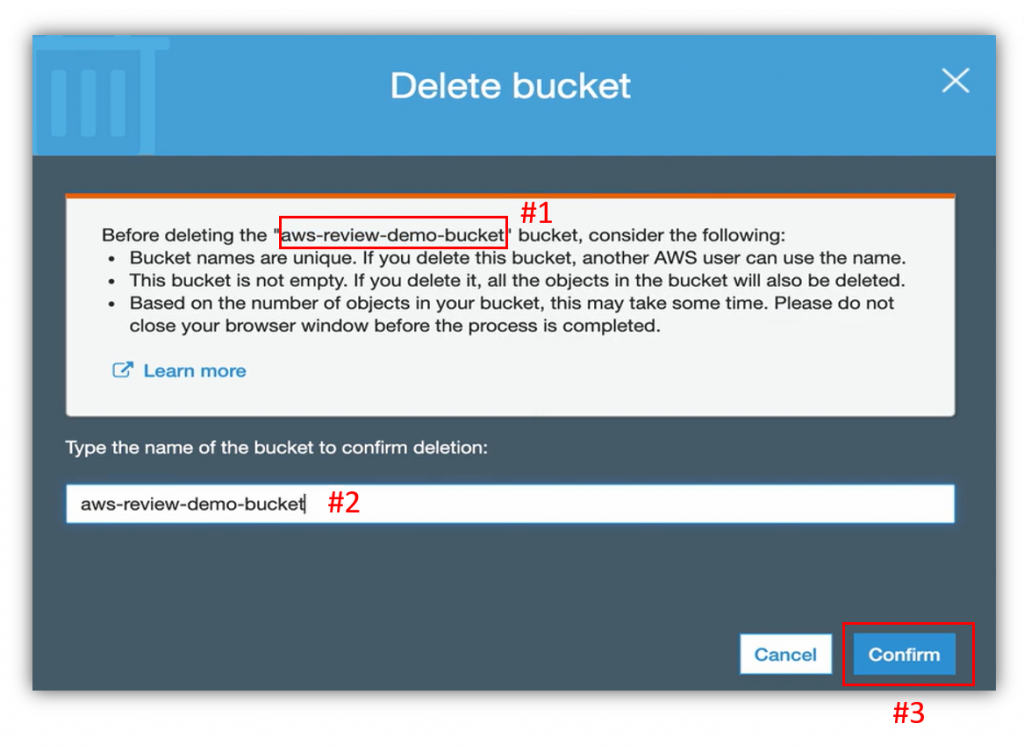
复制 Bucket Name (下图#1),贴上 Bucket Name (下图#2),点击 Confirm (下图#3)。
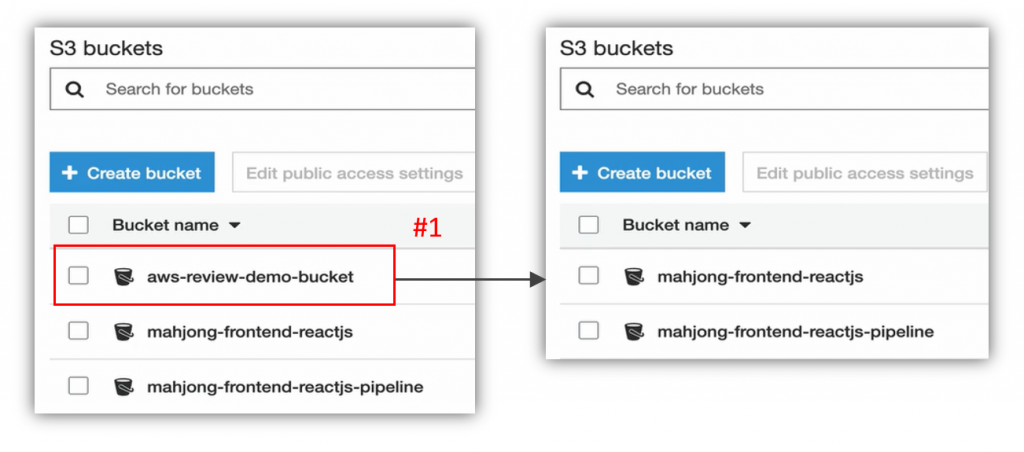
即完成删除 Bucket 的动作(下图#1)。
到这边,便完成 S3 部分的资源清理。
资源清理 —— VPC
展开页首左方的 Service (下图#1),搜寻 VPC (下图#2)并新分页开启(下图#3)。
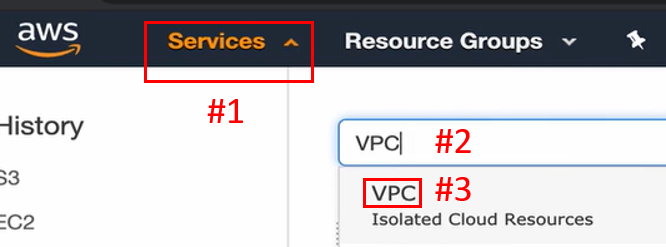
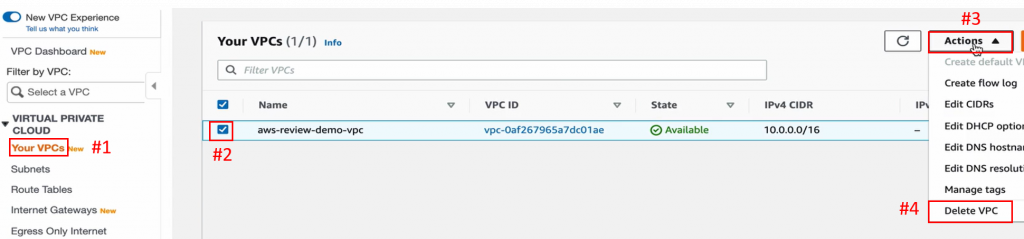
到 Your VPCs 页面(下图#1),勾选 VPC (下图#2),点击 Actions (下图#3)的 Delete VPC (下图#4),进行删除 VPC 的动作。
拉到最下方,输入 delete (下图#1),点击 Delete (下图#2)。
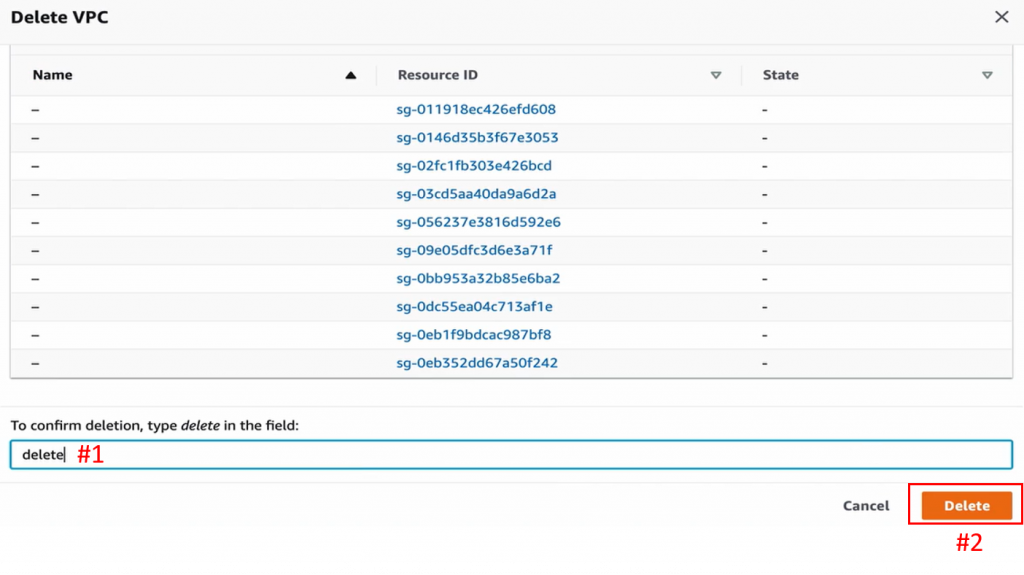
即可看到 Your VPCs 页面为空(下图#1)。

以上,便完成 VPC 相关的资源清理。
资源清理 —— IAM
展开页首左方的 Service (下图#1),搜寻 IAM (下图#2)并新分页开启(下图#3)。
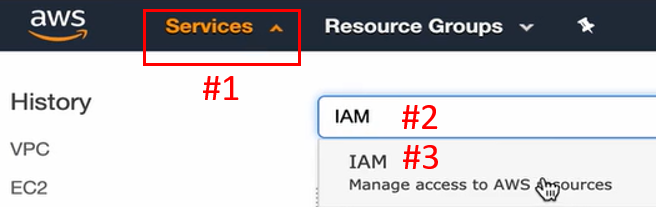
由於 sam 的 Account 没有权限,所以目前这边看不到 IAM 所有的东西,并且 IAM 的资源其实也都不收费,所以可以根据自己的需求,登入自己的 Root 帐号来把 IAM 清掉,这边就不一一示范,这次 Demo 也就到这边结束。
结语
继上篇 IAM 的前置设定与使用、VPC 环境建置、资料库创建、EC2 Instance 建立、资料库连结、资料库初始资料的设立、Docker 应用程序的运用、前端服务器与後端服务器的连结、页面内容互动与修改实作後,下篇接着透过档案控管、RDS/EC2/S3 的节省成本、备份还原与资源清理的实作,以增加实务专案的经验,学会根据公司的需求,判断节省成本的事项,进而协助专案的保留或是进行。
贺!完赛拉!
最近每天提醒自己写文章,比提醒自己吃饭还频繁,实在是很特别的体验。
30天说多不多、说少不少,最可惜的是还有许多单元没有时间挑出来介绍,事实上每个宝石都还有着许多重要观念与Lab值得探索,我之後有机会,再一一分享出来!感谢大家这次铁人赛的关注与参与!
<<: Day20-部署篇(二)SSH 连线与 PHP、Composer、Nginx、MySQL 安装
>>: Day 23【Tokens' Owner】FUN SIDE PROJECT
结束语&心得
30天一眨眼就结束了呢!每天坚持写一篇文章,下班回家後一边写一边又翻书查找资料,没想到都撑过来了! ...
Day 04 建立关键字广告前,你所要谨记在心的事
很多人公司在设定广告活动时,常会犯了几个错,这些错也许不会造成什麽毁灭性的结果,但很有可能会每天浪费...
Day 24 - Input filtering 相关攻击
出於书本 Chapter 14. Web sites and Applications 网站与网路应...
26. 产品管理页面
课程练习 此阶段多练习 Vue.js 的各项语法及指令,目标先以完成一页式的产品新增、删除、修改的页...
模板中的 Directive 指令 (下)
指令 Directive 表单绑定 使用 v-model 建立表单的双向资料绑定,ex: input...