【Side Project】 订单清单 - 画面设计2
清单设计
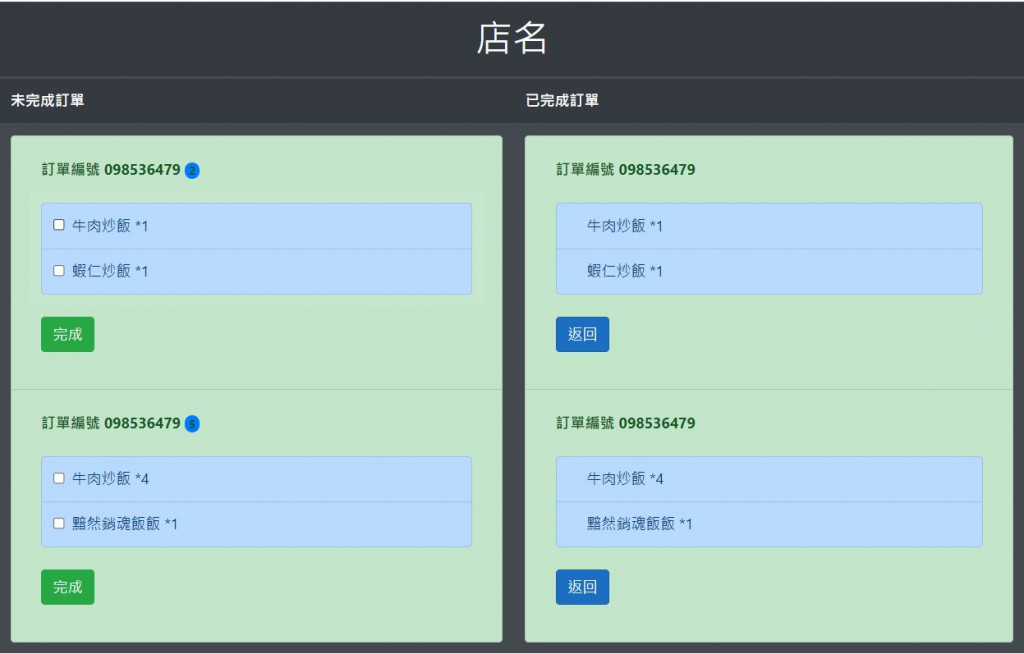
我们先将清单分成多个不同小块来设计,最後再将它们组起来
清单架构
<ul class="list-group ">
    <li class="list-group-item  justify-content-between align-items-center list-group-item-success">
        //订单1
    </li>
    <li class="list-group-item  justify-content-between align-items-center list-group-item-success">
        //订单2
    </li>
</ul>
订单内容
我们在订单内容这边多提供一个小小的数字,用来提示老板该订单未完成的项目
<table class="table table-borderless list-group-item-success">
    <thead>
        <tr>
            <th>
                订单编号 098536479
                <span class="badge bg-primary rounded-pill">2</span>
            </th>

        </tr>
    </thead>
    <tbody>
        <tr>
            <td>
                //订单内容
            </td>
        </tr>
    </tbody>
    <tfoot>
        <tr>
            <td>
                <button id="done" type="button" class="btn btn-success">
                    完成
                </button>
            </td>
        </tr>
    </tfoot>
</table>
项目内容设计
为了让使用者在操作上比较方便,所以我们用Lable包起来,
让使用者要勾选完成的餐点项目时,比较容易。
<label class="list-group-item list-group-item-primary">
 
<input class="form-check-input me-1" type="checkbox" value="">
牛肉炒饭 *1
</label>
组装
- 打开
Proprietor.cshtml - 用table将画面分成左右两个区块(一边是已完成、一边是未完成)
- 将刚刚做好的元件分别装入已完成、未完成两边
<table id="orderlist"
class="table table-hover table-dark">
<thead>
<tr class="">
<th colspan="3" class="text-center "><h1>店名</h1></th>
</tr>
<tr class="">
<th data-field="undo">未完成订单</th>
<th data-field="done">已完成订单</th>
</tr>
</thead>
<tbody id="orderlist_body">
<tr>
@*未完成清单*@
<td>
<ul class="list-group ">
<li class="list-group-item justify-content-between align-items-center list-group-item-success">
<table class="table table-borderless list-group-item-success">
<thead>
<tr>
<th>
订单编号 098536479
<span class="badge bg-primary rounded-pill">2</span>
</th>
</tr>
</thead>
<tbody>
<tr>
<td>
<div class="list-group">
<label class="list-group-item list-group-item-primary">
 
<input class="form-check-input me-1" type="checkbox" value="">
牛肉炒饭 *1
</label>
<label class="list-group-item list-group-item-primary">
 
<input class="form-check-input me-1" type="checkbox" value="">
虾仁炒饭 *1
</label>
</div>
</td>
</tr>
</tbody>
<tfoot>
<tr>
<td>
<button id="done" type="button" class="btn btn-success">
完成
</button>
</td>
</tr>
</tfoot>
</table>
</li>
<li class="list-group-item justify-content-between align-items-center list-group-item-success">
<table class="table table-borderless list-group-item-success">
<thead>
<tr>
<th>
订单编号 098536479
<span class="badge bg-primary rounded-pill">5</span>
</th>
</tr>
</thead>
<tbody>
<tr>
<td>
<div class="list-group">
<label class="list-group-item list-group-item-primary">
 
<input class="form-check-input me-1" type="checkbox" value="">
牛肉炒饭 *4
</label>
<label class="list-group-item list-group-item-primary">
 
<input class="form-check-input me-1" type="checkbox" value="">
黯然销魂饭饭 *1
</label>
</div>
</td>
</tr>
</tbody>
<tfoot>
<tr>
<td>
<button id="done" type="button" class="btn btn-success">
完成
</button>
</td>
</tr>
</tfoot>
</table>
</li>
</ul>
</td>
@*已完成清单*@
<td>
<ul class="list-group ">
<li class="list-group-item justify-content-between align-items-center list-group-item-success">
<table class="table table-borderless list-group-item-success">
<thead>
<tr>
<th>
订单编号 098536479
</th>
</tr>
</thead>
<tbody>
<tr>
<td>
<div class="list-group">
<label class="list-group-item list-group-item-primary">
 
牛肉炒饭 *1
</label>
<label class="list-group-item list-group-item-primary">
 
虾仁炒饭 *1
</label>
</div>
</td>
</tr>
</tbody>
<tfoot>
<tr>
<td>
<button id="done" type="button" class="btn btn-primary">
返回
</button>
</td>
</tr>
</tfoot>
</table>
</li>
<li class="list-group-item justify-content-between align-items-center list-group-item-success">
<table class="table table-borderless list-group-item-success">
<thead>
<tr>
<th>
订单编号 098536479
</th>
</tr>
</thead>
<tbody>
<tr>
<td>
<div class="list-group">
<label class="list-group-item list-group-item-primary">
 
牛肉炒饭 *4
</label>
<label class="list-group-item list-group-item-primary">
 
黯然销魂饭饭 *1
</label>
</div>
</td>
</tr>
</tbody>
<tfoot>
<tr>
<td>
<button id="done" type="button" class="btn btn-primary">
返回
</button>
</td>
</tr>
</tfoot>
</table>
</li>
</ul>
</td>
</tr>
</tbody>
<tfoot>
</tfoot>
</table>
- 完成
结语
在写清单或是表单这种数据格式相同的画面时,
可以将他先整理分成一块一块的元件/组件来完成,
最後再将其组合起来。这样一来可以简单化问题,
二来也更容易做成样板的方式。
另外Bootstrap也有提供 摺叠的元件,
如果希望画面可以美观一点,不要一次显示这麽多资讯的话,可以透过摺叠,
来收纳我们的一些内容。
<<: Day 21 UICollectionView的练习(1/2)
[Day 7] 系统功能规划
今天来聊聊系统开发前要做哪些事 还有接到需求後,要怎麽根据需求去设计系统架构 通常在开发系统前,都会...
[Matplotlib] tight_layout()
With tight_layout() import numpy as np import mat...
【D8】制作图表:三大法人-区分期货与选择权二类
前言 有了资料後,就要进行分析,因此需要做出图表比较适合观察,所以我们现在来做图罗! 本日程序码使用...
第15天 - PHP 简易登入(2)_PHP的部分
接续昨天的部分,今天PHP的原理大致上就是 你填入的 帐号 && 密码 是否有(同时...
From Engineering to Business
On the way from an engineer to transfer to a Busin...