【没钱买ps,PyQt自己写】Day 15 / Project 与档案功能整合,制作出可读取图片并可缩放的 UI 介面 (使用 PyQt + OpenCV)
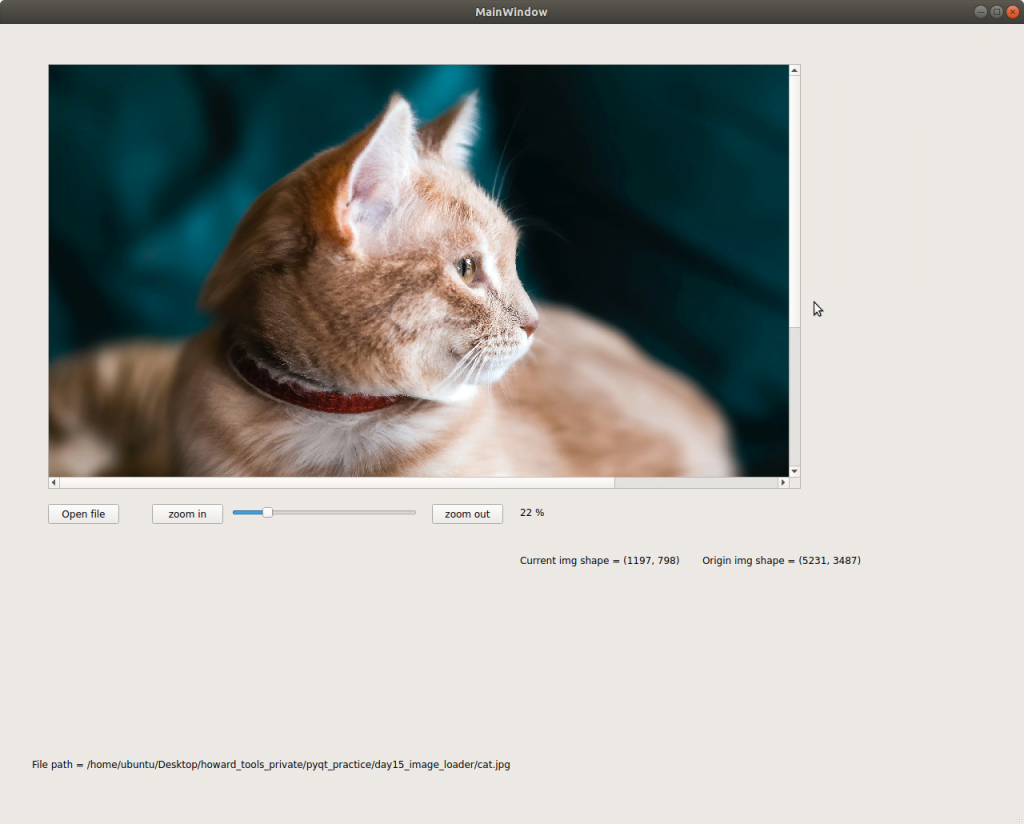
看完这篇文章你会得到的成果图
前言
我们接下来的讨论,会基於读者已经先读过我 day5 文章 的架构下去进行程序设计
如果还不清楚我程序设计的逻辑 (UI.py、controller.py、start.py 分别在干麻)
建议先阅读 day5 文章後再来阅读此文。
https://www.wongwonggoods.com/python/pyqt5-5/
此篇文章的范例程序码 github
https://github.com/howarder3/ironman2021_PyQt5_photoshop/tree/main/day15_image_loader
UI 设计部份 (UI.py)
我们今天要把 Day 10 的读档功能 、Day 14 的滑条功能 ,
整合进 Day 13 的最终成果 当中。
- 因此我们会从 Day 13 接下去改後续的功能。
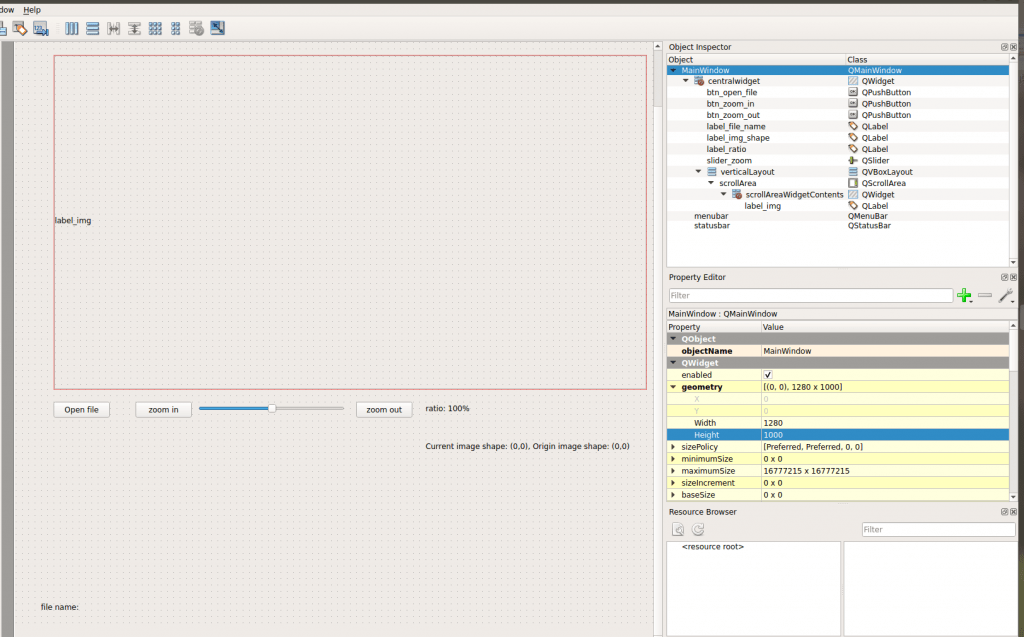
我设计的介面如同上图,
部份想法如下:
- 除了 zoom in, zoom out 可缩放图片大小之外,也可用滑条改变,我预期
- 50 -> 100%
- 0 -> 10%
- 100 -> 1000%
- 推算公式可以得到 y = 10^((x-50)/50)
推算公式的过程,我们把所有数值先正规化到 -1~1 间,就会很好推公式了
我们把 10% -> 0.1,100% -> 1,1000% -> 10
可参考一下的表,就是我们正规化後反推公式的过程。
最後可得上方公式 y = 10^((x-50)/50)
| progress bar 正规化 | ||
|---|---|---|
| 0 | 50 | 100 |
| -50 | 0 | 50 |
| -1 | 0 | 1 |
| ratio 正规化 | ||
| 10% | 100% | 1000% |
| 10^-1 | 10^0 | 10^1 |
| -1 | 0 | 1 |
转换成 UI.py
一样的编译指令,我们加上 -x (也可不加),
我们就可以先检视看看转换後的视窗是不是跟我们想像的一样。
转换 day15.ui -> UI.py
pyuic5 -x day15.ui -o UI.py
执行看看 UI.py 画面是否如同我们想像
一样,这程序只有介面 (视觉上的呈现),没有任何互动功能
- 看看我们制作出来的介面
python UI.py
这样我们的介面就大致出来罗!
controller 设计部份 (controller.py)
从 UI.py 中找出物件名称
button 类
- btn_open_file: 开启档案用按钮
- btn_zoom_in: 放大用按钮
- btn_zoom_out: 缩小用按钮
label 类
- label_ratio: 显示现在图片缩放比例
- label_file_name: 显示现在档名
- label_img_shape: 显示现在/原来图片大小
- label_img: 显示图片
silder 类
- silder_zoom: 控制图片大小
scrollArea 类
- scrollArea: 图片缩放区域
同 day13 的 scrollArea 说明,我们一样需要删除 scrollAreaWidgetContents 的部份
self.scrollArea = QtWidgets.QScrollArea(self.verticalLayoutWidget)
self.scrollArea.setWidgetResizable(True)
self.scrollArea.setObjectName("scrollArea")
# self.scrollAreaWidgetContents = QtWidgets.QWidget()
# self.scrollAreaWidgetContents.setGeometry(QtCore.QRect(0, 0, 937, 527))
# self.scrollAreaWidgetContents.setObjectName("scrollAreaWidgetContents")
# self.label_img = QtWidgets.QLabel(self.scrollAreaWidgetContents)
self.label_img = QtWidgets.QLabel()
self.label_img.setGeometry(QtCore.QRect(0, 0, 941, 521))
self.label_img.setObjectName("label_img")
# self.scrollArea.setWidget(self.scrollAreaWidgetContents)
self.scrollArea.setWidget(self.label_img)
- 可能会有新增与调整的 scrollArea 片段
取得名称後,去修改 controller.py
我们继续修改我们 day13 的程序码,但我们这次发现我们的程序码越来越大了,
是时候该做点封装了,我们决定将图片有关的功能封装至另外一个档案 img_controller.py
另外封装专门处理图片的 img_controller.py
from PyQt5 import QtCore
from PyQt5.QtGui import QImage, QPixmap
import cv2

class img_controller(object):
    def __init__(self, img_path, label_img, label_file_path, label_ratio, label_img_shape):
        self.img_path = img_path
        self.label_img = label_img
        self.label_file_path = label_file_path
        self.label_ratio= label_ratio
        self.label_img_shape = label_img_shape
        self.ratio_value = 50
        self.read_file_and_init()
        self.__update_img()

    def read_file_and_init(self):
        try:
            self.img = cv2.imread(self.img_path)
            self.origin_height, self.origin_width, self.origin_channel = self.img.shape
        except:
            self.img = cv2.imread('sad.png')
            self.origin_height, self.origin_width, self.origin_channel = self.img.shape

        bytesPerline = 3 * self.origin_width
        self.qimg = QImage(self.img, self.origin_width, self.origin_height, bytesPerline, QImage.Format_RGB888).rgbSwapped()
        self.origin_qpixmap = QPixmap.fromImage(self.qimg)
        self.ratio_value = 50
        self.set_img_ratio()

    def set_img_ratio(self):
        self.ratio_rate = pow(10, (self.ratio_value - 50)/50)
        qpixmap_height = self.origin_height * self.ratio_rate
        self.qpixmap = self.origin_qpixmap.scaledToHeight(qpixmap_height)
        self.__update_img()
        self.__update_text_ratio()
        self.__update_text_img_shape()

    def set_path(self, img_path):
        self.img_path = img_path
        self.read_file_and_init()
        self.__update_img()

    def __update_img(self):
        self.label_img.setPixmap(self.qpixmap)
        self.label_img.setAlignment(QtCore.Qt.AlignLeft | QtCore.Qt.AlignTop)

    def __update_text_file_path(self):
        self.label_file_path.setText(f"File path = {self.img_path}")

    def __update_text_ratio(self):
        self.label_ratio.setText(f"{int(100*self.ratio_rate)} %")

    def __update_text_img_shape(self):
        current_text = f"Current img shape = ({self.qpixmap.width()}, {self.qpixmap.height()})"
        origin_text = f"Origin img shape = ({self.origin_width}, {self.origin_height})"
        self.label_img_shape.setText(current_text+"\t"+origin_text)

    def set_zoom_in(self):
        self.ratio_value = max(0, self.ratio_value - 1)
        self.set_img_ratio()

    def set_zoom_out(self):
        self.ratio_value = min(100, self.ratio_value + 1)
        self.set_img_ratio()

    def set_slider_value(self, value):
        self.ratio_value = value
        self.set_img_ratio()
读者看到会不会看到突然觉得这个程序难度整个飞起来...
但其实这些都是我们前几天学的东西哦,只是我们加入了一点物件导向的写法,
我们把每一个功能都分装好,不要让所有程序码集中到 controller.py,
不然 controller.py 太过强大,万事都能做到,我们还真的不知道,
如果今天要改一个功能,要去 controller.py 的哪找...
(就跟图书馆什麽都有,只是你能不能有效率的快速找到你要的东西一样)
主要我们分装成这些函数,并遵守我自己定义的规则:
- set_instance_name:使用者可以 call,去修改一些想要的变化,并在此实作复杂功能与算法
- __update_instance_name:private function,不希望使用者去 call,主要只负责单纯的更新 info,而不实作任何复杂功能或算法
因此我们有:
- init():初始化
- read_file_and_init():实作读取图片档案,并实作图片初始化
- set_img_ratio():设定图片比率,并实作变化
- set_path():更换档案时,更新图片路径
- set_zoom_in():设定 zoom in 功能
- set_zoom_out():设定 zoom out 功能
- set_slider_value():设定缩放功能的那条 bar
- __update_img():更新图片
- __update_text_file_path():更新图片路径的文字
- __update_text_ratio():更新图片缩放比率的文字
- __update_text_img_shape():更新图片大小的文字
controller.py 的部份
from PyQt5 import QtCore
from PyQt5.QtWidgets import QMainWindow, QFileDialog

import time
import os

from UI import Ui_MainWindow
from img_controller import img_controller

class MainWindow_controller(QMainWindow):
    def __init__(self):
        super().__init__() # in python3, super(Class, self).xxx = super().xxx
        self.ui = Ui_MainWindow()
        self.ui.setupUi(self)
        self.setup_control()

    def setup_control(self):
        self.file_path = ''
        self.img_controller = img_controller(img_path=self.file_path,
                                             label_img=self.ui.label_img,
                                             label_file_path=self.ui.label_file_name,
                                             label_ratio=self.ui.label_ratio,
                                             label_img_shape=self.ui.label_img_shape)

        self.ui.btn_open_file.clicked.connect(self.open_file)
        self.ui.btn_zoom_in.clicked.connect(self.img_controller.set_zoom_in)
        self.ui.btn_zoom_out.clicked.connect(self.img_controller.set_zoom_out)
        self.ui.slider_zoom.valueChanged.connect(self.getslidervalue)

    def open_file(self):
        filename, filetype = QFileDialog.getOpenFileName(self, "Open file", "./") # start path
        self.init_new_picture(filename)

    def init_new_picture(self, filename):
        self.ui.slider_zoom.setProperty("value", 50)
        self.img_controller.set_path(filename)

    def getslidervalue(self):
        self.img_controller.set_slider_value(self.ui.slider_zoom.value()+1)
因为我们把大部分的功能都封装在 img_controller.py 里面了,
因此现在我们只需要单纯的「from img_controller import img_controller」,
就能使用 img_controller 的 「set 开头相关的函数」搞定所有图片相关的功能。
这边我们在 setup_control() 实作的有:
def setup_control(self):
    self.file_path = ''
    self.img_controller = img_controller(img_path=self.file_path,
                                         label_img=self.ui.label_img,
                                         label_file_path=self.ui.label_file_name,
                                         label_ratio=self.ui.label_ratio,
                                         label_img_shape=self.ui.label_img_shape)

    self.ui.btn_open_file.clicked.connect(self.open_file)
    self.ui.btn_zoom_in.clicked.connect(self.img_controller.set_zoom_in)
    self.ui.btn_zoom_out.clicked.connect(self.img_controller.set_zoom_out)
    self.ui.slider_zoom.valueChanged.connect(self.getslidervalue)
分别有设定图片路径,初始化 img_controller,设定按键功能,
因为 button 因为吃的也是 function,可以直接 call img_controller 的函数来使用,
而开档案与滑条的部份,我们一样另外使用 open_file()、getslidervalue() 来实作。
特别注意图片初始化问题,我们另外用 init_new_picture() 来处理
因为有时候开新的档案,就会有一大堆东西要初始化,一个疏忽就会让人非常头痛,因此我们也另外使用 init_new_picture(),把所有应该要初始化的功能都集中在这边。 (例如像 bar 需要回到中间 50 的地方)
另外把程序封装,还有一个最大的好处就是更容易 debug,
我们因为功能切的很细,如果我们今天看画面上「少了哪一个功能」,
我们只需要去把对应的功能呼叫回来,问题就解决了。
如果是没有封装好的情况,可能会要开始在「function 海当中寻找对应的那一行功能」,会大幅减少解 bug 的效率。
执行结果
照我们 day5 的程序架构,我们执行
python start.py
★ 本文也同步发於我的个人网站(会有内容目录与显示各个小节,阅读起来更流畅):【PyQt5】Day 15 / Project 与档案功能整合,制作出可读取图片并可缩放的 UI 介面 (使用 PyQt + OpenCV)
<<: JS Library 学习笔记:首先当然来试试 jQuery (四)
>>: Day15 竞合的团队气氛塑造 - Release line
[Day 13] 简单的单元测试实作(七)-建立共用的函式
昨天有提到, 其实我们通常不会把函式直接写在web.php当中, 其实我们回传的这个资料, 如果要透...
Leetcode: 98. Validate Binary Search Tree
确认树是不是从任意中间节点切开时,左子树值皆小於中间节点,右子树皆大於中间节点。 程序码 class...
【Side Project】 订单清单 - 未完成清单(後台资料传前台&动态生成html)
我们这篇会一次从取得资料库的订单资料一直到动态生成html语法生成未完成清单的画面。 取得资料库资料...
【Day 28】JavaScript Promise
Promise 是甚麽? Promise 是 ES6 引入的标准之一。 Promise 字面上的意思...
DAY27 Aidea专案实作-AOI瑕疵检测(2/4)
那我们要开始着手处理我们的资料集了,今天会先做资料前处理的部分,其实不管是机器学习或是深度学习,只要...


